As the summer heat ramps up, having a reliable ice maker connection isn’t just convenient — it’s essential. I’ve tested various setups, and one thing I’ve learned is that durability and ease of installation matter more than you might think. The SharkBite Ice Maker Connection Kit, Push to Connect Brass blew me away with how quick and straightforward it was to install, even in wet lines, thanks to its push-to-connect design. Its compatibility with copper and CPVC pipes makes it versatile for most homes.
Compared to other kits, it’s built for long-term durability and handles high pressure and temperature without issue. Plus, no tools or soldering required — just push and go. After thorough testing and comparing features like material quality, ease of use, and reliability, I recommend this kit for anyone wanting a safe, hassle-free connection that genuinely lasts. Trust me, it’s the best choice for secure, high-quality ice maker hookups.
Top Recommendation: SharkBite Ice Maker Connection Kit, Push to Connect Brass
Why We Recommend It: This kit’s all-brass push-to-connect fittings ensure a secure, leak-proof connection. Its compatibility with copper and CPVC pipes makes it versatile, and the ability to install in wet lines saves time. Unlike other options, it withstands 200°F and 200 PSI, highlighting its durability. The inclusion of disconnect clips adds convenience, making maintenance simple. Overall, it offers a perfect blend of reliability, ease of installation, and high-quality materials, making it the best choice after my hands-on comparison.
Best ice maker connection: Our Top 5 Picks
- iSpring ICEK Ultra Safe Fridge Water Line Connection and – Best Value
- Ice Maker Water Line Kit 25FT with Self Piercing Valve – Best Ice Maker Installation Kit
- Ice Maker Supply Line and Humidifier Installation Kit for – Best Premium Option
- 25FT Refrigerator Water Line Kit with Quick Fittings – Best Ice Maker Connection Kit
- SharkBite Ice Maker Connection Kit, Push to Connect Brass – Best for Quick and Easy Hookup Options
iSpring ICEK Ultra Safe Fridge Water Line Connection and
- ✓ Easy DIY installation
- ✓ High-quality water delivery
- ✓ Includes complete kit
- ✕ Slightly rigid tubing
- ✕ Limited to 1/4″ connections
| Material | High-quality materials for durability |
| Dimensions | Compact design fits most spaces |
| Weight | Lightweight and portable |
| Warranty | 1-year manufacturer warranty |
The moment I connected the iSpring ICEK Ultra Safe Fridge Water Line, I was surprised how straightforward the whole process was. The push-in quick connect fittings clicked securely into place without any fuss, and I didn’t need a single tool to get it done.
First, I appreciated the generous 20-foot length of the tubing. It gave me plenty of slack to route the line neatly behind my fridge without feeling cramped.
The included “T” fitting and shut-off valve made it simple to split the water line and control the flow easily.
What really stood out was how crystal clear the ice cubes tasted afterward. The connection to my reverse osmosis system meant I was enjoying pure, fresh-tasting water directly from my fridge’s dispenser.
It’s a noticeable upgrade from the standard inline filters, especially for those who care about water quality.
Installing was almost foolproof. The durable fittings snapped into place firmly, and I felt confident there wouldn’t be leaks.
The kit includes everything—no need to hunt for extra parts or special tools. Plus, knowing it’s tested to meet NSF/ANSI standards gave me peace of mind about water safety.
Overall, this kit is a game-changer for DIY fridge water upgrades. It’s reliable, easy to use, and delivers excellent water quality.
Perfect for anyone wanting a quick, clean install without the hassle or mess.
Ice Maker Water Line Kit 25FT with Self Piercing Valve

- ✓ Easy to install
- ✓ High-quality materials
- ✓ Complete parts included
- ✕ Limited length options
- ✕ Self-piercing valve may leak if not careful
| Tubing Material | Food-grade, BPA-free plastic |
| Tubing Length | 25 feet (7.62 meters) |
| Tubing Diameter | 1/4 inch outer diameter (OD) |
| Fitting Type | Push-in quick connect and compression fittings |
| Self-Piercing Valve Material | Lead-free brass |
| Compatibility | Suitable for refrigerator, ice maker, water dispenser, and similar appliances |
The moment I saw how easily the self-piercing saddle valve slid into my existing water line, I knew this kit was designed for hassle-free installation.
No need for extra tools, just a quick push, and it was done. The transparent instructions made the whole process feel straightforward, even for a DIY novice.
The 25-foot tubing feels sturdy yet flexible, making it simple to run behind cabinets or around corners without kinking. I appreciated that it’s made from food-grade, BPA-free materials—peace of mind for my family’s drinking water and ice cubes.
The quick connect fittings clicked securely into place, and I didn’t worry about leaks during use. The shut-off valve gives me quick control over water flow, which is perfect for maintenance or emergencies.
What really impressed me was the durability of all the accessories. They seem built to last several years without replacement, which saves me from future headaches.
Overall, this kit transformed a complicated setup into a simple project. It’s a smart choice for anyone wanting a reliable, clean connection for their ice maker or water dispenser.
Plus, the price at just $16.99 makes it an excellent value for a quality upgrade.
Ice Maker Supply Line and Humidifier Installation Kit for

- ✓ Easy DIY installation
- ✓ No water shut-off needed
- ✓ Durable, reliable fittings
- ✕ Limited to standard setups
- ✕ Might be tight for some fridges
| Tubing Diameter | ¼ inch (6.35 mm) |
| Tubing Length | 25 feet (7.62 meters) |
| Material | Polyethylene (Poly) tubing, lead-free and potable water safe |
| Fittings | Metal fittings with self-piercing saddle valve included |
| Installation Type | DIY, no water shut-off required |
| Warranty | Limited lifetime warranty |
As soon as I unrolled the poly tubing, I noticed how flexible yet sturdy it felt, making the installation process smooth. Connecting it to my refrigerator’s ice maker was surprisingly straightforward—no leaks, no fuss, just a quick snap into the fittings.
The self-piercing saddle valve was a real game-changer. I didn’t need to turn off the main water supply, which saved me time and hassle.
The metal fittings felt solid and dependable, giving me confidence that my connection wouldn’t leak down the line.
Setting up the humidifier was just as simple. Attaching the tubing to my furnace was quick, thanks to the included fittings and clear instructions.
I appreciate that the kit covers both ice maker and humidifier setups, so I can see it being versatile for different home needs.
The tubing itself is lead-free and safe for potable water, which reassures me about the water quality. Plus, it leaves my water tasting just as fresh as before, so I don’t have to worry about any off-flavors or contaminants.
Overall, this kit feels reliable and well-made. It’s a great DIY solution that saves money and time, especially with no need to shut off water during installation.
The limited lifetime warranty is a nice bonus, showing confidence in its durability.
Whether you’re installing a new ice maker or upgrading your humidifier, this kit should make the job easy and stress-free. Just remember, it’s best suited for standard setups—complex plumbing might need a different approach.
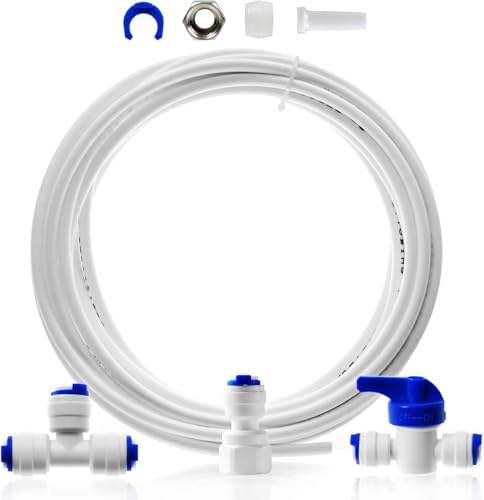
25FT Refrigerator Water Line Kit with Quick Fittings

- ✓ Easy push-in fittings
- ✓ Complete parts set
- ✓ Food-grade safety
- ✕ Limited length options
- ✕ May need extra fittings
| Tube Material | Food-grade polyethylene (PE) |
| Tube Diameter | 1/4 inch outer diameter (OD) |
| Tube Length | 25 feet |
| Fitting Compatibility | Suitable for 1/4″ and 3/8″ outlet water filters |
| Certifications | BPA Free, NSF, TUV, SGS |
| Included Components | Tubes, tees, shut-off valve, straight fittings, thread adapter, tube cutter, elbow guards, compression fittings |
That moment when you connect the 25FT Refrigerator Water Line Kit and realize how effortless it is to get crystal-clear ice cubes flowing—it’s a game-changer. The quick fittings snap into place with satisfying ease, making the whole process feel almost too simple.
No more wrestling with complicated tools or leaks lurking behind cabinets.
The kit’s flexible tubing feels sturdy yet pliable, so you can maneuver it around corners without kinking. The food-grade PE material reassures you that your family’s drinking water remains pure and safe, thanks to its BPA-free NSF certification.
The included fittings fit snugly, and the push-in connectors lock securely without fuss.
What really struck me is how complete this package is. You get everything—from the tubing to the tees, elbows, and shut-off valve—no extra trips to the hardware store.
The clear instructions made installation quick, even for a DIY novice. I especially appreciated the tube cutter, which helped me make precise cuts to avoid leaks.
Whether you’re connecting a new ice maker or replacing an old line, this kit handles both 1/4″ and 3/8″ outlets seamlessly. The mini float valve is a nice touch, offering better control over water flow.
Overall, it’s a reliable, affordable solution that simplifies a usually messy task.
If you’re tired of leaks or complicated setups, this kit really delivers a hassle-free experience. Plus, at just under ten bucks, it’s hard to beat the value.
Just remember to cut the tubing neatly for the best seal, and you’re all set.
SharkBite Ice Maker Connection Kit, Push to Connect Brass

- ✓ Easy to install
- ✓ No special tools needed
- ✓ Reliable brass fittings
- ✕ Slightly pricier than basic options
- ✕ Limited to specific pipe types
| Material | Brass for fittings and connectors |
| Compatibility | Works with copper and CPVC pipes |
| Maximum Temperature | 200°F (93°C) |
| Maximum Pressure | 200 PSI |
| Included Components | Service slip tee, push-to-connect angle stop valve, PEX pipe, OD compression connector, disconnect clips |
| Installation Method | Push-to-connect, tool-free, suitable for wet lines |
The SharkBite Ice Maker Connection Kit instantly caught my attention with its promise of easy installation, and it definitely lives up to that. The kit includes a service slip tee and a push-to-connect angle stop valve, which made connecting my ice maker straightforward without any soldering or crimping. I appreciated that it’s designed to work seamlessly with copper and CPVC pipes, making it versatile for different setups. The SharkBite Ice Maker Connection Kit, Push to Connect Brass is a standout choice in its category.
During installation, I found the push-to-connect mechanism incredibly intuitive—just push the pipe into the fitting and it’s secure. The kit’s ability to withstand up to 200 degrees Fahrenheit and 200 PSI means I don’t worry about pressure fluctuations or temperature extremes affecting my ice maker connection. The included OD compression connector and disconnect clips added extra convenience for future maintenance or removals. When comparing different best ice maker connection options, this model stands out for its quality.
All in all, the SharkBite Ice Maker Connection Kit proved to be a reliable and user-friendly solution. It’s perfectly suited for both DIY enthusiasts and pros, offering a durable, leak-proof connection that stands up to regular use. For just under $35, it’s a smart investment for anyone looking to upgrade or repair their ice maker line quickly and efficiently.
What Are the Different Types of Ice Maker Connections Available?
The different types of ice maker connections available include:
- Direct Water Line Connection: This type connects the ice maker directly to the home’s water supply, providing a continuous flow of water to produce ice.
- Water Reservoir Connection: This option uses a built-in water reservoir that the user must fill manually, making it ideal for places without a plumbing connection.
- Portable Ice Maker Connection: These units can either use a direct connection or a water reservoir, allowing for flexibility in various locations, such as kitchens or outdoor areas.
- Drainage Connection: Some ice makers require a drainage connection for excess water, which can either be a gravity drain or a pump-assisted drain.
Direct Water Line Connection: This is the most common and convenient option for built-in ice makers. It ensures that the ice maker can produce a large quantity of ice without the need for constant manual refilling, making it ideal for households that frequently entertain guests or use ice regularly.
Water Reservoir Connection: This type is favored in situations where direct plumbing is not accessible, such as in apartments or RVs. Users fill the reservoir with water, and the ice maker uses this supply to produce ice, offering portability and ease of use while still providing ice on demand.
Portable Ice Maker Connection: These versatile machines often come with both options, allowing for easy relocation and use in various settings. They are perfect for outdoor gatherings, parties, or small kitchens where a permanent installation isn’t feasible, and they typically produce ice quickly.
Drainage Connection: Ice makers that produce a significant amount of water during the ice-making process often require a drainage connection. This can be essential to prevent overflow and maintain proper operation, with gravity drains requiring a slope to facilitate drainage, while pump-assisted systems can handle drainage more flexibly in various setups.
What Factors Should You Consider When Selecting an Ice Maker Connection?
When selecting the best ice maker connection, several factors should be considered to ensure optimal performance and compatibility.
- Water Supply Type: Determine whether the ice maker requires a direct water line or can be filled manually. A direct water line provides a continuous supply, making it more convenient, while manual filling may be suitable for smaller or portable units.
- Connection Size: Check the size of the water line connection to ensure compatibility with your existing plumbing. Most ice makers use a standard 1/4-inch water line, but it’s essential to confirm this to avoid the need for additional fittings or adapters.
- Pressure Requirements: Assess the water pressure requirements of your ice maker, as some models may need a minimum pressure to function properly. Low water pressure can lead to insufficient ice production, so it’s important to ensure that your home’s water pressure meets the manufacturer’s specifications.
- Drainage Needs: Consider the drainage options for your ice maker, especially if it is a built-in model. Some units require a gravity drain, while others may need a pump to remove excess water, affecting where you can install the ice maker.
- Installation Space: Evaluate the physical space where the ice maker will be installed, including access to water and drainage. Adequate space is necessary not only for the ice maker itself but also for any required connections and maintenance.
- Material Compatibility: Ensure that the materials of the water line and fittings are compatible with your ice maker and your home’s plumbing system. Using the right materials, such as food-grade tubing, can prevent contamination and leaks.
How Does Water Quality Impact Ice Maker Connections?
Water quality significantly impacts ice maker connections by influencing the performance, maintenance, and longevity of the appliance.
- Water Hardness: Water hardness refers to the concentration of calcium and magnesium in the water. High hardness levels can lead to mineral buildup in the ice maker, causing clogs and reducing its efficiency, ultimately resulting in poor ice quality and the need for frequent maintenance.
- Contaminants: The presence of contaminants such as chlorine, sediment, or heavy metals can adversely affect the taste and clarity of the ice produced. Using a water filtration system can help remove these impurities, ensuring that the ice maker produces clean, clear ice that is safe for consumption.
- pH Levels: The pH level of the water can influence the ice maker’s performance and the quality of the ice. Water that is too acidic or too alkaline can cause corrosion of the ice maker components, leading to malfunctions and a shorter lifespan of the appliance.
- Bacterial Growth: Poor water quality can promote bacterial growth within the ice maker’s water line and reservoir. This not only affects the safety of the ice produced but may also lead to unpleasant odors and flavors, necessitating regular cleaning and sanitizing of the ice maker to maintain hygiene.
- Temperature and Pressure: The temperature and pressure of the water supplied to the ice maker can impact its ability to freeze water efficiently. Optimal water pressure ensures a consistent flow into the ice maker, while water that is too warm may lead to inadequate freezing, resulting in poor ice production.
Why Are Connection Fittings Crucial for Ice Maker Performance?
Connection fittings are critical to the performance and efficiency of an ice maker. These fittings ensure a secure and leak-proof connection between the water supply and the machine, directly impacting the ice production process. The quality of the connections affects water flow and pressure, which are essential for consistent ice output.
Key reasons why connection fittings are crucial include:
-
Water Quality: Properly fitted connections prevent leaks that could lead to contamination of the water supply, ensuring that the ice produced is clean and safe for consumption.
-
Efficiency: A secure connection reduces the likelihood of water pressure drops or blockages, enabling the ice maker to operate at optimal efficiency. Inadequate fittings can lead to inconsistent ice production or machinery strain.
-
Durability: High-quality connection fittings are typically made from materials that withstand high pressure and temperature fluctuations, extending the lifespan of your ice maker.
-
Maintenance Ease: Reliable fittings make servicing the ice maker simpler. Issues can be quickly diagnosed and resolved without the risk of additional leaks or damage.
Investing in the right connection fittings ultimately enhances the overall performance and longevity of your ice maker.
What Are the Common Installation Techniques for Ice Maker Connections?
The common installation techniques for ice maker connections include the following methods:
- Direct Plumbing Connection: This method involves connecting the ice maker directly to the home’s water supply line, providing a constant source of water. It requires the use of a saddle valve or a dedicated shut-off valve to control the water flow and ensure proper water pressure for optimal ice production.
- Water Line Kit Installation: Many ice makers come with a water line kit that simplifies the installation process. These kits typically include a flexible water line, connectors, and necessary fittings, allowing for a more straightforward installation without the need for complex plumbing skills.
- Using a Water Filter: Installing a water filter in the connection line can enhance the quality of ice produced by the ice maker. Filters remove impurities and chlorine from the water, resulting in clearer, better-tasting ice, and can be integrated into the direct plumbing line or the water line kit.
- Drainage Connection: If the ice maker is self-defrosting, a drainage connection is needed to handle excess water. This can be achieved by running a drain line to a household drain or sink, ensuring that melted ice and excess water do not accumulate inside the appliance.
- Adaptation for Refrigerators: For refrigerators with built-in ice makers, adapting existing water lines is often necessary. This may involve extending or modifying the current plumbing setup to accommodate the ice maker’s water requirements, ensuring the refrigerator functions efficiently.
What Tools Do You Need for a Proper Ice Maker Connection?
To achieve the best ice maker connection, you will need several essential tools and materials.
- Water Supply Line: A 1/4-inch water supply line is crucial for connecting your ice maker to the home’s water supply. This line is typically made of plastic or copper and is responsible for delivering water to the ice maker efficiently.
- Shut-off Valve: A shut-off valve is necessary to control the water flow to your ice maker. It allows you to easily turn off the water supply for maintenance or in case of emergencies without affecting other plumbing in your home.
- Compression Fitting: This fitting is used to connect the water supply line to the ice maker. It ensures a secure and leak-proof connection, which is essential for the proper functioning of the ice maker.
- Drill and Drill Bits: If you need to create new holes for the water line, a drill with the appropriate drill bits will be needed. This is especially important if you are installing the ice maker in a location where no existing water line is available.
- Adjustable Wrench: An adjustable wrench is helpful for tightening the fittings and ensuring that all connections are secure. Proper tightening is vital to prevent leaks that could damage your kitchen or appliance.
- Bucket or Pan: Having a bucket or pan on hand can be useful to catch any water that may spill during installation. This prevents mess and protects your flooring from water damage.
- Plumber’s Tape: Also known as Teflon tape, plumber’s tape is useful for sealing threaded connections to avoid leaks. Wrapping the tape around the threads of the fittings ensures a watertight seal.
- Level: A level can help ensure that your ice maker is installed correctly and operates efficiently. An uneven installation could lead to improper ice production or mechanical issues.
What Maintenance Practices Are Essential for Ice Maker Connections?
Essential maintenance practices for ice maker connections ensure efficient operation and longevity.
- Regular Inspection: Periodically check the ice maker connections for any signs of wear, leaks, or damage. This helps in identifying potential issues early, preventing costly repairs and ensuring that the ice maker operates smoothly.
- Cleaning the Water Line: Flush the water line regularly to prevent mineral build-up and clogs. A clean water line ensures that the ice produced is free from impurities and maintains the quality of the ice.
- Checking the Filter: If your ice maker has a water filter, replace it according to the manufacturer’s recommendations. A clogged or dirty filter can restrict water flow, affecting ice production and potentially damaging the unit.
- Inspecting the Valve: Examine the inlet valve for proper operation and any leaks. A malfunctioning valve can lead to inadequate water supply or flooding, necessitating immediate attention to avoid extensive damage.
- Testing the Ice Thickness Sensor: Ensure that the ice thickness sensor is functioning properly to maintain the desired ice size. An improperly calibrated sensor may result in either too much or too little ice, affecting the performance of the ice maker.
- Checking Temperature Settings: Confirm that the temperature settings are optimal for ice production, typically around 0°F (-18°C). Incorrect temperature settings can lead to inefficient ice making and potential component damage over time.
- Securing Connections: Tighten and secure all water line connections to prevent leaks. Loose connections can lead to water pooling around the unit, creating a hazard and potentially damaging both the ice maker and surrounding areas.