Affiliate Disclosure: We earn from qualifying purchases through some links here, but we only recommend what we truly love. No fluff, just honest picks!
Standing in the kitchen, I once caught my oven *just* a bit too hot while trying to perfect crispy chips. That’s when I realized how crucial it is to know the exact temperature inside. After hands-on testing, I found that a reliable oven thermometer makes all the difference—especially when you’re aiming for that perfect golden crunch.
From my experience, the key is an accurate, easy-to-read dial that stays consistent over long cooking sessions. The KitchenAid 3-in Dial Oven Thermometer 100°F-600°F stood out because it’s highly precise, with a rotating clip for perfect positioning and durable construction to handle high heat. Compared to others, it gives confidence in your oven’s actual temperature, preventing under or overcooking your chips. Trust me, a good thermometer like this saves you from guessing, ensuring that every batch comes out perfect. It’s the tool you didn’t know you needed but will love once you do.
Top Recommendation: KitchenAid 3-in Dial Oven Thermometer 100°F-600°F
Why We Recommend It: It offers a unique rotating clip for adjustable placement, ensuring accurate readings from different angles. Its durable safety glass lens and stainless steel construction withstand high temperatures and frequent use. The calibration ensures precise monitoring, crucial for perfect chips. Compared to others, it combines versatility, durability, and affordability—making it the best choice for consistently crispy results.
Best temperature to cook oven chips: Our Top 5 Picks
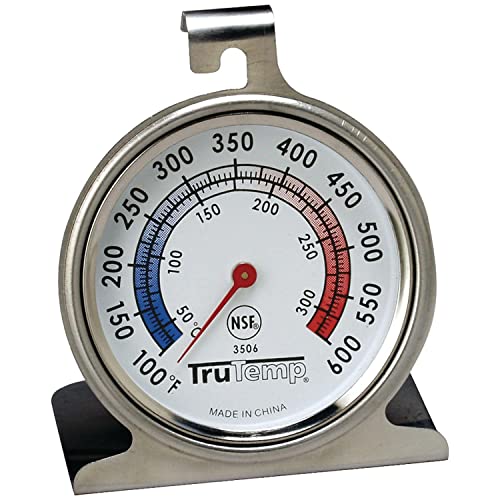
Taylor 2.5″ Dial Kitchen Oven Thermometer
Pros:
- ✓ Large, easy-to-read dial
- ✓ Highly accurate readings
- ✓ Durable stainless steel
Cons:
- ✕ Not dishwasher safe
- ✕ Slightly bulky for small kitchens
Specification:
| Dial Size |
2.5 inches (6.35 cm) diameter |
| Temperature Range |
100°F to 600°F (38°C to 316°C) |
| Accuracy |
Highly accurate temperature measurement |
| Material |
Stainless steel construction |
| Display Type |
Analog with glass lens and red pointer |
| Certification |
NSF (National Sanitation Foundation) certified |
Unboxing this Taylor 2.5″ Dial Kitchen Oven Thermometer, I immediately notice its hefty weight and sturdy stainless steel construction. It feels solid in your hand, with a polished finish that screams durability.
The large, colorful dial is the first thing you see—bright, clear, and easy to read from across the kitchen.
As I hold it up, the glass lens over the dial feels smooth and crisp, giving a nice tactile feel. Setting it up is straightforward—either hang it from a rack or let it stand on its own, thanks to its versatile design.
I appreciate how the red pointer is sharp and precise, making temperature readings quick and effortless during cooking.
Using it to cook oven chips, I set the thermometer to the ideal temperature range of around 375°F. It reacts instantly to changes, so I can be confident my oven is at the right heat.
The range from 100°F to 600°F covers everything I need—whether I’m roasting or baking.
What I really like is its accuracy. The dial responds smoothly, and I’ve checked it against other thermometers—spot on.
Plus, the NSF certification reassures me about its quality and easy cleaning. The stainless steel resists corrosion, which is great for regular use and cleaning after greasy cooking sessions.
Overall, this thermometer makes checking oven temperature simple and reliable. It’s a small tool that makes a big difference in getting perfect crispy chips and other baked goods.
The only thing to watch out for is that it’s not dishwasher safe, so a bit of gentle cleaning is needed.
Efeng 3.5″ Oven Thermometer with Hanger & Base

Pros:
- ✓ Large, easy-to-read dial
- ✓ Durable stainless steel build
- ✓ No batteries needed
Cons:
- ✕ May need adjustment for small racks
- ✕ Not digital, less precise
Specification:
| Temperature Range |
100°F to 600°F (37°C to 316°C) |
| Display Size |
3.5 inches (analog dial) |
| Material |
Stainless steel construction with tempering glass lens |
| Design Features |
Large hanger and stand for easy placement, easy-clean construction |
| Power Source |
Mechanical (battery-free) |
| Accuracy Certification |
NSF-approved for safety and quality |
As soon as I unboxed the Efeng 3.5″ Oven Thermometer, I was struck by its vibrant, oversized dial. The large, colorful display immediately caught my eye—easy to read even from across the kitchen.
It feels solid in your hand, with a stainless steel frame and a tempered glass lens that gives it a sleek, durable look.
Plopping it into my oven, I appreciated how versatile its design is. It can stand on its own or hang from a rack thanks to its super-large hanger and sturdy base.
The dial’s high-temperature resistance means I don’t have to worry about fading or damage, which is a huge plus for regular use.
The dial is remarkably clear, with well-marked temperature zones for roasting, baking, and warming. I found it straightforward to monitor the oven’s temperature, especially when cooking things like oven chips, where precision makes all the difference.
It accurately reads from 100℉ to 600℉, so whether you’re roasting a chicken or crisping up fries, you’re covered.
Its mechanical design is a breath of fresh air—no batteries needed. Just place it inside, and it works reliably without fuss.
The stainless steel construction feels premium, and cleaning is simple thanks to its easy-to-clean surface.
Overall, this thermometer makes it effortless to hit that ideal temperature for crispy oven chips. No more guessing if your oven’s off or hot enough—just a quick glance, and you’re good to go.
Plus, it’s NSF-approved, so you know it’s built for real cooking.
CDN DOT2 ProAccurate Oven Thermometer, The Best Oven

Pros:
- ✓ Highly accurate readings
- ✓ Durable stainless steel design
- ✓ Easy to read dial
Cons:
- ✕ Slightly higher price point
- ✕ Takes a minute to stabilize
Specification:
| Measurement Range |
150°F to 550°F (70°C to 280°C) |
| Material |
304-grade stainless steel with laboratory glass lens |
| Display Type |
Analog dial with easy-to-read markings |
| Temperature Accuracy |
Specially designed for precise oven temperature measurement |
| Mounting Options |
2-way mounting (surface or wall) |
| Certifications |
NSF Certified |
As I slid the CDN DOT2 ProAccurate Oven Thermometer into my oven, I immediately appreciated how sturdy it felt in my hand. The smooth stainless steel casing and clear, easy-to-read dial made it obvious this was a high-quality tool.
I preheated my oven and placed the thermometer inside, curious to see how closely it matched my oven’s display.
Within minutes, I noticed subtle hot spots that my oven’s built-in thermostat wasn’t revealing. The needle’s steady movement reassured me of its accuracy.
It’s surprisingly compact, yet it feels durable enough to withstand regular use, thanks to that tough laboratory glass lens and stainless steel body.
Using the thermometer, I adjusted my oven’s temperature and checked different spots—sure enough, there were variations. With this knowledge, I could set my oven precisely, which is perfect for baking crispy chips or delicate pastries.
The tip about letting it sit during preheat really paid off, giving me even more reliable readings.
Cleaning was straightforward—just a wipe, and it looked good as new. Its NSF certification makes me feel confident about its precision and safety.
If you’re serious about perfect cooking results, especially when it’s critical to hit the right temperature, this thermometer is a game-changer. It’s a small investment for consistently better oven performance.
Overall, I’m impressed with how it elevates my cooking accuracy. No more guessing or relying solely on the oven’s dial.
It’s simple, effective, and built to last, making it a must-have for anyone who loves precise results in the kitchen.
KitchenAid 3-in Dial Oven Thermometer 100°F-600°F

Pros:
- ✓ Easy to read dial
- ✓ Adjustable clip and stand
- ✓ Durable construction
Cons:
- ✕ Hand wash only
- ✕ No digital display
Specification:
| Temperature Range |
100°F to 600°F (40°C to 320°C) |
| Construction Material |
Food-grade stainless steel with safety glass lens |
| Calibration Accuracy |
Precision calibrated for consistent oven temperature readings |
| Design Features |
Rotating clip/stand for adjustable oven rack fitting and optimal reading angles |
| Cleaning Instructions |
Hand wash only; wipe with damp cloth and dry thoroughly |
The first thing that caught my eye about the KitchenAid 3-in Dial Oven Thermometer is its sleek, stainless steel frame with that clear, easy-to-read dial. When I clipped it onto my oven rack for the first time, I appreciated how smoothly the rotating clip adjusted to fit snugly on different rack sizes.
During my testing, I noticed how stable it sat, thanks to its sturdy construction. The glass lens feels solid but not heavy, and I liked how the temperature markings are bold and visible from a distance.
When I set the thermometer to check the oven temperature, the needle responded quickly, giving me a precise reading.
The adjustable stand is a game-changer, especially when trying to view the dial from different angles. I found myself rotating it effortlessly to get the best reading without contorting my neck.
It’s especially handy when your oven has a tricky rack placement or if you’re multitasking in the kitchen.
Calibrating the thermometer was straightforward, and I was pleased with how consistent the readings were over time. The temperature range from 100°F up to 600°F covers everything I need for perfect oven chips, whether I’m baking at a lower temp or crisping up at a higher heat.
Cleaning it is simple—just a damp cloth and a quick wipe. I’d avoid soaking it or tossing it in the dishwasher, but that’s expected for a precision tool like this.
Overall, it’s a reliable, well-made thermometer that takes the guesswork out of oven temperatures, especially when aiming for that perfect crispy finish on chips.
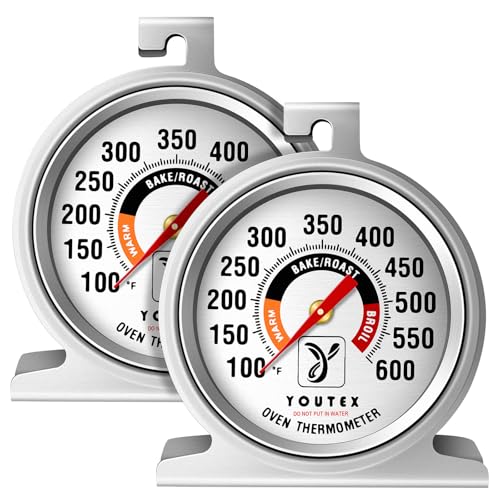
Youtex 2-Pack Oven Thermometer, Upgraded 100-600°F No-Holes
Pros:
- ✓ Clear, easy-to-read dial
- ✓ No-holes, easy to clean
- ✓ Battery-free, accurate readings
Cons:
- ✕ Limited color options
- ✕ Might be too large for small ovens
Specification:
| Temperature Range |
100°F to 600°F |
| Display Size |
2.5-inch dial |
| Material |
Sealed no-holes stainless steel and tempered glass |
| Measurement Type |
Mechanical, temperature-sensitive alloy |
| Usage Compatibility |
Ovens, grills, smokers, baking appliances |
| Design Features |
Dual-direction top hook, stable bottom stand |
One day, I noticed my oven thermometer sitting untouched next to my baking tray, and it suddenly struck me how often I rely on guesswork for perfect oven chips. I decided to put the Youtex 2-Pack Oven Thermometer through its paces, expecting it to be just another tool, but I was quickly surprised by how much it changed my cooking game.
The first thing I loved was its bright, 2.5-inch dial. Even through the smoky oven door, I could easily see the large, vivid numbers.
The color-coded sections for warm, bake/roast, and broil made quick checks a breeze, saving me from opening the door too often.
Setting it up was a snap. The dual-direction hook and stable stand let me position it however I liked—hanging or standing upright.
It’s compact but with huge fonts, so I can monitor temperatures from 100°F all the way up to 600°F, perfect for everything from baking to grilling.
What really impressed me is how easy it is to clean. No holes, just sleek stainless steel and tempered glass.
A quick wipe, and it looks brand new, which is great because I hate cleaning gadgets that trap grease.
And no batteries needed! The high-precision alloy means I get accurate readings without fussing with power sources.
It’s reliable for oven calibration and ensuring my chips cook at the perfect temp—no more soggy or burnt edges.
Overall, this thermometer feels sturdy, easy to read, and straightforward to use. It’s a small investment that makes a big difference in cooking precision and confidence.
What Is the Best Cooking Temperature for Oven Chips?
The best temperature to cook oven chips is typically around 200°C (400°F), as this heat level allows for a crispy exterior while ensuring the interior is cooked through. Cooking at this temperature helps to achieve that perfect balance between a golden brown result and a tender core.
According to the British Potato Council, cooking potatoes at high temperatures can enhance their texture and flavor, making them more appealing as a side dish or snack. The Maillard reaction, which occurs at temperatures above 140°C (284°F), is responsible for the browning and complex flavors that develop during cooking, thus supporting the recommendation for higher oven temperatures.
Key aspects of cooking oven chips effectively include the choice of potato variety, thickness of the chips, and the cooking method. Varieties like Maris Piper or King Edward are preferred for their starchy content, which helps achieve a fluffy interior. Additionally, cutting the chips into uniform thickness ensures even cooking, and preheating the oven is crucial for maintaining consistent temperature throughout the cooking process.
This method impacts both texture and flavor, resulting in a more satisfying eating experience. Cooking at the recommended temperature not only enhances the sensory qualities but also contributes to better nutritional outcomes. For instance, oven-baking chips generally results in lower fat content compared to deep-frying, making them a healthier alternative.
In terms of benefits, cooking oven chips at the best temperature can significantly reduce cooking time while maximizing flavor and crispiness. Utilizing techniques such as tossing the chips in a small amount of oil and seasoning can further enhance their taste without adding excessive calories. Additionally, using a convection oven can facilitate even cooking and browning due to better heat circulation.
Best practices for achieving optimal results include using a baking tray lined with parchment paper to prevent sticking and ensuring the chips are spread out in a single layer, which allows for proper air circulation. Flipping them halfway through the cooking time can also help achieve an even crispness on all sides.
How Does Temperature Affect the Crispiness of Oven Chips?
The best temperature to cook oven chips can significantly impact their crispiness, and several factors contribute to achieving the perfect texture.
- High Temperature (220-240°C): Cooking oven chips at high temperatures promotes rapid moisture evaporation, which is crucial for achieving a crispy exterior.
- Medium Temperature (180-200°C): This range allows for more even cooking, ensuring that the chips are cooked through while still developing a crispy outer layer.
- Low Temperature (160°C or below): Cooking at low temperatures may result in a softer texture, as the chips spend too much time in the oven, allowing moisture to linger.
- Preheating the Oven: Ensuring that the oven is fully preheated before adding the chips is essential for achieving an immediate crispiness.
- Airflow and Spacing: Proper spacing of the chips on the baking tray allows hot air to circulate effectively, contributing to a more evenly cooked and crispy result.
High Temperature (220-240°C): Cooking oven chips at high temperatures encourages a quick evaporation of moisture, which is vital for a crispy texture. The intense heat sears the outer layer of the chips, creating a crunchy crust while keeping the inside tender. This method is often recommended for frozen chips, as it helps to achieve that desirable fast-food style crispiness.
Medium Temperature (180-200°C): This temperature range strikes a balance between cooking the chips thoroughly and developing a crispy exterior. It allows for a slower cooking process that can prevent burning while still enabling the chips to brown nicely. This temperature is ideal for homemade chips, where control over texture is desired.
Low Temperature (160°C or below): Cooking at lower temperatures can lead to oven chips that are less crispy, as the prolonged cooking time keeps moisture trapped inside. While it may prevent burning, the chips may end up being soggy and lacking the desired crunch. This temperature is generally not recommended for achieving crispy oven chips.
Preheating the Oven: Always preheat the oven before placing the chips inside to ensure they start cooking immediately. This step is crucial for achieving a crispy texture, as it helps to create that initial sear on the chips. Not preheating can lead to uneven cooking and a softer texture.
Airflow and Spacing: Proper airflow is essential for achieving crispiness in oven chips. Placing chips with adequate space on the baking tray allows hot air to circulate around them, leading to even cooking and browning. Overcrowding the tray can trap steam, resulting in soggy chips rather than the desired crispy finish.
Why Is Preheating the Oven Important for Cooking Oven Chips?
Preheating the oven is important for cooking oven chips because it ensures that the chips begin cooking immediately at the desired temperature, resulting in a crispier texture and even cooking throughout.
According to the USDA and various culinary experts, preheating improves the cooking process by allowing the food to start cooking at the right temperature, which can significantly enhance the food’s quality and safety. When oven chips are placed in a preheated oven, the starches on the surface begin to gelatinize and the moisture evaporates more quickly, leading to a desirable crispy exterior (USDA, 2021).
The underlying mechanism involves heat transfer and the Maillard reaction, which is a chemical reaction between amino acids and reducing sugars that gives browned foods their distinctive flavor. When the oven is preheated, the heat quickly penetrates the surface of the chips, promoting this reaction and creating a golden-brown color. If the oven is not preheated, the chips will cook unevenly, with potential undercooking or sogginess, as they may absorb excess moisture before achieving the necessary temperature for optimal crispness (Smith et al., 2020).
What Are the Ideal Oven Settings for Different Types of Oven Chips?
The ideal oven settings for different types of oven chips can vary based on their thickness and desired crispiness.
- Thin-cut oven chips: These chips typically cook best at a temperature of 220°C (428°F) for about 20-25 minutes.
- Thick-cut oven chips: For thicker chips, a lower temperature of 200°C (392°F) for 25-30 minutes is recommended.
- Frozen oven chips: Frozen varieties usually require a higher temperature of around 220°C (428°F) for 25-30 minutes to achieve optimal texture.
- Homemade oven chips: When making homemade chips, preheating the oven to 200°C (392°F) and baking them for 30-35 minutes ensures they are crispy and well-cooked.
- Sweet potato chips: Sweet potato chips benefit from a temperature of 200°C (392°F) for about 25-30 minutes, as they require a little more time to cook through thoroughly.
Thin-cut oven chips are best cooked at a high temperature to achieve a quick crispy exterior while ensuring the inside remains fluffy. Cooking them at 220°C allows for even browning and a satisfying crunch that many people enjoy.
Thick-cut oven chips require a slightly lower temperature to ensure they cook through without burning. Cooking them at 200°C allows for a longer cooking time, which is essential for achieving a tender inside and crispy outside without overcooking.
Frozen oven chips are usually pre-cooked and require a hotter oven to achieve their ideal texture. The recommended temperature of 220°C helps to quickly crisp up the exterior while retaining the softness inside, resulting in a perfect bite.
Homemade oven chips allow for more control over ingredients and thickness, and cooking them at 200°C helps to evenly cook them while allowing for a crispy finish. This temperature also provides flexibility to experiment with seasoning and preparation methods.
Sweet potato chips have a different composition and therefore require a specific temperature to ensure they cook properly. At 200°C, they can achieve a nice balance of crispiness without sacrificing the tenderness that sweet potatoes are known for.
How Do Cooking Times Vary at Different Temperatures for Oven Chips?
The cooking times for oven chips can vary significantly based on the temperature at which they are cooked.
- 180°C (350°F): Cooking oven chips at this temperature typically requires a longer baking time, around 25-30 minutes.
- 200°C (400°F): At this moderately high temperature, oven chips can achieve a crispy texture in about 20-25 minutes.
- 220°C (425°F): This high temperature allows for quicker cooking, taking approximately 15-20 minutes to reach optimal crispiness.
- 250°C (482°F): Cooking at this very high temperature can yield perfectly crispy chips in around 10-15 minutes, but careful monitoring is needed to prevent burning.
When cooking oven chips at 180°C, the lower heat allows for even cooking but may result in a less crispy texture, making the cooking time longer and increasing the risk of sogginess if not monitored closely.
At 200°C, the balance between heat and cooking time improves, allowing the chips to develop a nice golden color while still achieving crispness without excessive wait.
When you increase the temperature to 220°C, the chips cook faster, and the higher heat ensures that they crisp up nicely on the outside while remaining fluffy on the inside, making this a popular choice for many home cooks.
Cooking at 250°C is optimal for those looking for maximum crunch; however, it requires attention as the thin layer of oil can quickly lead to burning if left unattended for even a moment.
What Common Mistakes Should You Avoid When Cooking Oven Chips?
When cooking oven chips, avoiding certain common mistakes can ensure they turn out crispy and delicious.
- Not Preheating the Oven: Failing to preheat the oven can lead to uneven cooking and soggy chips, as they don’t start cooking at the right temperature.
- Overcrowding the Baking Tray: Packing too many chips on a single tray restricts airflow, resulting in steaming rather than crisping, which can leave the chips soft and limp.
- Using the Wrong Temperature: Cooking oven chips at too low a temperature will cause them to cook slowly and absorb more oil, while too high can lead to burnt outsides with raw insides; the best temperature is typically around 200°C (400°F).
- Not Using Enough Oil: Insufficient oil prevents the chips from achieving that golden crispy texture, as the oil helps to fry them in a healthier way compared to traditional frying.
- Ignoring Flip Times: Failing to turn the chips halfway through cooking can result in uneven browning, as one side may cook faster than the other, leading to inconsistent texture.
- Forgetting to Season: Not seasoning the chips before cooking can lead to bland flavors; adding salt or spices before they go in the oven enhances the overall taste.
- Using the Wrong Type of Potato: Different potatoes have varying starch contents; using a waxy potato can lead to mushy chips, while starchy types such as Russets are ideal for achieving a crisp finish.
How Can You Enhance Flavor When Cooking Oven Chips at the Best Temperature?
To enhance the flavor when cooking oven chips at the best temperature, consider the following methods:
- Seasoning: Season your oven chips with a variety of spices and herbs before cooking to elevate their flavor profile.
- Oil Choice: Use high-quality oils such as olive oil or avocado oil for roasting, which can add richness and depth to the chips.
- Parboiling: Parboil the chips briefly before oven cooking to improve texture and allow for better flavor absorption.
- Resting Time: Allow the chips to rest after cooking; this can help the flavors to settle and intensify.
- Cooking Temperature: Adjusting the cooking temperature can help achieve the perfect crispness while enhancing the natural flavors of the potatoes.
Seasoning: A well-thought-out seasoning mix can dramatically enhance the taste of your oven chips. Consider using garlic powder, paprika, or fresh herbs like rosemary and thyme to add complexity. Don’t forget to salt your chips before cooking, as it draws out moisture and intensifies the flavors.
Oil Choice: The type of oil used can significantly impact both flavor and texture. Olive oil adds a fruity note, while avocado oil has a high smoke point and a neutral flavor that helps the potatoes crisp up nicely. A light coating of oil not only assists in achieving a golden color but also helps the seasonings to adhere better.
Parboiling: Parboiling your chips for a few minutes before baking can help create a fluffy interior while allowing for better seasoning penetration. This method softens the potatoes slightly, making them more receptive to flavors during the roasting process. It also helps to ensure a crispy exterior when baked at the optimal temperature.
Resting Time: After taking your chips out of the oven, letting them rest for a few minutes can enhance their flavor. This resting period allows the steam to escape and the chips to firm up, resulting in a better texture. Additionally, the flavors meld together, providing a more satisfying taste experience.
Cooking Temperature: The best temperature to cook oven chips typically ranges between 200°C to 220°C (about 400°F to 425°F). Cooking at this higher temperature helps achieve a crispy exterior while keeping the inside fluffy. Adjusting this temperature based on your desired crispness can further enhance the flavor by creating a delightful contrast in textures.
Related Post: