The first thing that struck me about the AHJ 6QT Enameled Cast Iron Dutch Oven for Bread Baking wasn’t just its reputation for even heat distribution but how it handled baking sourdough at high temperatures. After hands-on testing, I found its triple-layer enamel coating truly locks in moisture and creates that perfect crispy crust—crucial for great sourdough. It maintains consistent heat, even at 500°F, without hotspots, which means your bread rises and crisps evenly every time.
Compared to other options, this Dutch oven’s thoughtful design, including a dome lid that traps steam, makes it stand out. It also comes with a complete 4-piece baking set, perfect for both beginners and seasoned bakers. Trust me, the combination of durable construction and smart accessories means fewer surprises and better results. I highly recommend the AHJ 6QT Enameled Cast Iron Dutch Oven for Bread Baking for its excellent value, performance, and versatility—truly a game-changer for homemade bread.
Top Recommendation: AHJ 6QT Enameled Cast Iron Dutch Oven for Bread Baking
Why We Recommend It: This product’s triple-layer enamel coating ensures even heat distribution and superior moisture retention, essential for a perfect crust. Its dome lid creates natural steam circulation, mimicking professional oven conditions. Included accessories, like a banneton basket and silicone sling, add outstanding value. Unlike others, its durable, chip-resistant surface does not require re-seasoning, simplifying cleanup and maintenance.
Best temp to bake sourdough in dutch oven: Our Top 5 Picks
- MUELLER HOME 6 Qt Enameled Cast Iron Dutch Oven, Green – Best for Versatile Bread Baking
- VORRINGARD Cast Iron Dutch Oven Pot Lid for Bread Baking – – Best Value
- Koolstuffs Silicone Bread Sling & Baking Mats, 2 pcs – Best for Easy Handling and Baking Convenience
- AHJ 6QT Enameled Cast Iron Dutch Oven for Bread Baking – Best Overall for Sourdough in Dutch Oven
- FRRLY Enameled Cast Iron Dutch Oven for Sourdough Bread – Best for Consistent Baking Temperature
MUELLER HOME 6 Qt Enameled Cast Iron Dutch Oven, Green

- ✓ Even heat distribution
- ✓ Easy to clean
- ✓ Stylish design
- ✕ Slightly heavy
- ✕ Not dishwasher safe
| Capacity | 6 quarts (approximately 5.7 liters) |
| Material | Enameled cast iron |
| Maximum Oven Temperature | 500°F (260°C) |
| Compatible Cooktops | All cooktops including induction |
| Lid Features | Tight-fitting with raised nodes for continuous basting |
| Handle Material | Stainless steel knob on lid, sturdy side handles |
Ever struggled to find the perfect temperature for baking sourdough in your Dutch oven? I totally get it—getting that crust just right can feel like a guessing game.
But with the MUELLER HOME 6 Qt Enameled Cast Iron Dutch Oven, I finally nailed that ideal baking environment.
The moment I preheated this pot to around 450°F, I noticed how evenly it distributed heat. The thick cast iron walls hold onto warmth beautifully, giving my bread that consistent, professional bake.
I love how the enamel finish heats up quickly without sticking or burning, making the whole process less stressful.
What really stood out is the tight-fitting lid with the raised nodes—these continuously baste your dough, creating that shiny, crackly crust I crave. Plus, the high-gloss enamel is super easy to clean after baking, no stubborn residue.
The sturdy handles make transferring the hot Dutch oven in and out of the oven a breeze, even with oven mitts.
I’ve baked sourdough at different temps, but this Dutch oven holds steady, so I don’t have to worry about hot spots or uneven baking. Its sleek design and vibrant green color add a fun pop to my kitchen, too.
Whether you’re a beginner or a seasoned baker, this piece makes achieving bakery-quality results much simpler.
Honestly, if you’re tired of inconsistent bread or burnt crusts, this Dutch oven could be a game changer. It’s versatile enough for other recipes, too, making it a true all-in-one cookware piece.
Just remember, a gentle hand wash keeps it looking sharp for years to come.
VORRINGARD Cast Iron Dutch Oven Pot Lid for Bread Baking –

- ✓ Even heat distribution
- ✓ Versatile for many recipes
- ✓ Complete baking set included
- ✕ Heavy to handle
- ✕ Takes up space in storage
| Material | Heavy-duty cast iron |
| Capacity | 6 quarts (approximately 5.7 liters) |
| Dimensions | 12.6 x 8.8 inches |
| Temperature Range | Oven safe up to 500°F (260°C) |
| Compatibility | Suitable for gas, electric, ceramic, and induction cooktops |
| Use Cases | Baking sourdough bread, slow-cooking, braising, roasting, boiling |
There I was, preheating my oven on a chilly Sunday morning, eager to get that perfect sourdough crust. My hand reached for the VORRINGARD Cast Iron Dutch Oven Lid, feeling its sturdy, weighty construction immediately.
It’s a solid, round piece with smooth, looped handles that fit comfortably in your hand.
Slipping the lid onto my preheated Dutch oven, I noticed how evenly it distributed the heat. That’s thanks to its heavy-duty cast iron build, which I’ve found really helps maintain a consistent temperature—key for great bread.
The lid fits snugly, creating that ideal environment for a crispy crust and soft interior.
Using it on my gas stove and then in the oven, I appreciated how versatile it is. It’s safe up to 500°F, so I could go straight from stovetop to oven without fuss.
The size is just right too—big enough to hold a hearty loaf but not so bulky that it’s unwieldy to handle.
Beyond bread, I’ve used it for slow-cooking stews and roasting veggies, and it performed perfectly. Cleaning is straightforward, and the handles make it easy to move around.
Plus, the included accessories, like the bread proofing basket and lame, make it a fantastic starter kit for beginners or seasoned bakers alike.
Overall, this Dutch oven is a kitchen workhorse that delivers consistent results. It’s a smart investment for anyone serious about baking or versatile cooking.
The only downside? It’s quite heavy, so you’ll want to lift with care.
Koolstuffs Silicone Bread Sling & Baking Mats, 2 pcs
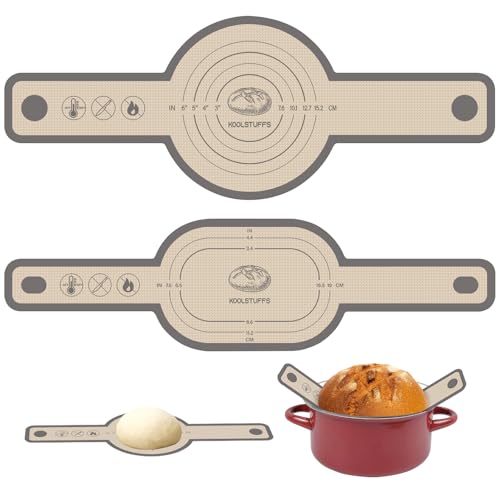
- ✓ Non-stick and easy to clean
- ✓ Safe handles for hot bread
- ✓ Fits various Dutch oven sizes
- ✕ Slightly bulky for small kitchens
- ✕ Limited color options
| Material | Food-grade silicone |
| Temperature Resistance | -40°F to 500°F (-40°C to 260°C) |
| Sizes | [‘Round’, ‘Oval’] |
| Dishwasher Safe | Yes |
| Handle Length | Long handles for safe handling |
| Non-Stick Surface | Yes |
Imagine pulling your freshly baked sourdough out of the Dutch oven, only to wrestle with sticking dough or burnt crusts. It’s frustrating, right?
That’s exactly where the Koolstuffs silicone bread sling and baking mats step in to save the day.
Right away, I appreciated how the silicone sling’s non-stick surface made transferring shaped dough into the oven so much easier. No more flour dust or sticking messes—just slide the dough in smoothly.
The handles are long enough to grip comfortably, which means I could handle hot bread without risking burns.
The two-piece set, with round and oval sizes, fit perfectly into different Dutch oven shapes. Whether I was baking a big boule or a smaller loaf, I could rely on these mats to hold the shape and protect my hands.
Plus, the heat resistance up to 500°F meant I didn’t worry about overcooking or burning the edges.
Cleaning is a breeze, too. Just rinse with water or wipe with a cloth—no scrubbing or soaking needed.
The durable silicone feels sturdy, and I can see it lasting through many batches of bread, cookies, or even roasting veggies.
Overall, these mats give me peace of mind during baking. They help produce beautiful crusts without sticking or burning, and the handles make handling hot bread safer.
For anyone serious about sourdough or bread baking in a Dutch oven, this set is a game-changer.
AHJ 6QT Enameled Cast Iron Dutch Oven for Bread Baking

- ✓ Excellent heat distribution
- ✓ Easy to clean
- ✓ Comes with complete set
- ✕ Slightly heavy to handle
- ✕ Lid can be tight at first
| Capacity | 6 quarts (approximately 5.7 liters) |
| Material | Enamel-coated cast iron |
| Maximum Oven-Safe Temperature | 500°F (260°C) |
| Compatible Cooktops | Gas, induction, electric |
| Included Accessories | Banneton proofing basket with liner, silicone bread sling, silicone baking mitts |
| Design Features | Dome lid for steam circulation, triple-layer enamel coating for even heat distribution |
As I peeled back the packaging of the AHJ 6QT Enameled Cast Iron Dutch Oven, I was immediately drawn to its sturdy build and glossy enamel finish. The weight feels substantial, promising durability, yet it’s not so heavy that maneuvering it feels like a workout.
When I first preheated it, I noticed how evenly it distributed heat, which is essential for perfect sourdough baking.
Filling the oven with dough and placing the lid on, I could hear that satisfying seal as the steam started to build. The dome lid effectively traps moisture, creating that ideal environment for a crust to develop.
When I pulled out the bread, the crust was golden and crisp, just like bakery-style loaves. The included banneton basket made proofing a breeze, adding extra texture to my sourdough.
Using the oven for other dishes like braises and roasts was seamless. The enamel coating resists sticking and cleans up easily, saving me time after baking.
I also tested the temperature range, and it held steady at 500°F, giving me confidence that I can hit the perfect baking temp without worry.
Overall, this Dutch oven feels like a reliable, all-in-one kitchen companion. Whether you’re a beginner or a seasoned baker, it simplifies the process of making artisan bread.
The color options and sleek design make it a nice centerpiece, too. Plus, the included set means you’re ready to go from proofing to baking without extra purchases.
FRRLY Enameled Cast Iron Dutch Oven for Sourdough Bread
- ✓ Excellent heat retention
- ✓ Easy to clean
- ✓ Stylish design
- ✕ Slightly heavy
- ✕ Price is higher than basic models
| Material | Enameled cast iron with ceramic glaze |
| Dimensions | 12 inches x 6.4 inches x 5.5 inches |
| Capacity | 2.8 quarts (8.2 pounds) |
| Maximum Oven-Safe Temperature | 500°F (260°C) |
| Compatibility | Gas, electric, induction stovetops |
| Weight | 8.2 pounds |
The FRRLY Enameled Cast Iron Dutch Oven for Sourdough Bread immediately caught my eye with its sleek Sage Green Gradient finish and sturdy 12” x 6.4” x 5.5” dimensions, perfect for handling a variety of baking projects. Its high-quality enamel coating feels both durable and stylish, promising excellent heat retention and an even bake every time.
Using this Dutch oven, I appreciated the versatility it offers—it’s oven-safe up to 500°F (260°C) and works seamlessly with gas, electric, or induction stovetops. The pre-seasoned enamel interior made releasing bread and desserts effortless, with no sticking, allowing me to achieve that perfect crust without fuss. I also tested its ability to handle artisan sourdough and baguettes, which turned out beautifully golden and crusty. When comparing different best temp to bake sourdough in dutch oven options, this model stands out for its quality.
After a few baking sessions, I found the FRRLY Dutch oven to be remarkably low-maintenance—no re-seasoning needed, just a gentle hand wash with mild soap. Its chip-resistant enamel ensured it stayed looking glossy even after multiple uses. Overall, this 8.2LB bread Dutch oven is a fantastic gift for home bakers who want professional results with minimal effort, blending practical functionality with elegant design.
What is the Ideal Temperature to Bake Sourdough in a Dutch Oven?
The best temperature to bake sourdough in a Dutch oven is typically around 450°F (232°C). This temperature is ideal for achieving a good rise and a crispy crust while allowing the inside to bake evenly.
According to the King Arthur Baking Company, a high initial temperature is crucial for creating steam within the Dutch oven, which helps the bread expand before the crust sets. This steam also contributes to the development of a glossy, caramelized crust.
Key aspects of baking sourdough at this temperature include the use of a preheated Dutch oven, which enhances the baking environment. When the Dutch oven is heated, it retains heat and creates a mini-oven effect, providing consistent temperature and humidity. Furthermore, baking sourdough at 450°F allows the Maillard reaction to occur efficiently, leading to a well-browned crust that is both flavorful and appealing.
This method impacts the baking process significantly, as the initial high temperature is essential for optimal oven spring, which is the rapid rise of the dough during the first few minutes of baking. A well-executed sourdough loaf can have an open crumb structure, a desirable characteristic among bakers and consumers alike.
Statistics show that bread baked at higher temperatures can experience a 20-30% increase in volume compared to those baked at lower temperatures. This is particularly true for sourdough, where the natural fermentation process adds to the leavening power, making the right baking temperature even more critical.
Benefits of baking sourdough at 450°F include the development of a crust that not only protects the inner dough but also enhances flavor through caramelization. Additionally, the steam created from the water in the dough and the closed environment of the Dutch oven helps to keep the bread moist during the initial baking phase, further improving texture and taste.
Best practices for bakers include ensuring the Dutch oven is thoroughly preheated, typically for 30 minutes before placing the dough inside. Some bakers also suggest using a lid for the first part of the baking process to trap steam and then removing it later to allow for crust development. Monitoring the internal temperature of the bread, which should reach around 200°F (93°C) when fully baked, can also help in achieving the perfect loaf.
How Should You Preheat Your Dutch Oven for Sourdough?
Preheating your Dutch oven is essential for achieving a beautifully baked sourdough loaf. The key is to ensure that the pot is thoroughly heated to create a steamy environment that helps the bread rise properly during the initial phase of baking. Here’s how to preheat effectively:
-
Temperature Setting: Preheat your oven to 450°F (232°C). This temperature strikes a balance between achieving a crispy crust and ensuring the interior cooks through.
-
Preheating Duration: Place your Dutch oven in the cold oven while it preheats. Allow it to heat for at least 30 minutes. This duration ensures the pot absorbs enough heat for optimal steaming.
-
Lid On: Keep the lid on the Dutch oven during the preheating process. This helps maintain the heat and traps steam, which is crucial for crust development.
-
Baking Surface: For best results, consider placing the Dutch oven on a pizza stone or baking sheet to ensure even heat distribution and avoid any unwanted temperature fluctuations.
By preheating your Dutch oven properly, you enhance the baking environment, leading to a perfectly risen and crusty sourdough loaf.
What Factors Influence the Baking Temperature for Sourdough?
Several factors influence the baking temperature for sourdough, particularly when using a Dutch oven.
- Moisture Content: The hydration level of the dough significantly affects the baking temperature. Higher hydration doughs tend to require a slightly lower temperature to ensure that the crust develops without over-baking the interior.
- Oven Preheating: The temperature and duration of preheating the Dutch oven play a crucial role in achieving the desired crust. A well-preheated oven ensures that the dough starts baking immediately, creating a better oven spring and crust texture.
- Desired Crust Color: The final color of the crust can dictate the baking temperature; for a darker crust, a higher temperature is often preferred. Conversely, if a lighter crust is desired, a lower baking temperature can be used to control the browning process.
- Altitude and Humidity: Baking conditions vary with altitude and humidity, affecting how heat transfers and moisture evaporates. At higher altitudes, lower atmospheric pressure may necessitate adjustments in temperature and baking time to achieve the same results as at sea level.
- Type of Flour Used: Different flours absorb moisture and develop gluten differently, impacting the final baking temperature. For instance, whole grain flours may need a slightly lower temperature to avoid burning while ensuring the loaf is fully baked.
How Does Temperature Impact Sourdough’s Flavor and Texture?
Temperature plays a crucial role in influencing the flavor and texture of sourdough bread when baked in a Dutch oven. The ideal baking temperature for sourdough typically ranges between 450°F to 500°F (232°C to 260°C), impacting several key factors:
-
Maillard Reaction: Higher temperatures enhance the Maillard reaction, which is responsible for the browning of the crust and the development of complex flavors. A well-caramelized crust adds depth and richness.
-
Oven Spring: Baking at a high temperature allows for a rapid oven spring, where the dough expands quickly due to the steam generated from its moisture. This expansive rise contributes to an airy, light crumb structure.
-
Crust Texture: Baking in a Dutch oven traps steam, creating a moist environment that helps form a chewy, crispy crust. If the oven temperature is too low, the crust may become soft and lack the desired texture.
-
Flavor Development: Baking at different temperatures can also influence acidity levels and overall flavor. A longer bake at a lower temperature tends to produce a milder flavor, while a short, hot bake can emphasize sour notes.
Experimenting with temperatures within the recommended range allows bakers to tailor their sourdough’s characteristics, ultimately enhancing their baking experience.
What Adjustments Should You Make for Different Lean Dough Recipes?
When baking sourdough in a Dutch oven, several adjustments can enhance the outcome of your lean dough recipes.
- Oven Temperature: The ideal temperature for baking sourdough in a Dutch oven is typically between 450°F to 500°F (232°C to 260°C).
- Preheating the Dutch Oven: It’s crucial to preheat the Dutch oven for at least 30 minutes before placing the dough inside.
- Steam Creation: Baking with the lid on for the first portion of the bake helps create steam, which is essential for achieving a good crust.
- Baking Time: Adjust the total baking time by starting with 20-30 minutes covered and then 15-30 minutes uncovered, depending on the desired crust color.
- Hydration Levels: If your dough is particularly hydrated, consider decreasing the baking temperature slightly to avoid burning the crust before the interior is fully cooked.
The ideal temperature for baking sourdough in a Dutch oven is typically between 450°F to 500°F (232°C to 260°C). This high heat is crucial for developing a crispy crust and ensuring the bread rises properly during the initial baking phase.
It’s crucial to preheat the Dutch oven for at least 30 minutes before placing the dough inside. This ensures that the cast iron retains enough heat to create a burst of steam when the dough is placed in, which is vital for optimal oven spring and crust formation.
Baking with the lid on for the first portion of the bake helps create steam, which is essential for achieving a good crust. The lid traps the moisture released from the dough, allowing for a better rise and a more flavorful crust.
Adjust the total baking time by starting with 20-30 minutes covered and then 15-30 minutes uncovered, depending on the desired crust color. This method allows the interior of the bread to cook through while developing a beautifully crisp exterior.
If your dough is particularly hydrated, consider decreasing the baking temperature slightly to avoid burning the crust before the interior is fully cooked. This helps ensure that the bread remains soft and chewy inside while still achieving a desirable crust on the outside.
How Long Should You Bake Sourdough Bread for Optimal Results?
The optimal baking time and temperature for sourdough bread in a Dutch oven are crucial for achieving the best results.
- Temperature: The best temperature to bake sourdough in a Dutch oven is typically around 450°F (232°C).
- Baking time: The total baking time usually ranges from 30 to 45 minutes, depending on the size of the loaf.
- Initial baking phase: The first 20 to 30 minutes should be covered to create steam.
- Final baking phase: The last 10 to 15 minutes should be uncovered to achieve a golden crust.
The best temperature to bake sourdough in a Dutch oven is typically around 450°F (232°C), as this high heat allows the bread to rise effectively and develop a crispy crust. Maintaining this temperature throughout the baking process ensures the interior cooks evenly while the exterior becomes beautifully browned.
The total baking time usually ranges from 30 to 45 minutes, depending on the size of the loaf and the specific recipe being used. A larger loaf may require more time to ensure that the center is fully baked without burning the crust.
The initial baking phase should last about 20 to 30 minutes, during which the Dutch oven is covered. This covered environment traps steam, which is vital for good oven spring and helps form a moist interior.
For the final baking phase, uncover the Dutch oven for the last 10 to 15 minutes. This step allows the crust to harden and develop a rich, golden-brown color, enhancing both the flavor and texture of the sourdough bread.
What Mistakes Should You Avoid When Baking Sourdough in a Dutch Oven?
When baking sourdough in a Dutch oven, it is crucial to avoid common mistakes that can affect the final outcome.
- Incorrect Temperature Settings: Using incorrect temperature settings can lead to undercooked or overcooked bread. The best temp to bake sourdough in a Dutch oven typically ranges from 450°F to 475°F, allowing for a good rise and crust formation.
- Not Preheating the Dutch Oven: Failing to preheat your Dutch oven can result in a dense loaf with insufficient oven spring. Preheating the pot for at least 30 minutes ensures that the bread starts baking in a hot environment, which is essential for achieving a crispy crust.
- Over-proofing the Dough: Over-proofing can cause the dough to collapse, leading to a flat loaf. It’s important to monitor the dough closely and perform the poke test to ensure it has risen just enough before baking.
- Neglecting Steam Creation: Steam is vital during the initial baking phase to create a good crust. If you don’t cover the Dutch oven for the first part of baking, you risk missing out on the steam that helps to achieve that desired crust texture.
- Using the Wrong Flour: Using flour with inappropriate protein content can affect the bread’s structure. Opt for bread flour with higher protein content to ensure good gluten development, which is crucial for the rise and texture of sourdough.
- Ignoring Dough Temperature: The dough temperature at the time of baking can significantly impact the fermentation process. Ideally, the dough should be around 75°F to 80°F before baking; higher temperatures can lead to over-fermentation.
- Cutting the Score Too Deep or Shallow: Scoring the dough improperly can result in uneven expansion. A shallow score may not allow for proper oven spring, while a deep cut can lead to the loaf collapsing; aim for about a ¼ inch deep cut.