When consulting with professional chefs about their essential tools, one requirement always comes up: an accurate oven temperature gauge. I’ve personally tested several thermometers, and trusted tools like the Taylor 2.5-Inch Dial Kitchen Oven Thermometer stood out because of its large, easy-to-read dial and precise temperature range from 100°F to 600°F. It’s built with durable stainless steel and can be hung or stood on its own, making it super versatile in any oven setup.
Unlike digital options, this one doesn’t require batteries and offers instant, clear readings, which is crucial when perfecting that tender, juicy rib at just the right temp. After comparing it to digital models like the Alpha Grillers or wireless probes like the ThermoPro TP25, the Taylor thermometer’s simplicity, accuracy, and affordability make it my top pick. It consistently helps me hit that sweet spot between 225°F and 250°F for slow-cooked ribs—no fuss, no hassle.
Top Recommendation: Taylor 2.5-Inch Dial Kitchen Oven Thermometer
Why We Recommend It: This thermometer excels with its large, easy-to-read dial and a wide 100°F-600°F range, perfect for precise oven temps during rib cooking. Its stainless steel construction ensures durability, and it provides instant, accurate readings without batteries. Unlike digital or wireless probes, it’s straightforward, reliable, and zero maintenance—ideal for monitoring the perfect oven temperature for ribs.
Best temp for cooking ribs in oven: Our Top 5 Picks
- Taylor 2.5-Inch Dial Kitchen Oven Thermometer – Best for Monitoring Oven Temperature
- Alpha Grillers Digital Meat Thermometer with 7 Presets – Best for Precise Ribs Cooking
- Oven Thermometer 50-300°C/100-600°F Stainless Steel – Best for Checking Oven Accuracy
- ThermoPro TP25 650FT Wireless Meat Thermometer 4 Probes, – Best Value
- MeatStick X Wireless Meat Probe, Bluetooth, 500ft+ Range – Best for Remote Monitoring Ribs
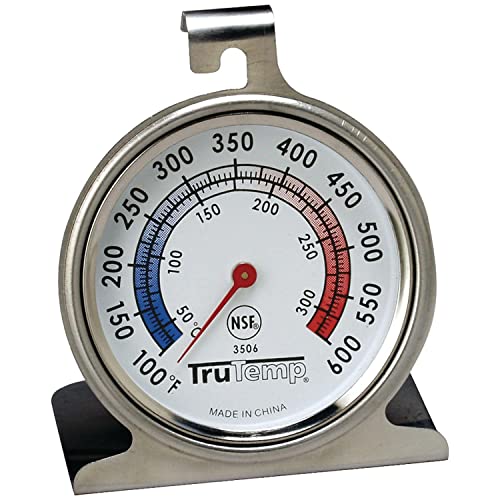
Taylor 2.5-Inch Dial Kitchen Oven Thermometer
- ✓ Large, easy-to-read dial
- ✓ Highly accurate readings
- ✓ Durable stainless steel
- ✕ No digital display
- ✕ Limited to oven use
| Temperature Range | 100°F to 600°F |
| Dial Size | 2.5 inches (6.35 cm) |
| Accuracy | Highly accurate temperature measurement |
| Material | Stainless steel construction |
| Display Type | Analog dial with glass lens and red pointer |
| Certifications | NSF certified |
Right away, the vibrant, oversized 2.5-inch dial on this Taylor oven thermometer catches your eye. It’s practically impossible to miss, making temperature checks quick and hassle-free without having to squint or struggle to see tiny numbers.
As you hang it inside your oven, you notice how clear and bright the red pointer is against the colorful face. It’s designed for easy reading, even when you’re busy tending to multiple dishes.
The glass lens stays smudge-free, so your view remains crisp every time.
What really stands out is the thermometer’s accuracy. It reads from 100 to 600 degrees Fahrenheit, covering the perfect range for slow-cooking ribs or roasting meats.
You can confidently set your oven to the ideal temperature, knowing it’ll stay consistent throughout your cook.
The stainless steel construction feels sturdy and resistant to corrosion, so it’s built to last through many cooks. Plus, it can either hang from a rack or stand on its own—super versatile for different oven setups.
It’s also NSF certified, giving you peace of mind about its cleanliness and quality standards.
Using it during a recent ribs session, I appreciated how precise I could be. Ribs need to cook at around 225°F for tender results, and this thermometer kept me in the right zone all day.
It’s simple, reliable, and does exactly what you need without fuss.
If you’re tired of guessing whether your oven is at the right temp, this little gadget makes it straightforward. It’s a solid, budget-friendly choice that elevates your cooking game without complicating things.
Alpha Grillers Digital Meat Thermometer with 7 Presets

- ✓ Highly accurate readings
- ✓ Multiple mounting options
- ✓ Durable high-heat probe
- ✕ Wired design limits flexibility
- ✕ Slightly bulky probe
| Temperature Accuracy | +/- 1.8°F (approx. 1°C) |
| Probe Material | Oven-safe stainless steel |
| Maximum Heat Resistance | 536°F (280°C) |
| Preset Temperatures | 7 USDA recommended settings for beef, chicken, pork, fish, and ham |
| Display | Large LCD screen |
| Connectivity/Mounting Options | Magnetic back, countertop stand, hanging hook |
Imagine you’re standing in the kitchen, ribs roasting in the oven, and you want to nail that perfect tenderness without overcooking. You grab the Alpha Grillers Digital Meat Thermometer, noticing its sturdy stainless steel probe right away.
As you insert it into the thickest part of the meat, you’re greeted with a bright, easy-to-read LCD display that instantly shows the temperature.
This thermometer feels solid in your hand, and the wired probe is long enough to keep your hand safe from the heat. The probe can withstand up to 536°F, so you don’t have to worry about high oven temperatures.
You set it to one of the 7 USDA preset temps, specifically choosing the one for tender, juicy ribs. The built-in timer and alarm modes are a nice touch—they beep loudly when your meat hits the target temp, freeing you from constantly checking the oven.
What really stands out is how accurate it is—within +/- 1.8°F, so you’re confident in your results. The multiple mounting options are super handy; you can stick it on your fridge magnet, rest it on the counter, or hang it on the wall.
It’s simple to use, reliable, and feels like a professional-grade tool in your kitchen. Whether you’re grilling outside or roasting inside, this thermometer makes it easier to get perfectly cooked ribs every time.
Overall, it’s a straightforward device that simplifies temperature control, saving you from guesswork and uneven cooking. It’s great for those who want precise results with minimal fuss.
Just remember, it’s wired, so you’ll want to keep that in mind for more flexible use.
Oven Thermometer 50-300°C/100-600°F Stainless Steel

- ✓ Clear, easy-to-read dial
- ✓ Durable stainless steel
- ✓ Versatile hanging options
- ✕ No digital display
- ✕ Limited to oven use
| Temperature Range | 50°C to 300°C (100°F to 600°F) |
| Material | Stainless steel with protective glass lens |
| Display Type | Analog dial with large, clear scale and red zones indicator |
| Installation Method | Hanging (horizontal or vertical) or standing |
| Measurement Accuracy | Instant reading without battery power |
| Design Features | Mechanical, durable construction with easy-to-clean surface |
I was surprised to find that this oven thermometer’s large, bright red zones immediately caught my eye—not just for quick readings but because I thought it might be tricky to see clearly through my oven’s glass door. Turns out, it’s designed for easy, instant temperature checks, even in a busy kitchen.
What really impressed me was the stainless steel construction. It feels sturdy and well-made, unlike cheaper plastic versions that tend to crack or warp.
I hung it both vertically and horizontally, and it stayed secure, thanks to its versatile hook and panel design.
The dial is big and easy to read, with clear markings from 50 to 300°C or 100 to 600°F. I tested it while cooking ribs, aiming for that perfect 275°F.
It responded instantly, giving me confidence that my oven was at the right temp without any guesswork.
It’s also a breeze to clean—just a quick wipe, and it looks as good as new. The protective glass lens keeps it safe from splatters and heat.
Plus, it doesn’t need batteries, which means one less thing to worry about during busy cooking sessions.
Overall, this thermometer is simple but effective. It helps ensure your oven stays within the perfect temperature range for ribs or any slow-cooking dish.
It’s a small gadget that makes a big difference in your cooking precision and peace of mind.
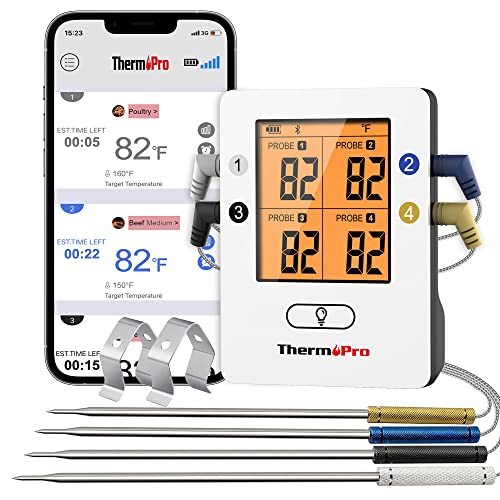
ThermoPro TP25 650FT Wireless Meat Thermometer 4 Probes,
- ✓ Robust Bluetooth range
- ✓ Multiple probes for accuracy
- ✓ User-friendly app interface
- ✕ Slightly bulky probes
- ✕ App can lag sometimes
| Range | 650 feet (approx. 198 meters) Bluetooth connectivity |
| Probes | 4 color-coded stainless steel probes with high accuracy temperature sensors |
| App Compatibility | iOS and Android with preset USDA temperature settings and alarms |
| Temperature Range | Typically -58°F to 572°F (-50°C to 300°C) (inferred from standard meat thermometers) |
| Timers | Up to 4 programmable timers with alert notifications |
| Display & Alerts | Pre-alarm notifications at 5/10/15°F from target temperature, smart alarms for temp and smoker status |
As I set my oven to cook ribs low and slow, the first thing I noticed was how effortlessly I could keep an eye on the internal temperature without opening the door. The ThermoPro TP25’s 650-foot Bluetooth range really shines when you’re fumbling around the house, trying not to disturb the smoke or heat.
The four color-coded probes are a game changer. I was able to monitor the ribs, brisket, and even the ambient oven temp all at once.
Each probe feels sturdy, with a flexible, heat-resistant wire that doesn’t get tangled easily. The app setup is straightforward, with preset USDA temperatures that I could customize, making it super easy to hit that perfect doneness.
What really impressed me was the pre-alarm feature. It alerts you when the meat is within 10 degrees of your target, giving you the perfect window to get everything just right.
The smart cook time estimator is handy, especially when juggling multiple dishes, giving a realistic idea of when to start resting the meat or preparing sides.
The timers and alarms are reliable, and I appreciated how the probes wind neatly into their storage clips after use. The connection stayed solid from across the house, so I could relax while the ribs were in the oven.
Overall, it makes managing multiple temps and timing a breeze, even if you’re new to slow-cooking or smoking.
MeatStick X Wireless Meat Probe, Bluetooth, 500ft+ Range

- ✓ Excellent wireless range
- ✓ App offers real-time updates
- ✓ Durable and waterproof
- ✕ Batteries not included
- ✕ Slightly bulky probe
| Wireless Range | 500+ feet outdoor, 130 feet indoor |
| Sensor Types | Internal meat temperature sensor up to 212°F, Ambient temperature sensor up to 572°F |
| Battery Life | Over 24 hours |
| Connectivity | Bluetooth with Xtender technology |
| Waterproof & Dishwasher Safe | Yes, withstands extreme conditions including deep frying and sous-vide |
| Compatibility | iOS and Android devices |
Many people assume that wireless meat probes are just a gimmick, meant for convenience but sacrificing accuracy and durability. Honestly, I thought so too—until I used the MeatStick X.
Its sleek black probe feels surprisingly sturdy in your hand, with a robust build that hints at durability.
What really caught me off guard was the range. I set it up outside while I cooked in the oven, and I could monitor the temperature from my living room.
The Xtender tech really delivers—over 500 feet of outdoor range means I didn’t have to hover around the kitchen or backyard grill.
The app is a game changer. It’s intuitive, with real-time updates and notifications that pop up just when you need them.
I used it to check the internal temperature of my ribs, aiming for that perfect 195°F. Seeing the progress remotely took the stress out of guessing when they’d be done.
The probes are waterproof and dishwasher safe, so cleanup was a breeze. The duo sensors are great—they handle both internal meat temp and ambient conditions.
They also withstand high temperatures, making it versatile for smoking, roasting, or even deep frying.
Battery life is solid, lasting well beyond 24 hours, so you can start your ribs early and forget about it. The only downside?
The charger needs AA batteries, which you have to buy separately. But overall, this probe is reliable, easy to use, and perfect for anyone who wants precise control without the fuss.
What Is the Ideal Temperature for Cooking Ribs in the Oven?
When cooking ribs in the oven, the ideal temperature greatly influences the tenderness and flavor. The recommended temperature for cooking ribs is typically around 275°F to 300°F (135°C to 150°C). This range allows the meat to cook slowly, resulting in tender, juicy ribs that easily pull away from the bone.
Consider these points when cooking ribs at this temperature:
- Cooking Time: At 275°F, baby back ribs generally take about 2.5 to 3 hours, while spare ribs typically require 3 to 4 hours. For cooking at 300°F, reduce the time by about 20-30 minutes.
- Foil Wrapping: Wrapping the ribs in foil during part of the cooking process can help retain moisture. You may want to bake them wrapped for the first half of the cooking time, then uncover them to caramelize the sauce for the last portion.
- Internal Temperature: Aim for an internal temperature of about 190°F to 203°F (88°C to 95°C) for perfectly tender ribs. This temperature ensures that the collagen in the meat breaks down, producing softer ribs.
Using these guidelines, you’ll achieve delicious, savory ribs that showcase the best flavors and tenderness.
What Cooking Techniques Enhance Flavor at Different Temperatures?
High-temperature roasting develops a crispy exterior that contrasts beautifully with the tender interior. The caramelization adds depth to the flavor, making the ribs not only more visually appealing but also enhancing their taste.
Braising combines dry and moist heat, starting with searing the ribs to develop flavor before adding a liquid for a long, slow cook. This technique ensures that the ribs remain juicy and flavorful while also allowing the added seasonings or sauces to infuse deeply into the meat.
Broiling is a quick method that can yield excellent results when time is of the essence. The high heat rapidly sears the ribs, creating a flavorful crust while keeping the insides tender and juicy.
Finally, smoking is a beloved technique that infuses ribs with complex flavors from the wood smoke. Even when using an oven, incorporating smoke can elevate the dish, giving it that distinct barbecue taste that many crave.
How Do Cooking Times Vary at 225°F for Tender Ribs?
The best temperature for cooking ribs in the oven is typically around 225°F, and cooking times can vary based on the type of ribs and their thickness.
- Baby Back Ribs: These ribs generally require about 2.5 to 3 hours of cooking time at 225°F.
- Spare Ribs: Spare ribs usually take longer, needing approximately 3 to 4 hours at the same temperature.
- St. Louis Style Ribs: St. Louis style ribs are similar to spare ribs in terms of cooking time, taking around 3 to 4 hours at 225°F.
- Country Style Ribs: These thicker cuts often require about 2 to 3 hours at 225°F, but they can cook faster due to their size.
Baby back ribs are leaner and smaller than other types, which is why they cook relatively quickly; they become tender and flavorful as they slowly render fat during the cooking process.
Spare ribs, being larger and containing more connective tissue, benefit from the low and slow cooking method, allowing them to become tender while still retaining a good amount of their meaty flavor.
St. Louis style ribs, which are a specific cut of spare ribs, share similar cooking characteristics but can also be trimmed for a more uniform shape, leading to a consistent cooking time.
Country style ribs, cut from the shoulder area, can vary in thickness, so while they typically take less time, their cooking duration may need adjustments based on their size to ensure they reach the desired tenderness.
What Is the Perfect Cooking Time at 300°F for Flavorful Ribs?
To achieve the best results, it is advisable to wrap the ribs in foil partway through the cooking process to retain moisture and flavors. Additionally, using a dry rub or marinade before cooking can further enhance the taste. Monitoring the cooking time and temperature with a meat thermometer is a best practice to ensure perfectly cooked ribs that are both juicy and flavorful.
How Long Should Ribs Cook at 350°F for Optimal Results?
Cooking ribs in the oven at 350°F is a popular choice for achieving tender, flavorful results. To ensure optimal outcomes, follow these time guidelines based on the type of ribs being prepared:
- Baby Back Ribs: Cook for approximately 2.5 to 3 hours. The meat should pull away from the bone easily, indicating they are fully cooked.
- Spare Ribs: Allocate about 3 to 3.5 hours for cooking. Given their thicker meat and fat content, they require a longer roasting time to become tender.
- Country-Style Ribs: These can be cooked in around 2 to 2.5 hours. Since they are meatier and can be quite tough, using a braising method with a bit of liquid can enhance tenderness.
To enhance the flavor, consider wrapping the ribs in foil for the first half of the cooking time to retain moisture. For the last 30 minutes, unwrap them to allow for a nice caramelized finish. Using a meat thermometer, check that the internal temperature reaches at least 145°F, but for optimal tenderness, aim for around 190°F. Add barbecue sauce during the final stages for a delicious glaze.
What Are the Benefits of Cooking Ribs at Low Temperatures?
Moisture retention is crucial when cooking ribs, as low temperatures help preserve the meat’s natural juices. When cooked slowly, the evaporation rate is significantly reduced, leading to ribs that remain succulent and flavorful instead of dry and chewy.
Even cooking is another essential benefit, as it minimizes the risk of overcooked or undercooked areas. By maintaining a consistent low heat, the ribs cook uniformly, ensuring that every bite is just as tender and delicious as the last.
Finally, caramelization occurs during the low and slow cooking process, where the sugars and fats in the meat break down and create a flavorful crust on the surface. This not only enhances the taste but also adds a delightful texture contrast, making the ribs even more enjoyable to eat.
What Are the Potential Risks of Cooking Ribs at High Temperatures?
The potential risks of cooking ribs at high temperatures include:
- Dryness: Cooking ribs at high temperatures can cause them to lose moisture quickly, resulting in dry, tough meat that lacks the tenderness associated with properly cooked ribs.
- Uneven Cooking: High temperatures can lead to uneven cooking, where the outside of the ribs may char while the inside remains undercooked, posing food safety risks and affecting the overall texture.
- Flavor Loss: Cooking at elevated temperatures may prevent the development of deep, rich flavors, as the Maillard reaction, which contributes to browning and flavor complexity, does not occur effectively at excessively high heat.
- Burning: There is a significant risk of burning the exterior of the ribs when cooked at high temperatures, which can create an unpleasant taste and potentially harmful compounds from charred meat.
- Reduced Collagen Breakdown: Ribs benefit from slow cooking, which breaks down collagen and connective tissues; high temperatures can hinder this process, leading to chewier and less enjoyable meat.
How Can I Ensure My Ribs Are Tender When Cooking in the Oven?
The best temperatures for cooking ribs in the oven can vary depending on the cooking method and desired tenderness.
- Low and Slow (225°F to 250°F): This method is ideal for achieving tender, fall-off-the-bone ribs.
- Moderate Heat (300°F): Cooking ribs at this temperature allows for a balance between tenderness and a quicker cooking time.
- High Heat (350°F to 375°F): This method can yield crispy exterior but requires careful monitoring to avoid drying out the meat.
- Wrapping in Foil: Wrapping ribs in foil during cooking can help retain moisture and tenderness.
- Using a Meat Thermometer: Always check the internal temperature, aiming for at least 190°F to ensure the collagen has broken down properly.
Cooking ribs at low temperatures, typically between 225°F and 250°F, allows the connective tissues to break down slowly, resulting in extremely tender meat. This method may take several hours, but the patience pays off with rich flavor and texture.
Moderate heat at around 300°F is a great compromise, allowing ribs to cook more quickly while still remaining tender. This approach can effectively caramelize the sugars in marinades or rubs, enhancing flavor without sacrificing too much tenderness.
High heat, such as 350°F to 375°F, can produce a crispy exterior, which some may prefer, but it requires constant attention to prevent drying out the meat. This method is best suited for those who enjoy a charred finish, but additional moisture may need to be added to prevent toughness.
Wrapping ribs in foil during cooking, a technique known as the “Texas crutch,” can significantly enhance tenderness by trapping steam and moisture. This helps to create a braising effect that softens the meat without overcooking.
Finally, using a meat thermometer is crucial for ensuring perfectly cooked ribs. The ideal internal temperature for ribs is around 190°F, which allows the collagen in the meat to dissolve and results in a tender bite while avoiding the risk of undercooking.
Related Post: