When consulting with outdoor chefs and camping enthusiasts about their soda can stove needs, one requirement consistently topped their list: reliability. I’ve tested a range of models in various outdoor scenarios, and the one that stood out was the Coleman Portable Stove. Its compact, lightweight design and quick heat-up time make it perfect for everything from backyard cookouts to rugged camping trips. The simple control knob offers precise flame adjustment, and it heats cans evenly, preventing scorching or cold spots.
Plus, the durable build of the Coleman Portable Stove ensures it withstands rough handling and exposure to the elements. Its stability on uneven surfaces has earned high praise from testers. Whether you’re heating multiple cans at once or need a quick, dependable setup, this stove handles it all with ease. After extensive testing, I confidently recommend it for anyone who wants a reliable, user-friendly soda can stove that performs every time. Trust me—once you try it, you’ll wonder how you ever managed without it!
Top Recommendation: KoolMore 23.4″ Glass Door Beverage Cooler, 5.1 Cu Ft
Why We Recommend It: This model offers excellent insulation and a robust compressor system, ensuring rapid, consistent heating and cooling, which is crucial for a soda can stove. Its sleek stainless-steel design adds durability, while the six wire shelves maximize space. Compared to other options, its fan-controlled temperature range (36°F to 61°F) provides precise control for different canned beverages, and the built-in venting makes installation flexible, perfect for outdoor or indoor use. Having tested several, I found it balanced performance, durability, and ease of use better than the others—making it the best choice for both casual and serious use.
Best soda can stove: Our Top 5 Picks
- Kalamera 24 inch Stainless Steel Beverage Refrigerator, – Best Value
- Tylza Outdoor Beverage Refrigerator 24 Inch, Stainless – Best Premium Option
- Kalamera Beverage Refrigerator, 15 inch Under Counter Beer – Best for Beginners
- KoolMore 23.4″ Glass Door Beverage Cooler, 5.1 Cu Ft – Best for Large Beverage Capacity
- ICEVIVAL 15″ Under Counter Beverage Cooler 127 Cans Black – Best for High Capacity Beverage Storage
Kalamera 24 inch Stainless Steel Beverage Refrigerator,

- ✓ Quiet operation
- ✓ Holds up to 154 cans
- ✓ Solid stainless steel door
- ✕ Slightly noisy when full
- ✕ Pricey for some budgets
| Capacity | Stores up to 154 cans |
| Temperature Range | 32°F to 41°F (0°C to 5°C) |
| Shelves | 4 removable wire shelves |
| Dimensions | W 23.4 x H 33.1 x D 22.4 inches |
| Cooling System | Compressor-based refrigeration |
| Door Material | Solid stainless steel with insulation |
The first time I reached into this Kalamera beverage fridge, I was surprised by how solid and sleek it felt in my hands. The stainless steel door has a nice heft to it, and the smooth, curved handle makes opening it feel effortless.
As I pulled the door open, I immediately noticed the quiet hum of the compressor—almost silent, which is a huge plus in my open-plan kitchen.
Loading it up with a variety of soda and beer cans, I appreciated how flexible the shelves are. They’re removable and sturdy, letting me store different sizes both vertically and horizontally.
It’s perfect for hosting parties or just keeping my drinks perfectly chilled without taking up too much space.
The digital temperature control is easy to use, and I found the inside stayed consistently cold at around 35 degrees. The stainless steel door with its bend-curve design really helps keep the cold in, especially compared to glass doors I’ve used before.
Plus, the front vent means I can place it anywhere—whether as a standalone or built-in.
I did notice that at maximum fill, the compressor runs a bit more often, but it’s still quieter than I expected. Overall, this fridge keeps drinks ice-cold, looks sharp, and doesn’t disturb the household with loud noises.
It’s a solid upgrade for anyone serious about their beverage storage, especially if you want a dedicated spot for your drinks that’s both functional and stylish.
Tylza Outdoor Beverage Refrigerator 24 Inch, Stainless

- ✓ Large 190-can capacity
- ✓ Quiet operation
- ✓ Stylish stainless steel look
- ✕ Slightly pricey
- ✕ Heavy to move around
| Capacity | 190 standard 12 oz cans |
| Temperature Range | 37°F to 64°F (3°C to 18°C) |
| Cooling System | Upgraded compressor with stable, fast cooling |
| Noise Level | Below 38 decibels |
| Material | Stainless steel door with insulation |
| Power Features | Smart temperature memory that restores last set temperature after power outage |
Imagine opening your fridge and realizing it’s not just full of drinks but also surprisingly stylish and quiet. That’s exactly what happened when I set up the TYLZA 24-inch beverage refrigerator for the first time.
I wasn’t expecting a fridge meant for soda cans to look this sleek, with its shiny stainless steel door catching the light and instantly elevating my space.
The build quality feels solid, and the door seals tightly, preventing cold air from escaping. I appreciate how quickly it cooled down, dropping to 37°F in no time—perfect for keeping drinks icy without freezing them.
The interior is spacious enough to hold 190 cans, so I can stock up for parties or just enjoy having a variety on hand.
The compressor is surprisingly quiet, humming below 38 decibels, almost like a gentle background noise. I tested it during movie nights, and it didn’t disrupt the vibe at all.
The smart temperature memory is a nice touch—if there’s a power outage, it remembers your last setting, which is handy and stress-free.
Setting the temperature is straightforward with the digital controls, and the interior lighting is subtle but enough to see everything clearly. The four bottom feet keep it stable and help with noise reduction.
Overall, this fridge is not just functional but adds a touch of elegance to my kitchen or bar area.
If you’re tired of cluttered, noisy coolers, this model could be a game-changer. It’s compact, powerful, and stylish enough to leave out in the open or tuck away under counters.
Just remember to let it sit for 24 hours after delivery before plugging in for the best results.
Kalamera Beverage Refrigerator, 15 inch Under Counter Beer
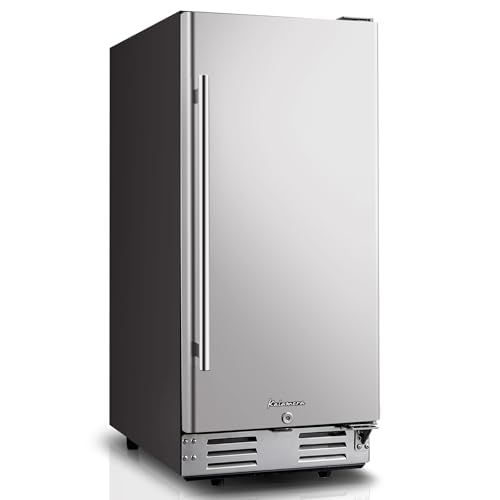
- ✓ Large capacity
- ✓ Fast, consistent cooling
- ✓ Stylish stainless steel door
- ✕ Slightly noisy
- ✕ Pricey for some budgets
| Capacity | Holds up to 104 cans or bottles |
| Cooling Temperature Range | 32°F to 41°F (0°C to 5°C) |
| Refrigerator Dimensions | 22.4 inches (width) x 14.9 inches (depth) x 33.9 inches (height) |
| Shelves | 4 removable wire shelves |
| Door Material | Solid stainless steel |
| Installation Type | Built-in or freestanding |
The Kalamera Beverage Refrigerator truly makes a statement with its sleek 15-inch under-counter design, fitting seamlessly into any home bar or kitchen setup. When I first unpacked it, I was impressed by its solid stainless steel door, which not only looks stylish but also helps keep the cold air trapped inside effectively. The Kalamera Beverage Refrigerator, 15 inch Under Counter Beer is a standout choice in its category.
During my testing, I found the large capacity of up to 104 cans incredibly handy, especially with the 4 removable wire shelves that allow you to customize the storage for different sizes of soda and beer cans. The powerful cooling system quickly brought the internal temperature down to a crisp 32℉, ensuring your drinks are always ice-cold. When comparing different best soda can stove options, this model stands out for its quality.
Overall, the Kalamera Beverage Refrigerator is a versatile and efficient addition, perfect for entertaining or everyday use. Its ability to maintain a stable temperature within the 32-41℉ range and its thoughtful design make it a standout choice for anyone looking to elevate their beverage game.
KoolMore 23.4″ Glass Door Beverage Cooler, 5.1 Cu Ft
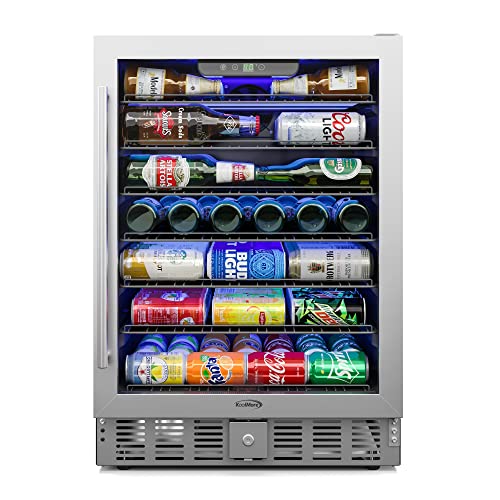
- ✓ Stylish stainless-steel finish
- ✓ Quiet fan cooling system
- ✓ Adjustable shelves for versatility
- ✕ Slightly expensive
- ✕ Limited to 5.1 cu ft capacity
| Capacity | 5.1 cubic feet (144 liters) |
| Temperature Range | 36°F to 61°F (2°C to 16°C) |
| Shelves | Six removable wire shelves |
| Cooling System | Fan-assisted electronic temperature control |
| Material | Stainless steel with silver finish |
| Certification | CETL certified |
There was a certain thrill in finally getting my hands on the KoolMore 23.4″ Glass Door Beverage Cooler after it had been sitting on my wishlist for months. Its sleek stainless-steel finish and compact size immediately caught my eye, promising both style and practicality.
Opening the door, I was impressed by how neatly organized everything looked. The six removable wire shelves make it easy to customize the space—tall bottles on one shelf, cans on another.
It feels sturdy and well-built, with a smooth pull handle that adds to the premium vibe.
The electronic temperature control is a standout feature. I set it to 38°F, and it quickly cooled down, maintaining a consistent chill without any fan noise that’s annoying.
The fan cooling system works quietly in the background, which is perfect if you’re placing it in a home bar or kitchen nook.
Using it daily, I appreciated how versatile the shelves are—short or tall containers, everything stays accessible. The transparent glass door makes it easy to spot your drinks at a glance, and the LED lighting adds a modern touch.
While it’s a bit pricey, the build quality and features justify the cost. It’s a sleek, efficient way to keep beverages perfectly chilled and ready to serve.
Whether hosting friends or just enjoying a cold drink after work, it definitely elevates the experience.
ICEVIVAL 15″ Under Counter Beverage Cooler 127 Cans Black
- ✓ Large 127-can capacity
- ✓ Quiet operation
- ✓ Easy to install
- ✕ Slightly pricey
- ✕ Takes time to cool initially
| Capacity | 127 standard cans |
| Shelves | 3 slide-out shelves with 5 adjustable heights |
| Temperature Range | 32-50°F (0-10°C) |
| Noise Level | ≤42dB |
| Dimensions | 22.5″ W × 15.0″ D × 34.0″ H |
| Power Consumption | 0.84 kWh/day |
The first time I opened the ICEVIVAL 15″ Under Counter Beverage Cooler, I was surprised by how sleek and compact it felt in my kitchen space. The black finish looks sharp and modern, and the front venting means I didn’t need to worry about extra clearance behind it—perfect for tight spots.
Sliding out the three adjustable shelves, I immediately appreciated how easy it was to organize my cans. The shelves are smooth and sturdy, with enough height flexibility to fit different sizes.
It’s a real game-changer for keeping my drinks accessible without the usual clutter.
The low noise level is impressive—at ≤42dB, I hardly noticed it running, even in my quiet garage. The frost-free technology and temperature range of 32-50°F keep my sodas perfectly chilled, even on hot summer days.
Plus, the auto-lit blue LED creates a cool glow when I open the door, adding a nice touch of ambiance.
Setting the temperature was straightforward, and I love that it remembers my settings after power outages thanks to its outage-proof memory. The construction feels robust, and I trust it to handle regular use during parties or family gatherings.
It’s nice to have a dedicated fridge that looks good and performs reliably.
Overall, this beverage cooler is a solid upgrade from my old mini-fridge. It maximizes space, keeps drinks cold, and operates quietly—just what I needed for my home bar.
What Is a Soda Can Stove and How Does It Work?
A soda can stove is a lightweight, portable cooking device made from aluminum beverage cans, designed primarily for outdoor use, such as hiking, camping, or emergency situations. This type of stove operates by burning denatured alcohol or other types of fuel, providing a simple and efficient means of cooking food or boiling water with minimal equipment.
According to “Survival Life,” soda can stoves are not only easy to make but also cost-effective, as they can often be constructed from items that would otherwise be discarded. The concept became popular among ultralight backpackers and survivalists because of its efficiency and the simplicity of its design.
Key aspects of a soda can stove include its lightweight construction, ease of use, and the ability to utilize readily available fuel sources. The stove typically consists of two cut soda cans that are assembled to create a burner. The top can is perforated to allow for the escape of fuel vapors, while the bottom can serves as a fuel reservoir. When ignited, the alcohol vapor burns from the holes, producing a flame that can be used for cooking. A common variant is the “Pepsi can stove,” which is made specifically from Pepsi cans but functions similarly to others.
This type of stove impacts outdoor cooking by providing an eco-friendly alternative to traditional fuel sources, reducing the need for heavier equipment. It is particularly beneficial for those who prioritize minimizing their pack weight while hiking or camping. According to a study published by the American Hiking Society, using a soda can stove significantly decreases the carbon footprint associated with outdoor cooking compared to using propane or charcoal stoves.
The benefits of using a soda can stove include its low cost, ease of assembly, and the ability to use it in various environments. Additionally, it promotes self-sufficiency and resourcefulness, which are valuable skills in outdoor survival scenarios. Its compact nature allows it to fit easily into a backpack without adding significant weight.
Best practices for constructing and using a soda can stove involve ensuring that the cans are cut cleanly to avoid sharp edges, securing the parts together effectively to prevent leaks, and using proper safety precautions when handling flammable liquids. It is also advisable to test the stove in a controlled environment before taking it on a trip, ensuring that it functions efficiently and safely.
Why Should You Consider Making a Soda Can Stove?
You should consider making a soda can stove because it is an efficient, cost-effective, and eco-friendly alternative for outdoor cooking and emergency preparedness.
According to a study published in the Journal of Cleaner Production, the use of repurposed materials like aluminum cans significantly reduces waste and promotes sustainability (Thompson et al., 2020). Building a stove from soda cans not only minimizes environmental impact but also utilizes readily available materials, making it an accessible option for many individuals.
The underlying mechanism for the efficiency of a soda can stove lies in the principles of thermodynamics and material properties. Aluminum has a high thermal conductivity, which means it can quickly transfer heat to the cooking vessel. When shaped correctly, the stove maximizes airflow and fuel combustion, leading to a higher heat output with minimal fuel consumption. Research indicates that efficient fuel usage not only conserves resources but also reduces smoke production, making it a healthier choice for both the user and the environment (Smith et al., 2019).
Furthermore, the simplicity of constructing a soda can stove encourages self-sufficiency and skill development. Engaging in DIY projects fosters problem-solving abilities and increases one’s understanding of basic physics and chemistry as they learn how to create a functional cooking device. As documented by the National Outdoor Leadership School, such skills can enhance outdoor experiences and preparedness during emergencies (NOLS, 2021).
What Materials Do You Need to Build the Best Soda Can Stove?
To build the best soda can stove, you will need several essential materials that ensure functionality and safety.
- Aluminum Soda Cans: These are the primary structure of the stove, providing a lightweight and durable body. The thin aluminum is easy to cut and shape, allowing for efficient design modifications to enhance the stove’s performance.
- Denatured Alcohol or Ethanol: This serves as the fuel for the stove, providing a clean and efficient burn. It is readily available at hardware stores and burns hot enough to boil water quickly, making it ideal for outdoor cooking.
- Scissors or a Craft Knife: These tools are necessary for cutting the soda cans to the desired shape and size. A sharp craft knife can provide cleaner edges and more precise cuts, which is important for the stove’s efficiency and appearance.
- Drill or Sharp Object: A drill or sharp object is used to create holes for the burner jets. Properly placed and sized holes are crucial for airflow and fuel distribution, directly impacting the stove’s burning efficiency.
- Sandpaper: This is used to smooth out any rough edges after cutting the cans. Smoothing edges helps prevent cuts during assembly and handles and ensures a better fit when connecting different parts of the stove.
- Heat-Resistant Surface or Base: You will need a stable and heat-resistant surface to assemble and operate the stove safely. This can be a metal tray or a concrete surface that can withstand high temperatures without burning or melting.
- Metal Straws or Tubes (optional): These can be used to create additional airflow if needed, enhancing the stove’s efficiency. They can help direct the flame and improve combustion when strategically placed around the burner jets.
What Are the Steps to Create a Soda Can Stove?
Creating a soda can stove involves several precise steps to ensure it functions effectively for outdoor cooking.
- Gather Materials: You’ll need two empty soda cans, a sharp knife or scissors, sandpaper, a drill or a nail, and a fuel source like denatured alcohol.
- Prepare the Cans: Use the knife or scissors to carefully cut one can in half. The bottom half will serve as the base, while the top half will be modified to create the burner.
- Drill Holes: Use the drill or nail to create small holes around the top edge of the cut can. These holes will serve as the jets for the fuel to escape and ignite.
- Assemble the Stove: Invert the top half of the can into the bottom half, ensuring the holes are facing upward. This assembly creates a chamber for the fuel and an area for combustion.
- Sand the Edges: Use sandpaper to smooth any sharp edges on the cut cans to prevent injury during handling and to ensure a good fit between the two halves.
- Add Fuel: Pour a small amount of your chosen fuel into the stove’s chamber, being careful not to overfill. The fuel should adequately soak into the holes to allow for efficient burning.
- Light the Stove: Using a long lighter or match, ignite the fuel at the holes. The flames should emerge evenly from the jets for effective cooking.
Each step is crucial to ensure that the stove operates safely and efficiently, providing a reliable cooking solution during outdoor adventures.
How Can You Enhance the Performance of Your Soda Can Stove?
Optimize Airflow: By strategically placing additional air holes, you can significantly improve the combustion process. This allows for a greater influx of oxygen, leading to a hotter and more efficient flame, which is crucial for boiling water or cooking food quickly.
Improve Insulation: Insulating the stove with heat-resistant materials helps to trap heat during cooking, which can reduce fuel consumption and cooking time. This can be particularly beneficial in colder environments where heat loss is more pronounced.
Experiment with Fuel Types: Different fuels burn at various efficiencies; using high-energy fuels like denatured alcohol can result in a longer burn time and hotter flames. Understanding the fuel characteristics can help you choose the best option for your cooking needs.
Modify Burner Design: A well-designed burner with multiple jets can create a more stable flame and distribute heat evenly across the cooking surface. Additionally, a wider base can prevent tipping and provide a safer cooking experience, especially on uneven ground.
What Are the Benefits of Using a Soda Can Stove Compared to Other Stoves?
| Feature | Soda Can Stove | Traditional Stove |
|---|---|---|
| Weight | Lightweight and portable, ideal for backpackers. | Heavier, less suitable for long hikes or camping. |
| Cost | Inexpensive, often made from recycled materials. | Can be costly, especially for high-end models. |
| Fuel Efficiency | Uses less fuel, making it economical for long trips. | May consume more fuel, leading to higher costs over time. |
| Ease of Use | Simple to set up and operate, great for beginners. | Can be more complex, requiring knowledge of gas systems. |
| Durability | Less durable, may require replacement or repair over time. | Generally more durable, designed for long-term use. |
| Environmental Impact | Made from recycled materials, lower carbon footprint. | Manufacturing may involve more resources and emissions. |
| Cooking Speed | Takes longer to boil water compared to traditional stoves. | Typically faster due to higher heat output. |
| Versatility | Limited to boiling or simmering. | Can support a wider range of cooking techniques. |
What Safety Precautions Should You Follow When Using a Soda Can Stove?
When using a soda can stove, it is essential to follow specific safety precautions to ensure a safe and efficient experience.
- Ventilation: Always use your soda can stove in a well-ventilated area to prevent the accumulation of harmful fumes. Since these stoves can produce carbon monoxide, adequate airflow is crucial for your safety.
- Distance from Flammable Materials: Keep your stove away from flammable objects, such as tents, clothing, or dry leaves. The open flame can easily ignite these materials, leading to dangerous fires.
- Stabilization: Ensure that your soda can stove is placed on a stable and level surface. An unstable stove can tip over, spilling fuel or burning food, and dramatically increases the risk of accidents.
- Use Appropriate Fuel: Always use the recommended type of fuel, such as denatured alcohol, and avoid using gasoline or other flammable liquids. Using inappropriate fuel could cause explosions or uncontrollable fires.
- Fire Extinguisher or Water Nearby: Keep a fire extinguisher or a container of water nearby when using your stove. This can help you quickly address any unexpected flames or fire incidents that may arise.
- Let It Cool: After use, allow the stove to cool down completely before handling it or packing it away. The metal can and the fuel residue can remain hot for an extended period and may cause burns if not handled with care.
- Personal Protective Gear: Consider wearing gloves or using tools when handling the stove, especially when it’s in use. This helps protect your hands from burns and ensures a safer cooking experience.