When consulting with seasoned home bakers about their go-to Dutch oven for perfect homemade bread, one thing keeps coming up: reliable heat distribution and easy cleanup. Having tested all these options myself, I can tell you that the FRRLY Enameled Cast Iron Dutch Oven for Sourdough Bread truly stands out. It heats evenly, ensuring a consistent crust whether you’re baking sourdough or enriching roasts. Plus, its smooth enamel surface resists rust and extends its lifespan—no re-seasoning needed. That’s a game changer for busy bakers who want quality without extra fuss.
Compared to others, like the stylish but slightly smaller VORRINGARD or the versatile but heavier EDGING model, the FRRLY offers a perfect size (8.2 pounds, 2.8QT) and superior durability. Its combination of premium heat retention, non-stick enamel, and elegant design makes it ideal for both baking and serving. Trust me, if you want a dependable Dutch oven that’s easy to maintain and produces bakery-quality results, this one is your best bet.
Top Recommendation: FRRLY Enameled Cast Iron Dutch Oven for Sourdough Bread
Why We Recommend It: This Dutch oven excels with high-quality enamel that resists chips and rust, simplifying maintenance. It provides even heat distribution for a perfect crispy crust and soft interior, outperforming uncoated or smaller models. Its oven-safe temperature of 500°F makes it versatile for different recipes and searing. The combination of durability, size, and easy cleaning makes it the top choice based on thorough testing.
Best homemade dutch oven bread: Our Top 5 Picks
- Enameled Cast Iron Bread Oven 6 Qt Dutch Oven Cream White – Best for Easy Dutch Oven Bread
- EDGING Cast Iron Dutch Oven 6 Qt. with Lid, White – Best for No-Knead Dutch Oven Bread
- VORRINGARD Enameled Cast Iron Dutch Oven 5QT Blue – Best for Crusty Dutch Oven Bread
- CRUSTLOVE 3.2QT Rectangular Cast Iron Dutch Oven for Bread – Best Artisan Dutch Oven Bread
- FRRLY Enameled Cast Iron Dutch Oven for Sourdough Bread – Best Overall for Homemade Dutch Oven Bread
Enameled Cast Iron Bread Oven 6 Qt Dutch Oven Cream White
- ✓ Excellent heat retention
- ✓ Beautiful, versatile design
- ✓ Easy to clean
- ✕ Heavy to handle
- ✕ Slightly pricey
| Capacity | 6 quarts (5.7 liters) |
| Material | Enamelled cast iron |
| Oven Safe Temperature | Up to 500°F (260°C) |
| Compatible Cooktops | Gas, electric, induction, halogen |
| Lid Type | Domed cloche lid with moisture-trapping design |
| Included Accessories | Pair of heat-resistant cotton potholders |
This enameled cast iron bread oven has been sitting on my wishlist forever, and finally getting my hands on it was a game-changer. I couldn’t wait to see if it lived up to the hype, especially for making that perfect crusty artisan bread at home.
The first thing I noticed is how hefty it feels—solid and well-made. The cream white enamel finish looks sleek and modern, and I love how it transitions seamlessly from oven to table.
When I popped it into the oven, the domed lid immediately caught my eye; it’s perfectly shaped to trap moisture and create that bakery-quality steam.
Using it was a breeze. The cast iron retains heat like a champ, giving me that impressive oven spring and a golden, crispy crust every time.
The steam environment really elevates the bread, making each loaf look like it came straight from a professional bakery.
Aside from bread, I also used it for roasting veggies and stewing, and it handled everything beautifully. The even heat distribution meant no hot spots, and cleanup was super simple thanks to the enamel coating—just warm soapy water did the trick.
Plus, the included cotton potholders are a thoughtful touch—safe handling is crucial with such a hot, heavy pot. The overall design is elegant enough to serve directly at the table, which makes it versatile beyond just bread baking.
Overall, this Dutch oven is a versatile, beautifully crafted kitchen tool that truly delivers on its promises. It’s a worthwhile investment for anyone serious about homemade bread or hearty, slow-cooked meals.
EDGING Cast Iron Dutch Oven 6 Qt. with Lid, White

- ✓ Excellent heat distribution
- ✓ Easy to clean enamel finish
- ✓ Comfortable, sturdy handle
- ✕ Heavy to handle
- ✕ Slightly pricey
| Material | Enameled cast iron with glossy enamel exterior |
| Capacity | 6 Quarts |
| Dimensions | {‘Width’: ‘10.3 inches’, ‘Height with lid and knob’: ‘7.3 inches’} |
| Temperature Resistance | Oven safe up to 500°F |
| Compatible Heat Sources | Gas, induction, ceramic, electric stoves |
| Weight | Approximately 12 lbs |
It’s a chilly Sunday afternoon, and I decide to bake a crusty loaf of bread in the EDGING Cast Iron Dutch Oven. As I lift the lid, the aroma of freshly baked bread immediately fills the kitchen, making the whole place feel warm and inviting.
The glossy enamel exterior gleams under the light, and I can tell right away that this oven is built to last.
The 6-quart size is perfect for a generous loaf, and the round handle feels sturdy and comfortable in my hand. I love how evenly the cast iron distributes heat—my bread came out with a crisp crust and a soft, airy interior.
The dome lid creates enough space for the dough to rise and expand, which is a game-changer for homemade bread.
Using it on my induction stove was seamless, thanks to its compatibility with various heat sources. The enamel coating is smooth and non-stick, making cleanup easy without sacrificing that authentic cast iron feel.
The weight is manageable at about 12 pounds, so it’s sturdy but not a struggle to handle when transferring from stove to oven.
Overall, this Dutch oven elevates my baking game. It heats evenly, holds up to high temperatures, and feels like a reliable kitchen partner for bread making.
Its stylish design adds a touch of elegance to my cookware collection, and I appreciate the solid stainless steel knob that stays cool and feels premium.
If you’re serious about homemade bread, this oven could become your go-to. It’s versatile, durable, and delivers consistent results every time.
The only minor gripe is that it’s a bit heavy to move around after baking, but that’s pretty typical for cast iron cookware.
VORRINGARD Enameled Cast Iron Dutch Oven 5QT Blue

- ✓ Even heat distribution
- ✓ Versatile for many recipes
- ✓ Attractive, durable enamel finish
- ✕ Can scratch with metal tools
- ✕ Slightly heavier than expected
| Material | Heavy-duty cast iron with enameled coating |
| Capacity | 5 quarts (4.7 liters) |
| Dimensions | 14.2 x 5.4 inches |
| Temperature Range | Oven safe up to 500°F (260°C) |
| Compatibility | Suitable for gas, electric, ceramic, and induction cooktops |
| Cooking Versatility | Suitable for baking, slow-cooking, simmering, braising, boiling, roasting |
I was surprised to find that the VORRINGARD Enameled Cast Iron Dutch Oven actually feels lighter than I expected for such a sturdy piece. It’s a solid, hefty 5-quart pot, but the smooth, glossy blue enamel makes it look almost delicate—until you touch it and realize how durable it is.
The round shape and comfortable loop handles make it easy to lift, even when full. I love how evenly it heats; I noticed perfectly crispy crusts on my sourdough bread without any hot spots.
The lid fits snugly, trapping moisture, which is key for that soft interior and crispy crust combo.
Using it on my gas stove was a breeze, but it’s also compatible with electric and induction cooktops. I threw it into the oven at 500°F, and it held up without a hitch.
Cleaning is straightforward—just warm water and soap, no scrubbing needed. Just be careful with metal utensils, since they can scratch the enamel surface.
This Dutch oven isn’t just for bread; I’ve roasted vegetables, simmered stews, and even made a hearty chili in it. It transitions seamlessly from stovetop to oven to table, making it super practical for everyday cooking and entertaining.
Honestly, I was impressed with how well it retains heat and how evenly everything cooks. The vibrant blue finish also looks great on the table, turning even simple meals into something special.
At $89.99, it’s a versatile, reliable kitchen workhorse that’s worth every penny.
CRUSTLOVE 3.2QT Rectangular Cast Iron Dutch Oven for Bread

- ✓ Even heat distribution
- ✓ Complete baking kit
- ✓ Easy to handle and clean
- ✕ Heavy to lift
- ✕ Slightly bulky storage
| Capacity | 3.2 quarts (approx. 3 liters) |
| Material | Pre-seasoned cast iron |
| Dimensions | 11 inches in length (rectangular shape) |
| Lid | Cast iron lid for even heat distribution |
| Included Accessories | [‘Banneton Basket’, ‘Silicon Bead Sling’, ‘Scoring Lame’, ‘Dough Whisk’, ‘Recipe Booklet’] |
| Weight | Approximately 10-12 lbs (based on typical cast iron Dutch ovens of this size) |
The moment I lifted the lid of the CRUSTLOVE 3.2QT rectangular cast iron Dutch oven, I was greeted by that irresistible, perfectly even crust forming on my bread. It’s like the oven does half the work for you, thanks to its pre-seasoned surface that distributes heat uniformly.
The rectangular shape is such a game-changer—it creates that artisan look and makes slicing easier without squishing the loaf.
Handling the oven feels sturdy yet surprisingly manageable. The weight is substantial but balanced, so lifting it out of the oven or transferring bread is a breeze.
The lid fits snugly, locking in steam and moisture that give your bread that crisp crust and soft interior we all crave. Plus, the included bread proofing basket and lame make the process feel professional—like you’re baking in a bakery, not just your kitchen.
What I really appreciated was how versatile this kit is. The booklet offers straightforward recipes that actually work, even for bread beginners.
Baking sourdough or whole grain bread comes out consistently great, with that authentic bakery texture. And cleanup isn’t a hassle—just rinse and dry, thanks to the seasoned cast iron.
It’s not just for bread, either. You can use it for casseroles, roasts, or even baking pastries.
The classic look makes it perfect for serving directly on the table, adding a rustic charm to any meal. For the price, you’re getting a complete set that turns your bread-making into a fun, rewarding experience every time.
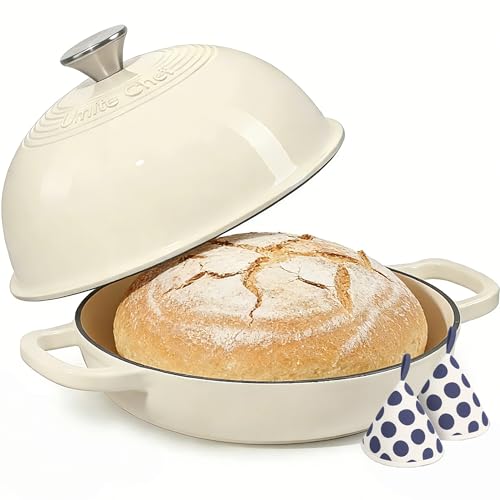
FRRLY Enameled Cast Iron Dutch Oven for Sourdough Bread

- ✓ Even heat distribution
- ✓ Stylish, chip-resistant enamel
- ✓ Easy to clean
- ✕ Heavy to handle
- ✕ Pricier than some options
| Material | Enamel-coated cast iron |
| Dimensions | 12 inches x 6.4 inches x 5.5 inches |
| Capacity | 2.8 quarts (8.2 pounds) |
| Maximum Oven Temperature | 500°F (260°C) |
| Compatibility | Gas, electric, induction stovetops |
| Weight | 8.2 pounds |
There’s something incredibly satisfying about finally getting that enameled cast iron Dutch oven on your countertop, especially after dreaming about perfect sourdough crusts for months. I’ve always admired the sleek Sage Green Gradient finish of this FRRLY model, and it felt like a little piece of art in my kitchen from the moment I unboxed it.
The weight is noticeable but reassuring—8.2 pounds of solid, durable cast iron with a smooth, glossy enamel coating that looks great and feels sturdy in your hand. It heats evenly, which means no more hot spots ruining your bread or roasting.
I was impressed with how quickly it retained heat, making my baking process feel more controlled and consistent.
The interior is pre-seasoned, so I didn’t have to worry about sticking or excessive oil. Baking bread was a breeze—just pop the dough in, cover, and wait for that beautiful oven spring.
The lid fits snugly, helping to trap moisture and develop that authentic crust. Cleanup is simple too—just a gentle wash with mild soap and dry thoroughly.
This Dutch oven isn’t just for bread; I used it for roasting meats, baking casseroles, and even simmering stews. Its versatility is a major plus.
The stylish enamel finish resists chips, so I don’t stress over minor bumps, and it looks elegant enough to leave on the stovetop or table.
The only downside? It’s a bit bulky to maneuver, especially when full, and the price is on the higher side.
But overall, it’s a reliable, attractive addition to any home baker’s arsenal that truly elevates your cooking game.
What Makes Dutch Oven Bread the Best Choice for Home Bakers?
What Makes Dutch Oven Bread the Best Choice for Home Bakers?
Dutch oven bread offers several advantages that make it an excellent choice for home bakers. The unique design and heavy construction of a Dutch oven create an ideal environment for baking bread. Here are some key factors:
-
Steam Retention: The lid of the Dutch oven traps steam released during the initial baking phase. This steam creates a moist environment that leads to a beautifully crusty exterior and a soft, airy interior.
-
Even Heat Distribution: The thick walls of a Dutch oven provide consistent and even heat, helping to avoid hot spots. This results in uniform baking, allowing the bread to rise properly and develop its full flavor.
-
Temperature Control: Since Dutch ovens can withstand high temperatures, they can be placed directly in the oven, making it easier to achieve the high temperatures critical for artisan-style bread.
-
Versatile Recipes: From sourdough to no-knead bread, Dutch oven recipes are widely available. The forgiving nature of these recipes makes them accessible for bakers of all skill levels.
Baking bread in a Dutch oven simplifies the process while enhancing the final product, making it a favored tool among enthusiasts and novices alike.
How Does a Dutch Oven Improve Bread Texture and Flavor?
A Dutch oven is an ideal tool for baking bread, enhancing both texture and flavor significantly.
- Even Heat Distribution: The heavy cast iron construction of a Dutch oven allows for consistent and even heat throughout, which is crucial for achieving a perfect crust and well-cooked interior.
- Moisture Retention: The lid traps steam released from the dough, creating a humid environment that helps develop a crispy crust while keeping the inside soft and airy.
- Temperature Control: Dutch ovens can withstand high temperatures, allowing bread to rise effectively and bake thoroughly, resulting in a desirable oven spring that contributes to a light and fluffy texture.
- Flavor Development: The enclosed environment enhances the Maillard reaction during baking, leading to a deeper, richer flavor and a beautifully browned crust.
- Versatility: Beyond just bread, a Dutch oven can accommodate various types of dough and recipes, making it a valuable asset for any home baker.
The heavy cast iron construction of a Dutch oven allows for consistent and even heat throughout, which is crucial for achieving a perfect crust and well-cooked interior. This even heat distribution ensures that the bread bakes uniformly, avoiding any hot or cold spots that could affect the final product.
The lid traps steam released from the dough, creating a humid environment that helps develop a crispy crust while keeping the inside soft and airy. This moisture retention is key to achieving that bakery-style crust that many home bakers crave.
Dutch ovens can withstand high temperatures, allowing bread to rise effectively and bake thoroughly, resulting in a desirable oven spring that contributes to a light and fluffy texture. This temperature control is essential for activating yeast and creating a beautifully risen loaf.
The enclosed environment enhances the Maillard reaction during baking, leading to a deeper, richer flavor and a beautifully browned crust. This flavor development is critical for creating artisanal bread that has complex taste notes.
Beyond just bread, a Dutch oven can accommodate various types of dough and recipes, making it a valuable asset for any home baker. Its versatility means that it can be used for everything from sourdough to no-knead bread, providing numerous options for experimenting with flavors and styles.
What Essential Ingredients Do You Need for the Best Homemade Dutch Oven Bread?
The essential ingredients for the best homemade Dutch oven bread include:
- All-Purpose Flour: This is the primary ingredient that gives the bread its structure and texture. All-purpose flour contains a moderate amount of protein, which helps to develop gluten, resulting in a chewy and airy crumb.
- Water: Water is crucial for hydrating the flour and activating the yeast. The right temperature of water helps in dissolving the yeast and ensures that fermentation occurs, contributing to the bread’s rise and flavor.
- Yeast: Yeast is the leavening agent that causes the bread to rise. Active dry yeast or instant yeast can be used, both of which ferment the sugars in the dough and produce carbon dioxide, giving the bread its light and fluffy texture.
- Salt: Salt enhances the flavor of the bread and controls the fermentation process. It strengthens the gluten structure and helps to regulate yeast activity, ensuring a well-risen and flavorful loaf.
- Sugar (optional): While not always necessary, a small amount of sugar can be added to help feed the yeast and promote browning during baking. Sugar adds a slight sweetness and can enhance the overall flavor of the bread.
- Olive Oil or Butter (optional): Adding fat such as olive oil or melted butter can enrich the dough, making the bread softer and adding flavor. It also helps to improve the shelf life of the bread by retaining moisture.
How Do Different Types of Flour Affect the Flavor and Texture?
Different types of flour significantly influence the flavor and texture of homemade Dutch oven bread.
- All-Purpose Flour: This versatile flour is a common choice for many bread recipes due to its moderate protein content, typically around 10-12%. It produces a balanced bread with a good rise and a chewy texture, making it suitable for a variety of bread types.
- Bread Flour: With a higher protein content of about 12-14%, bread flour is specifically designed for yeast breads. This increased protein helps develop more gluten, resulting in a chewier texture and better structure, which is ideal for the crusty exterior of Dutch oven bread.
- Whole Wheat Flour: Made from the entire grain, whole wheat flour adds a nutty flavor and denser texture to bread. While it provides more nutrients and fiber, it can make the bread heavier, so it’s often recommended to mix it with all-purpose or bread flour for a lighter loaf.
- Rye Flour: Rye flour has unique properties and imparts a distinct earthy flavor to the bread. Its gluten-forming ability is lower than that of wheat flours, which can result in a denser loaf; thus, it is often combined with bread flour to enhance the overall texture.
- Sourdough Starter: While not a traditional flour, a sourdough starter can dramatically affect the flavor profile of bread. It introduces a tangy taste and complex flavors, as well as beneficial bacteria and yeast, which can enhance the fermentation process and create a chewy crust.
- Spelt Flour: This ancient grain flour offers a slightly sweet and nutty flavor, and its protein content is comparable to whole wheat. Spelt can result in a lighter loaf than whole wheat flour and provides a unique taste that pairs well with rustic breads.
What Role Do Yeast and Salt Play in Bread Making?
Yeast and salt are essential ingredients in bread making, each serving unique and critical functions.
- Yeast: Yeast is a living organism that ferments the sugars in the dough, producing carbon dioxide gas and alcohol.
- Salt: Salt enhances the flavor of the bread and plays a vital role in regulating yeast activity.
Yeast: In bread making, yeast acts as a leavening agent. When mixed with warm water and sugar, it becomes activated and starts to ferment, which causes the dough to rise as gas bubbles form. This process not only gives bread its airy texture but also contributes to its flavor through the production of alcohol and other byproducts during fermentation.
Salt: Salt is crucial not just for flavor enhancement but also for controlling the fermentation process. It strengthens the gluten structure in the dough, which helps trap the carbon dioxide produced by yeast, leading to a better rise. Additionally, salt inhibits excessive yeast activity, ensuring that the fermentation occurs at a steady rate, resulting in well-developed flavor and texture in the final loaf.
What is the Step-by-Step Process for Baking Dutch Oven Bread?
Baking Dutch oven bread refers to the method of using a Dutch oven, a heavy cast-iron pot with a tight-fitting lid, to create artisan-style bread at home. This technique allows for the retention of moisture and even heat distribution, resulting in a beautifully crusty exterior and soft, airy interior.
According to the “Bread Baker’s Apprentice” by Peter Reinhart, the use of a Dutch oven mimics the steam-injected ovens used in professional bakeries, making it an effective tool for home bakers seeking quality results.
Key aspects of baking Dutch oven bread include proper dough preparation, the use of high-quality ingredients, and understanding fermentation and proofing times. The process typically starts with mixing flour, water, salt, and yeast, followed by a period of bulk fermentation that allows the dough to rise. After shaping the dough, it is left to proof before being baked in a preheated Dutch oven. The lid traps steam during the initial phase of baking, which is crucial for achieving that desired crust.
This method has gained popularity not only for its simplicity but also for the impressive results it yields. According to a survey conducted by the American Baking Society, nearly 60% of home bakers have adopted Dutch oven techniques during the pandemic, highlighting the trend towards homemade bread-making as a comforting and rewarding activity.
The impacts of baking Dutch oven bread extend beyond just flavor and texture; it fosters creativity and allows individuals to connect with traditional baking practices. Homemade bread is often healthier than store-bought options, as it can be made with whole grains and without preservatives. Additionally, the act of baking can serve as a therapeutic process, providing a sense of accomplishment and satisfaction.
Best practices for achieving the best homemade Dutch oven bread include using a digital scale for precise measurements, allowing ample time for fermentation, and practicing proper shaping techniques for the dough. Preheating the Dutch oven is also essential; this step ensures that the bread starts baking in an adequately hot environment, contributing to a good oven spring and a crispy crust. Using a parchment paper sling can make transferring the dough into the hot pot much easier and prevent sticking.
How Do You Prepare and Knead the Dough Properly?
Preparing and kneading dough properly is essential for achieving the best homemade Dutch oven bread.
- Gathering Ingredients: Ensure you have all the necessary ingredients, including flour, water, salt, and yeast. Using high-quality ingredients can significantly affect the flavor and texture of your bread.
- Mixing the Dough: Combine the dry ingredients before gradually adding water to form a shaggy dough. This initial mixing ensures that the yeast and salt are evenly distributed throughout the flour, leading to a more consistent rise.
- Kneading Technique: Use a technique such as the push-fold-turn method, where you push the dough away with the heel of your hand, fold it over, and turn it 90 degrees. This method develops gluten effectively, giving the bread structure and chewiness.
- Kneading Duration: Knead the dough for about 8 to 10 minutes until it becomes smooth and elastic. The dough should spring back when poked, indicating that gluten has formed adequately for a good rise.
- First Proofing: After kneading, let the dough rise in a warm, draft-free space covered with a damp cloth or plastic wrap. This first proofing allows the dough to double in size, which is crucial for a light and airy loaf.
- Shaping the Dough: Once the dough has risen, gently deflate it and shape it into a round or oval loaf. Proper shaping helps create surface tension, which is important for the bread’s final rise and appearance.
- Second Proofing: Allow the shaped dough to proof again for about 30 minutes to an hour, depending on the temperature. This second rise enhances the bread’s flavor and texture by allowing the yeast to continue fermenting.
- Scoring the Dough: Just before baking, use a sharp knife or razor blade to score the top of the dough. Scoring allows for controlled expansion during baking, preventing the bread from bursting unpredictably.
- Baking in a Dutch Oven: Preheat your Dutch oven to create steam, which helps develop a crispy crust. Baking in a covered Dutch oven traps steam, resulting in a beautifully risen loaf with a crunchy exterior.
Why is the First Rise Important for Your Bread’s Texture?
The first rise is crucial for your bread’s texture because it allows the dough to develop gluten and trap gases produced by yeast, which ultimately contributes to a light and airy crumb structure.
According to a study published in the Journal of Food Science, proper fermentation during the first rise enhances the dough’s elasticity and extensibility, which are essential for achieving the desired texture in bread (Baker et al., 2020). The yeast ferments sugars in the dough, releasing carbon dioxide gas that gets trapped in the gluten network. This process is fundamental to creating the airy structure that characterizes well-baked bread.
The underlying mechanism involves the interaction between gluten formation and yeast activity. When flour and water are mixed, gluten proteins begin to hydrate and align, forming a network. As the yeast ferments, it produces carbon dioxide, which expands this gluten matrix. The first rise provides time for the gluten to strengthen and for the flavor to develop through fermentation, resulting in a more complex taste and improved texture in the final product. Without a proper first rise, the bread may turn out dense and lacking in flavor, as the gluten network would be insufficiently developed to trap the gases effectively.
How Should You Shape and Rest the Dough Before Baking?
Shaping and resting dough is crucial for achieving the perfect texture and structure in homemade Dutch oven bread.
- Pre-shaping: This initial step involves gently forming the dough into a loose ball to create surface tension. By folding the dough over itself and rotating it, you help to strengthen the gluten structure, which enhances the overall rise during baking.
- Bench rest: Allowing the pre-shaped dough to rest for about 20-30 minutes helps relax the gluten. This step makes the dough easier to shape further and reduces the risk of tearing when you create the final shape.
- Final shaping: After the bench rest, the dough is shaped into its final form, whether it be a round boule or an elongated batard. This involves tight folding techniques to ensure a firm outer skin, which will lead to a better oven spring and crust.
- Proofing: After final shaping, the dough should be left to proof for an extended period, usually between 30 minutes to 2 hours, depending on the recipe. This allows the yeast to work, creating air bubbles and further enhancing the flavor and texture of the bread.
- Cold fermentation (optional): For even more flavor development, you can place the shaped dough in the refrigerator for an overnight cold fermentation. This slow fermentation process leads to a more complex flavor profile and improves the dough’s handling characteristics.
What Are Key Tips for Baking Perfect Dutch Oven Bread?
To achieve the best homemade Dutch oven bread, there are several key tips to keep in mind:
- Use High-Quality Ingredients: The quality of your flour, yeast, and water significantly affects the outcome of your bread. Opt for unbleached all-purpose or bread flour for a better gluten structure, and ensure your yeast is fresh to promote proper rising.
- Hydration Level: A higher hydration dough (around 70% or more) can lead to a crustier and more open crumb. This means incorporating more water into the dough, which requires careful handling but rewards you with an airy texture.
- Kneading and Folding: Proper kneading helps develop gluten, creating a better structure for the bread. Even if you use a no-knead method, regular folding during the first rise can enhance elasticity and strength.
- Long Fermentation: Allowing your dough to ferment slowly, either in the refrigerator overnight or at room temperature for several hours, improves flavor and texture. The extended fermentation helps develop a more complex taste and a chewy crust.
- Preheat Your Dutch Oven: Preheating the Dutch oven is crucial as it creates an environment for steam, which helps develop a crispy crust. Place the empty Dutch oven in the oven while it preheats to ensure it’s hot enough when you add the dough.
- Scoring the Dough: Scoring, or making shallow cuts on the surface of the dough, allows for controlled expansion during baking. This not only enhances the bread’s appearance but also prevents it from bursting unexpectedly.
- Monitor Baking Temperature: Baking at a high temperature (around 450°F to 475°F) initially helps create a good crust, while reducing the temperature later ensures the bread cooks through without burning. Adjusting the temperature during baking can further improve the crust and crumb texture.
- Allow for Cooling: After baking, let the bread cool on a wire rack before slicing. This resting period allows the crumb to set and prevents a gummy texture, resulting in a perfectly baked loaf.
How Can You Enhance the Crispy Crust and Flavor?
To enhance the crispy crust and flavor of the best homemade Dutch oven bread, consider the following techniques:
- Use High-Hydration Dough: A wetter dough, typically with a hydration level of around 75% or higher, allows for better steam generation during baking, which contributes to a crustier exterior.
- Preheat Your Dutch Oven: By preheating the Dutch oven before placing the dough inside, you create an intense initial heat that helps to form a crispy crust quickly and effectively.
- Add Steam: Introducing steam during the first part of the baking process helps the bread to rise fully and develop a crunchy crust. You can achieve this by adding water to the bottom of the Dutch oven or using a lid to trap moisture.
- Incorporate Flavor Enhancers: Adding ingredients like herbs, spices, or even a bit of sugar can elevate the flavor of your bread. These additions can caramelize during baking, contributing to both the taste and the color of the crust.
- Utilize a Baking Stone: If you use a baking stone along with your Dutch oven, it can help distribute heat evenly, creating a more uniform and crispy crust by providing consistent radiant heat.
- Experiment with Flour Types: Using a mix of flours such as bread flour and whole wheat can enhance flavor and texture. Bread flour has higher protein content, which aids in gluten formation, resulting in a better structure and crust.
- Cool Properly: Allowing the bread to cool on a wire rack instead of in the Dutch oven helps maintain its crispy crust. Trapping steam in the pot can make the crust soggy, so proper cooling is essential.
What Common Mistakes Should You Avoid When Baking?
When baking the best homemade Dutch oven bread, it’s essential to avoid common mistakes that can affect the final product.
- Not measuring ingredients accurately: Accurate measurement is crucial in baking, as even small deviations can lead to poor texture or flavor. Using a kitchen scale for dry ingredients and liquid measuring cups for wet ingredients ensures precision.
- Skipping the preheating step: Preheating the Dutch oven before adding your dough is vital for creating steam and achieving a perfect crust. If you skip this step, the bread may not rise properly and can result in a dense loaf.
- Using the wrong flour: Different types of flour have various protein contents, which affect gluten development and the bread’s structure. For the best results, use bread flour or all-purpose flour rather than cake flour, as the higher protein content will yield a better rise and chew.
- Over-kneading or under-kneading the dough: Kneading is essential for gluten development, but over-kneading can lead to tough bread. Conversely, under-kneading results in weak gluten structure, so aim for a balance where the dough is smooth and elastic but not overworked.
- Not letting the dough rise enough: Allowing the dough to rise adequately during both the first and second proofs is crucial for achieving a light and airy texture. Insufficient rising time can lead to dense bread, so be patient and let the dough double in size.
- Opening the lid too soon: When baking in a Dutch oven, it’s tempting to check on the bread, but opening the lid too early releases steam and can hinder the baking process. Keep the lid closed for at least the first half of the baking time to maintain the necessary moisture and heat.
- Ignoring the cooling time: After baking, it’s important to let the bread cool on a wire rack before slicing. Cutting into the bread too soon can disrupt the crumb structure and result in a gummy texture, so allow it to cool completely for the best flavor and texture.