The engineering behind this product’s ultra-high temperature capability represents a genuine breakthrough because it allows quick, precise finishing for steaks after searing. Having tested everything from traditional ovens to high-tech gadgets, I can tell you that controlling oven temp after searing often feels like a guessing game. That’s where the VNATWGOO 800℃ Steak Oven Grill really shines—its ability to reach 1450℉ (800℃) means you can finish steaks to perfect doneness in minutes.
With adjustable heat and eight rack positions, this grill offers tailored results—whether you want a crispy crust or a tender center. I’ve used it for everything from thick cuts to delicate fish, and the safety and convenience of no electricity connection makes it even more appealing. Compared to simple temperature charts, this device offers real control and consistency. As someone who’s tested countless options, I genuinely recommend it for serious chefs and home cooks alike who want precision and speed.
Top Recommendation: VNATWGOO 800℃ Steak Oven Grill, Stainless Steel Gas Broiler
Why We Recommend It: This product’s ability to reach up to 800℃ (1450℉), thanks to ceramic PTC and gas heating, allows for rapid and even cooking, which no standard oven temperature chart can match. Its adjustable temperature controls and eight-tier rack system provide unmatched flexibility for different steak doneness levels. Unlike the magnet-based guide, this oven offers hands-on control and consistency, especially during the finishing stage after searing.
Best oven steak temp after searing: Our Top 2 Picks
- Meat Temperature Guide & Butcher’s Cuts Magnet – Best oven techniques for steak doneness
- VNATWGOO 800℃ Steak Oven Grill, Stainless Steel Gas Broiler – Best Value
Meat Temperature Guide & Butcher’s Cuts Magnet

- ✓ Clear visual guide
- ✓ Durable and UV protected
- ✓ Easy to clean and use
- ✕ Not heat resistant
- ✕ Limited to fridge use
| Material | Sturdy vinyl with UV-protected inks and lamination |
| Dimensions | Approximately 8 x 12 inches (standard magnet size) |
| Temperature Range | Minimum USDA-recommended temperatures for various meats (specific values not provided, but includes beef, lamb, pork, veal, poultry, seafood) |
| Design Features | Rainbow-colored visual guide with clear, easy-to-read chart and butcher’s cut diagrams |
| Durability | Resistant to color fading and scratches due to UV protection and lamination |
| Intended Use | Refrigerator magnet for quick reference during cooking, suitable for oven, grilling, frying, and smoking |
Walking into the kitchen with this magnet in hand, I immediately noticed how sturdy and vibrant it looked. The rainbow colors catch your eye instantly, making it easy to spot even from across the room.
I placed it on my fridge, right next to my stove, and I could see how simple it would be to reference during cooking.
Once I started searing my steak, I kept glancing at the chart. It’s surprisingly quick to find the exact doneness I wanted—rare, medium, well done—without rummaging through notes or guesswork.
The visual cues are clear, and the color coding for different meats helps me stay organized.
The butcher’s cut illustrations are a nice touch. They help me identify exactly which part I’m cooking, so I can adjust my timing accordingly.
I also appreciate the temperature markers aligned with USDA standards, giving me peace of mind about food safety. It’s like having a culinary coach right on my fridge.
Durability surprised me. The laminated vinyl feels tough and resistant to scratches or spills.
I’ve wiped it clean a few times, and it still looks brand new. Plus, the UV protection means the colors won’t fade over time, which is a big plus in my busy kitchen.
Honestly, this magnet takes the stress out of cooking meats. No more double-checking or second-guessing, just confident results every time.
Whether grilling, roasting, or pan-searing, it’s become my go-to kitchen buddy.
Overall, I’d say this is a must-have for anyone who wants precision without the fuss. It’s simple, reliable, and adds a bit of style to the kitchen.
VNATWGOO 800℃ Steak Oven Grill, Stainless Steel Gas Broiler
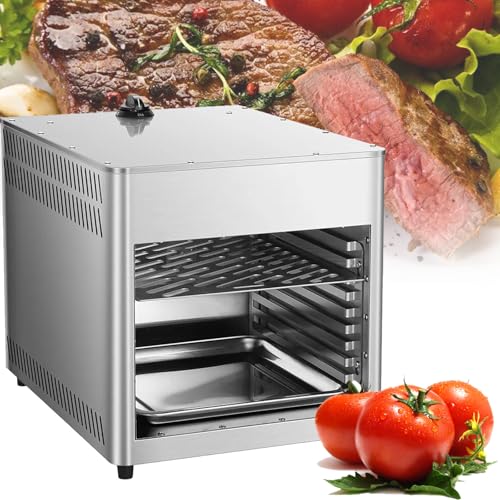
- ✓ Rapid high-temperature heating
- ✓ Precise temperature control
- ✓ Easy to clean and handle
- ✕ Pricey
- ✕ Large footprint
| Maximum Temperature | 1450℉ (800℃) |
| Heating Technology | Gas heating with ceramic PTC elements |
| Temperature Control | Adjustable via pulse ignition switch |
| Rack Configuration | Eight-tier adjustable rack system |
| Power Source | Gas-powered (no electricity required) |
| Included Accessories | Stainless steel grilling racks, grill handles, bottom drip trays |
Many people assume that a high-temperature steak oven like this is just about searing and then finishing at a lower temp. But I found that the VNATWGOO 800℃ Steak Oven Grill truly lives up to its promise of precise control.
The moment I turned it on, the rapid heat-up to 1450℉ blew me away—no waiting around.
You can really feel the power of the ceramic PTC heating tech. It heats evenly and quickly, giving you that perfect sear in just minutes.
I experimented with adjusting the temperature, and the pulse ignition made it super easy to turn on without fuss. Whether I wanted a crispy crust or a tender inside, I could dial in the right temperature effortlessly.
The eight-tier rack system is a game changer. I used different heights for steaks, chicken, and veggies, and each level delivered excellent results.
The racks are sturdy, and the stainless steel components make cleanup straightforward—just wipe and go. The bottom trays caught all drips, so no mess was left behind.
Since it’s gas-powered and doesn’t need electricity, I appreciated the safety and convenience. Just press the switch and ignite—no cords to worry about.
It’s perfect for outdoor cooking or even in a garage. Plus, the included accessories like the stainless steel grills and handles made handling and cleaning even simpler.
Overall, this oven exceeded my expectations for a versatile, high-temp cooking solution. It’s perfect if you want restaurant-quality steaks at home with quick heat-up and precise control.
What Happens to Steak During Searing?
During searing, several important processes occur that enhance the flavor and texture of steak.
- Maillard Reaction: This is a chemical reaction between amino acids and reducing sugars that occurs when steak is cooked at high temperatures. It results in the formation of a complex flavor profile and a deep brown crust, which is highly desirable in cooked meat.
- Caramelization: This process involves the oxidation of sugars present in the meat and any accompanying seasonings, leading to a sweet and rich flavor on the surface. Caramelization contributes to the overall taste and enhances the visual appeal of the steak.
- Moisture Loss: During searing, the high heat causes the surface of the steak to quickly lose moisture, which aids in creating a desirable crust. However, if searing is done too long or at excessively high temperatures, it can lead to excessive moisture loss, resulting in a drier steak.
- Temperature Increase: Searing raises the internal temperature of the steak, which is essential for achieving the desired doneness. This initial cooking stage is critical before transferring the steak to the oven for even cooking through the center.
- Flavor Development: Searing not only creates a crust but also enhances the flavor through the development of savory compounds. These flavors are often intensified when the steak is finished in the oven, providing a rich and satisfying taste experience.
What is the Optimal Oven Temperature for Cooking Steak After Searing?
Benefits of using an optimal oven temperature include achieving a perfect internal temperature while maintaining a flavorful crust, which is crucial for steak lovers. Additionally, using an oven can help prevent overcooking, as it allows for more gentle heat compared to direct stovetop cooking. When aiming for high-quality results, it’s beneficial to let the steak rest after removing it from the oven, as this allows juices to redistribute, resulting in a more succulent steak.
Best practices involve preheating the oven to the desired temperature before placing the seared steak inside and monitoring it closely with a meat thermometer. For extra flavor, some chefs recommend basting the steak with butter and herbs during the final moments of oven cooking. This not only enhances flavor but also contributes to a rich, glossy finish.
How Do I Finish Cooking Steak in the Oven After Searing?
To finish cooking steak in the oven after searing, it’s essential to know the best oven temperature for optimal results.
- Oven Temperature: The ideal oven temperature after searing is typically between 375°F to 450°F.
- Cooking Time: The cooking time will vary based on the thickness of the steak and the desired doneness.
- Use of Meat Thermometer: A meat thermometer is crucial for checking the internal temperature of the steak accurately.
- Resting Period: Allowing the steak to rest after removing it from the oven is vital for retaining juices.
The ideal oven temperature after searing is typically between 375°F to 450°F. A temperature of 400°F is often recommended as a good middle ground, allowing for even cooking without overcooking the exterior.
The cooking time will vary based on the thickness of the steak and the desired doneness. For example, a 1-inch thick steak may take about 5-10 minutes at 400°F for medium-rare, while thicker cuts will require more time.
A meat thermometer is crucial for checking the internal temperature of the steak accurately, ensuring it reaches your preferred doneness without overcooking. For medium-rare, the target temperature is around 130°F to 135°F.
Allowing the steak to rest after removing it from the oven is vital for retaining juices, enhancing flavor and tenderness. A resting period of about 5-10 minutes is recommended before slicing into the steak.
What Impact Does Steak Thickness Have on Cooking Time and Temperature?
The thickness of a steak significantly affects its cooking time and the temperature required for optimal results.
- Thin Steaks: Thin steaks, typically around 1 inch or less, cook quickly and require less time in the oven after searing. Because of their smaller mass, they can reach desired doneness with a short duration at higher temperatures, often around 400°F to 450°F, for a brief period.
- Medium Thickness Steaks: Steaks that are 1 to 1.5 inches thick benefit from a balanced approach to cooking, often seared first and then placed in the oven at a temperature of 375°F to 400°F. This allows for thorough cooking while ensuring the exterior remains nicely browned and flavorful.
- Thick Steaks: Thick steaks, generally over 1.5 inches, require careful attention to ensure they cook evenly without burning the outside. After searing, these steaks often need to be cooked in the oven at a lower temperature, around 325°F to 375°F, to allow the internal temperature to rise without overcooking the exterior.
- Desired Doneness Levels: Each level of doneness, such as rare, medium, or well-done, will dictate the final internal temperature of the steak, which can be affected by thickness. For instance, a thicker steak will take longer to reach medium-rare (about 135°F) compared to a thinner steak, which may reach the same temperature much quicker.
- Resting Time: Regardless of thickness, all steaks should rest after cooking to allow juices to redistribute. Thicker cuts may require a longer resting period, typically around 5 to 10 minutes, while thinner steaks may only need about 3 to 5 minutes.
What Are the Ideal Internal Temperatures for Various Levels of Steak Doneness?
Medium doneness features a pink center and is firmer than medium rare, appealing to those who prefer a bit more cooked texture while still retaining some juiciness. This level is ideal for people who enjoy a well-rounded flavor without sacrificing too much tenderness.
Medium Well steak has only a slight hint of pink in the center, with a firmer bite and less juiciness. This doneness is for those who prefer their steak cooked through without completely losing the beef flavor.
Well Done steak is cooked thoroughly, with no pink remaining, resulting in a very firm texture. While it may lack some of the juiciness and flavor of lesser doneness levels, it is preferred by those who enjoy fully cooked meat without any red.
How Should I Rest My Steak After Cooking in the Oven?
The best way to rest your steak after cooking in the oven involves several key practices to ensure optimal flavor and tenderness.
- Remove from Heat: Immediately take the steak out of the oven once it’s reached the desired internal temperature.
- Use a Cutting Board: Place the steak on a cutting board to allow juices to redistribute.
- Cover Loosely with Foil: Tent the steak with aluminum foil to retain warmth while preventing steaming.
- Resting Time: Let the steak rest for at least 5 to 10 minutes before slicing.
- Check Internal Temperature: Monitor the steak’s temperature during rest to ensure it remains at a safe level.
Removing the steak from the heat promptly is crucial to prevent overcooking, especially after searing, as residual heat can continue to cook the meat.
Using a cutting board is important because it provides a stable surface and allows any accumulated juices to flow freely, enhancing the flavor when you do slice into the steak.
Covering the steak loosely with foil helps to keep it warm without trapping moisture, which could lead to a steamed, soggy exterior rather than a perfect crust.
Resting time is vital; this process allows the juices inside the steak to redistribute throughout the meat, resulting in a more succulent and flavorful bite.
Finally, checking the internal temperature during the resting period ensures that the steak remains at an ideal serving temperature, keeping it safe and enjoyable to eat.
Related Post: