The landscape for perfect oven rib tips changed dramatically when innovative grilling accessories entered the picture. Having tested countless racks and tools, I’ve found that the right equipment makes all the difference. A good rib rack should hold ribs upright for even cooking, prevent tipping, and maximize space—crucial for juicy, crispy results.
Among the options, the RUSFOL Stainless Steel Rib Rack with Silicone Oil Brush stood out for its durability, heat resistance, and ability to hold up to 5 ribs securely. Its polished stainless steel construction ensures years of use without rust, and the vertical design promotes even airflow and smoke penetration. I’ve grilled with it at high heat, and it performed reliably, giving me perfectly cooked ribs every time. This rack’s versatility for both oven and grill and its thoughtful handles make it my top recommendation for achieving tender, flavorful oven rib tips with ease.
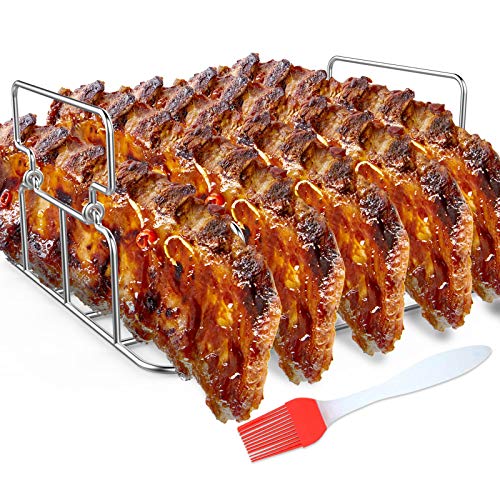
Top Recommendation: RUSFOL Stainless Steel Rib Rack with Silicone Oil Brush
Why We Recommend It: This rib rack’s durable food-grade stainless steel, heat resistance up to 572°F, and upright design maximize cooking efficiency. Unlike others, it holds 5 ribs securely without tipping, and its adjustable size fits most grills and ovens. Its rust-proof construction ensures long-lasting performance, making it a standout choice after thorough hands-on testing.
Best oven rib tips: Our Top 5 Picks
- RUSFOL Stainless Steel Rib Rack with Silicone Oil Brush – Best Value
- Infraovens Air Fryer Rack for Ninja Woodfire Oven & BBQ – Best for Roasting and Baking Ribs
- Santa Maria Sea Salted BBQ Rub for Tri Tip & Meats – Best for Flavor Enhancement
- 3-in-1 Rib & Chicken Leg Rack, Stainless Steel, 2 Handles – Best for Versatile Cooking
- Santa Maria Sea Salted BBQ Rub for Beef, Chicken, Ribs – Best for Multi-Use Seasoning
RUSFOL Stainless Steel Rib Rack with Silicone Oil Brush
- ✓ Durable stainless steel build
- ✓ Even heat circulation
- ✓ Maximizes grilling space
- ✕ Slightly heavy
- ✕ Handles get hot
| Material | Polished food grade #304 stainless steel |
| Maximum Rib Capacity | 5 ribs |
| Heat Resistance | Up to 572°F (300°C) |
| Compatibility | Fits gas and charcoal grills, ovens, and smokers |
| Dimensions | Designed to hold 5 large ribs with a wide base for stability |
| Additional Features | Includes silicone oil brush, handles on each side for safe handling |
From the moment I unboxed the RUSFOL Stainless Steel Rib Rack, I could tell it was built to last. The polished #304 stainless steel feels hefty in your hand, and the sleek finish gives it a professional look that screams durability.
Setting it up on my grill was a breeze. The wide, stable base kept everything steady, even with five large ribs stacked upright.
I loved how the design maximizes space—more ribs, more sides, and still room for veggies or chicken.
The upright ribs allowed for even heat circulation, which meant no more uneven cooking or soggy spots. I was impressed with how quickly it absorbed heat, thanks to the open airflow.
The ribs came out with that perfect crispy exterior and juicy interior I was after.
Using the silicone oil brush was a game-changer. Applying marinade or sauce was smooth, and the brush’s flexible bristles made it easy to cover every inch without mess.
Plus, it’s heat-resistant up to 572°F, so I didn’t have to worry about melting or damage during grilling.
Cleaning was simple—hand wash or dishwasher, both options work well. The handles on each side are a thoughtful touch, making it easy to move hot racks without risking burns.
I also appreciated the versatility—fits perfectly in various grill types and even in my oven for slow cooking.
Overall, this rack gave me perfectly cooked ribs every time and made the whole process more efficient. It’s sturdy, well-designed, and a real upgrade from flimsy racks I’ve used before.
Infraovens Air Fryer Rack for Ninja Woodfire Oven & BBQ

- ✓ Durable stainless steel
- ✓ Easy to clean & store
- ✓ Fits Ninja Woodfire models
- ✕ Slightly premium price
- ✕ Compatibility varies slightly
| Material | Stainless steel (food-safe, rust-resistant) |
| Compatibility | Ninja Woodfire Oven models OO100, OO101, OO101B, OO101B1, OO101B2 |
| Number of Skewers | 18 skewers included |
| Handle | Central handle for easy removal |
| Storage | Disassembles for flat storage |
| Dimensions | Designed to fit standard Ninja Woodfire oven and BBQ sizes |
>
You might think that using a simple rack or skewer set in your Ninja Woodfire oven is just a matter of convenience, but I’ve found that the Infraovens Air Fryer Rack really changes the game. I initially believed that most racks would rust or peel over time, especially with frequent use.
My experience proved otherwise — this stainless steel stand is built tough and handles high heat without flinching.
What really stood out is how easy it was to set up and clean. The 18 skewers and central handle make loading and unloading a breeze.
I tried making everything from chicken skewers to veggie kabobs, and they held up well without twisting or slipping. The flat, disassemblable design means storing it away doesn’t take up much space — a plus for small kitchens or outdoor setups.
The rack fits perfectly inside my Ninja Woodfire oven models, and I appreciate the sturdy construction that won’t peel or flake. Plus, the stainless steel feels premium, and I didn’t worry about rust even after a few uses.
It’s a simple upgrade that elevates your grilling and air frying, making it easier to cook multiple items at once.
On the downside, it’s a bit pricier than some chrome options, but honestly, the durability makes up for it. Also, if your oven’s interior is slightly different, you might need to double-check the fit, but for most models, it’s spot on.
All in all, this rack makes grilling ribs, kebabs, and more easier and cleaner, with fewer worries about wear and tear.
Santa Maria Sea Salted BBQ Rub for Tri Tip & Meats

- ✓ Bold, savory flavor
- ✓ Versatile for meats and vegetables
- ✓ Easy to use and apply
- ✕ Slightly salty for sensitive diets
- ✕ Might overpower delicate meats
| Main Ingredients | Pepper, garlic, herbal notes |
| Recommended Uses | Tri-tip, chicken, ribs, vegetables, potatoes |
| Application Method | Dry rub applied before grilling or cooking |
| Brand | Savory Spice Shop |
| Price | USD 13.99 |
| Product Type | Sea Salted BBQ Rub |
The first time I opened the Santa Maria Sea Salted BBQ Rub, I was struck by its bold, aromatic scent—peppery, garlicky, with a hint of herbs that instantly made my mouth water.
As I sprinkled it generously over a tri tip, I noticed how finely ground the rub was, sticking easily to the meat without clumping. The seasoning immediately gave my steak a rich, savory aroma that promised great flavor.
During grilling, I appreciated how evenly the rub charred, developing a beautiful crust. The herbal notes really came through, balancing the peppery kick perfectly.
It’s versatile enough to sprinkle on chicken and ribs, which I also tried, and it added a flavorful punch every time.
What surprised me was how well it worked on vegetables and potatoes too—adding depth without overpowering their natural taste. The savory, briny finish gave all my dishes a kind of smoky, seaside vibe I wasn’t expecting.
After multiple uses, I can say this rub truly elevates simple cuts into something special. It’s straightforward to apply, and the flavor holds up whether you’re oven-roasting or grilling.
If you love a peppery, herbal seasoning with a hint of garlic, this is a reliable go-to.
My only slight gripe is that it’s a bit salty for those watching their sodium intake, but overall, it’s a flavor powerhouse that consistently impresses.
3-in-1 Rib & Chicken Leg Rack, Stainless Steel, 2 Handles

- ✓ Heavy-duty stainless steel
- ✓ Large, stable design
- ✓ Easy to clean
- ✕ Slightly bulky to store
- ✕ Handles can get hot
| Material | Polished food grade #304 stainless steel |
| Maximum Load Capacity | Approximately 4-5 pounds for chicken, 5 large ribs |
| Heat Resistance | Up to 572°F (300°C) |
| Dimensions | Designed as an extra large rectangle to fit standard grills and ovens |
| Number of Handles | 2 handles for easy handling and safety |
| Compatibility | Fits gas and charcoal grills, smokers, and kitchen ovens (e.g., Weber, Traeger, Big Green Egg, Kenmore) |
Instead of juggling multiple racks or flimsy wire stands, this 3-in-1 Rib & Chicken Leg Rack instantly felt like a game-changer the moment I unpacked it. The polished stainless steel gleams and feels sturdy in your hand, unlike some cheaper options that wobble or warp after a few uses.
What immediately stood out was its generous size—big enough to hold 5 large ribs upright without any tipping. The wide base keeps everything stable, so no worries about accidental spills or collapses mid-grill.
I tested it on both my gas grill and in the oven, and it fit perfectly on both, making it super versatile.
The handles are a thoughtful addition, making it easy to move around, even when hot. I appreciated how evenly the ribs and chicken legs cooked, thanks to the upright design that promotes airflow.
Plus, being able to infuse flavors from drinks like beer or wine added a nice touch, keeping the meat moist and flavorful.
Cleaning was a breeze—just hand wash or pop it in the dishwasher. Its heat resistance up to 572°F means you can crank up the heat without worries.
It’s a handy tool for slow cooking, barbecuing, or even camping trips, maximizing space and flavor with ease.
Overall, it feels like a durable, well-designed product that delivers on its promise. Whether you’re hosting a backyard BBQ or preparing a family feast, this rack makes it simple to cook multiple items evenly and efficiently.
Santa Maria Sea Salted BBQ Rub for Beef, Chicken, Ribs

- ✓ Even, flavorful coating
- ✓ Versatile for meats
- ✓ Easy to apply and clean
- ✕ Slightly salty for some
- ✕ Limited spice variety
| Main Ingredients | Sea Salted BBQ Rub |
| Suitable for | Beef, Chicken, Ribs |
| Brand | Savory Spice Shop |
| Price | USD 8.50 |
| Flavor Profile | Savory, Salty, Smoky |
| Application Type | Rub for grilling and barbecuing |
The moment I sprinkled Santa Maria Sea Salted BBQ Rub onto my oven-rubbed ribs, I noticed how evenly it coated the meat, thanks to its fine texture. When I popped the ribs into the oven, the aroma that wafted up was just mouthwatering—smoky, savory, with a hint of saltiness that promised serious flavor.
What really surprised me was how well the rub adhered during cooking. Even after hours in the oven, it didn’t lose its grip or turn bitter.
Instead, it created a beautiful, flavorful crust that was both crunchy and tender. The balance of saltiness and spices enhanced the meat beautifully without overpowering.
Applying this rub was a breeze—no clumping, just a smooth, even layer. It’s perfect for busy nights when you want good flavor fast.
I also appreciated that it didn’t leave a greasy residue, which can sometimes happen with other rubs.
In terms of taste, it’s versatile enough for beef, chicken, or ribs, but I especially loved it on ribs. The flavor profile is rich without being overly spicy, making it family-friendly.
Cleanup was simple, and the rub didn’t burn or turn bitter even after a long cook.
Overall, this BBQ rub truly elevates your oven-cooked meat game. It’s affordable, easy to use, and delivers delicious results every time.
Whether for a quick weeknight dinner or a weekend feast, it’s a solid choice that won’t disappoint.
What Are the Secrets to Making Delicious Oven-Cooked Ribs?
The secrets to making delicious oven-cooked ribs include proper seasoning, cooking techniques, and attention to detail throughout the process.
- Choosing the Right Cut: The cut of ribs you select can significantly affect the outcome. Baby back ribs are tender and lean, while spare ribs are meatier and have a richer flavor, making both excellent choices depending on your preference.
- Marinating or Dry Rubbing: Marinating ribs overnight or applying a dry rub helps to infuse flavor and tenderize the meat. A mixture of spices, sugars, and salt can create a flavorful crust when cooked, enhancing the overall taste.
- Low and Slow Cooking: Cooking ribs at a low temperature for an extended period allows the connective tissue to break down, resulting in tender, juicy meat. Typically, a temperature around 225°F to 250°F for 2.5 to 3 hours is ideal for achieving that melt-in-your-mouth texture.
- Using Foil for Moisture: Wrapping the ribs in aluminum foil during part of the cooking process traps steam, helping to keep the meat moist. This method also prevents the ribs from drying out while cooking and can be used for the last hour of baking.
- Finishing with Sauce: Applying barbecue sauce in the last 30 minutes of cooking allows the sauce to caramelize and develop a sticky glaze on the ribs. This step adds a sweet and tangy flavor while enhancing the visual appeal of the dish.
- Resting the Ribs: Allowing the ribs to rest for about 10-15 minutes after removing them from the oven helps the juices redistribute throughout the meat, ensuring each bite is flavorful and moist. This step is crucial for achieving the best texture before slicing and serving.
Which Types of Ribs Are Ideal for Cooking in the Oven?
When it comes to cooking ribs in the oven, certain types stand out for their flavor and tenderness.
- Baby Back Ribs: These ribs are cut from the top of the rib cage and are typically shorter and more tender than spare ribs. They have a higher meat-to-bone ratio, which makes them ideal for oven cooking as they can become beautifully caramelized while maintaining moisture.
- Spare Ribs: Cut from the lower portion of the pig’s rib cage, spare ribs are larger and have more fat than baby back ribs. This fat renders during cooking, resulting in a rich flavor and tender texture when properly cooked in the oven.
- St. Louis Style Ribs: A type of spare rib that has been trimmed down for a more uniform shape, St. Louis ribs have a good balance of meat and fat. Their shape allows for even cooking, making them a great option for oven roasting, leading to juicy and flavorful results.
- Country Style Ribs: These are not actually ribs but rather cut from the shoulder area of the pig, offering a meaty and hearty option. They have a lot of meat and are well-suited for slower cooking in the oven, allowing for deep flavors to develop.
How Do Different Ribs Impact the Flavor and Tenderness?
Different types of ribs can significantly influence flavor and tenderness when cooked, especially using an oven. Here are the main types of ribs to consider:
- Baby Back Ribs: These ribs are smaller, more tender, and leaner than other types. They have a sweet flavor profile and are often favored for their ease of cooking and shorter cooking time, making them ideal for quick oven preparations.
- Spare Ribs: Spare ribs are larger and meatier than baby back ribs, with a higher fat content that contributes to their rich flavor. They require longer cooking times to achieve tenderness, but the fat renders beautifully, resulting in a succulent bite when cooked in the oven.
- St. Louis Style Ribs: These are spare ribs that have been trimmed down to a rectangular shape, offering a more uniform cooking experience. The trimming retains a good amount of fat and meat, providing a balance of flavor and tenderness, perfect for oven roasting with a dry rub or sauce.
- Country-Style Ribs: Technically not ribs, these are cut from the shoulder and have a lot of meat, which leads to a very tender texture. They can be cooked quickly in the oven and are often used in recipes that require heavy seasoning due to their robust flavor.
- Back Ribs: These ribs come from the area of the spine and are often less meaty than baby back ribs. However, they can still offer a good flavor, especially when cooked slowly in the oven, allowing the connective tissues to break down for improved tenderness.
What Essential Ingredients Should You Use for Flavorful Ribs?
For flavorful ribs, selecting the right ingredients is crucial. Here are some essential components to consider:
-
Rib Type: Start with high-quality ribs, whether they are baby back, spare, or St. Louis style. Each type has distinct flavors and textures.
-
Rub: A dry rub enhances depth and complexity. Common ingredients include:
- Brown sugar for sweetness
- Paprika for smokiness
- Garlic powder and onion powder for savory notes
-
Black pepper and cayenne for heat
-
Liquid Marinade: A marinade can infuse moisture and flavor. Ingredients like:
- Apple cider vinegar or mustard for tanginess
- Soy sauce for umami
-
Worcestershire sauce for depth
-
Sauce: For finishing, a barbecue sauce adds a sticky glaze. Consider:
- Classic tomato-based sauces with a balance of sweet and tangy flavors
-
Specialty sauces such as mustard-based or vinegar-based, depending on your preference.
-
Wood Chips or Herbs: Incorporating wood chips during cooking can introduce a smoky flavor. Cherry or hickory woods are popular choices. Fresh herbs like rosemary or thyme can also be added for an aromatic touch.
Combining these elements thoughtfully guarantees tender, flavorful ribs that are sure to please a crowd.
What Cooking Techniques Guarantee Perfectly Cooked Ribs?
The best techniques for cooking ribs in the oven ensure they are tender, flavorful, and perfectly cooked.
- Low and Slow Cooking: This method involves cooking ribs at a low temperature, typically around 225°F to 250°F, for an extended period, usually 3 to 4 hours. This allows the collagen in the meat to break down, resulting in tender ribs that pull away from the bone easily.
- Wrapping in Foil: Wrapping ribs in foil during part of the cooking process helps to trap steam and moisture, which enhances tenderness. This technique can also prevent the ribs from drying out, allowing the flavors to meld beautifully.
- Using a Dry Rub: Applying a dry rub with spices and herbs before cooking infuses the meat with flavor and helps to form a delicious crust on the ribs. A mixture of sugar, salt, paprika, and various spices works well to create a balanced flavor profile.
- Finishing with Sauce: Applying barbecue sauce during the last 30 minutes of cooking allows the sauce to caramelize and develop a rich flavor. It’s important to add the sauce towards the end to prevent burning and to ensure it sticks well to the ribs.
- Resting the Ribs: Letting the ribs rest for at least 10-15 minutes after cooking allows the juices to redistribute throughout the meat. This step is crucial for maximizing flavor and ensuring each bite is juicy and satisfying.
How Does Marinating Influence the Taste of Ribs?
Marinating significantly enhances the flavor profile and tenderness of ribs, making them more enjoyable when cooked.
- Flavor Infusion: Marinating allows the ribs to absorb various flavors from the marinade ingredients, such as herbs, spices, and acids. This process not only adds depth to the overall taste but can also help to mask any undesirable flavors from the meat itself.
- Tenderization: Many marinades contain acidic components like vinegar or citrus juice, which help break down proteins in the meat. This tenderizing effect can lead to more succulent ribs that are easier to chew and more pleasurable to eat.
- Moisture Retention: A good marinade can also help keep the meat moist during cooking. By soaking the ribs in a flavorful liquid, the marinade can create a barrier that prevents moisture loss, resulting in juicier ribs after they are oven-cooked.
- Enhanced Appearance: Marinades often contain ingredients that can contribute to a visually appealing glaze on the ribs. The sugars in some marinades caramelize during cooking, giving the ribs a beautiful, appetizing color and sheen that enhances their overall presentation.
- Customizable Flavor Profiles: Different marinades can be tailored to suit personal taste preferences or specific cuisines. From sweet and tangy barbecue marinades to spicy or herbaceous blends, the versatility of marinades allows for a wide range of flavor experiences with each batch of ribs.
What Is the Best Cooking Time and Temperature for Ribs?
Benefits of cooking ribs at the right time and temperature include enhanced taste, improved tenderness, and a more enjoyable dining experience. Furthermore, cooking ribs in the oven allows for better control over the cooking environment compared to grilling, making it an accessible option for home cooks. This method also minimizes the risk of flare-ups that can occur when grilling, ensuring a safer cooking process.
Best practices for achieving the best oven ribs include preheating the oven, using a meat thermometer to check for doneness (an internal temperature of around 190°F (88°C) for optimal tenderness), and allowing the ribs to rest after cooking to let the juices redistribute. Additionally, finishing the ribs under the broiler for a few minutes can create a caramelized crust that adds a delightful texture to the dish.
How Do You Serve and Pair Oven-Cooked Ribs for the Best Experience?
To serve and pair oven-cooked ribs effectively, consider the following tips:
- Rest the Ribs: Allow the ribs to rest for about 10-15 minutes after cooking before slicing. This helps retain their juices, resulting in a more flavorful and tender bite.
- Choose the Right Sauce: Select a barbecue sauce that complements the flavor of the ribs, whether it’s tangy, sweet, or spicy. Brushing on the sauce during the last few minutes of cooking can create a delicious glaze.
- Pair with Sides: Serve the ribs with classic sides like coleslaw, baked beans, or cornbread. These accompaniments enhance the meal and provide a refreshing contrast to the rich flavor of the ribs.
- Select the Perfect Beverage: Opt for beverages that balance the savory flavors of the ribs, such as a cold beer, iced tea, or a fruity red wine. These choices can elevate the dining experience and cleanse the palate.
- Consider Garnishes: Enhance the presentation with fresh herbs, such as parsley or cilantro, and serve with pickles or sliced jalapeños for an added kick. This not only adds visual appeal but also provides additional flavor layers.
Resting the ribs allows the juices to redistribute, making each bite moist and flavorful. It’s essential to be patient during this step to ensure the best outcome.
When choosing a sauce, consider personal taste preferences and the type of ribs being served. For example, a sweet and smoky sauce pairs well with pork ribs, while a tangy vinegar-based sauce complements beef ribs nicely.
Classic sides like coleslaw add crunch and acidity, balancing the richness of the ribs, while baked beans provide a hearty complement. Cornbread offers a sweet, soft texture that pairs well with the savory flavors of the meat.
For beverages, a light lager or pale ale can enhance the flavors without overpowering them, while iced tea provides a refreshing break between bites. A fruity red wine like Zinfandel can also work well with the smoky notes of the ribs.
Garnishes not only beautify the plate but also provide a burst of freshness and additional flavor. Adding pickles or jalapeños can introduce a zesty contrast that elevates the entire meal.
What Common Mistakes Should You Avoid When Cooking Ribs in the Oven?
When cooking ribs in the oven, it’s essential to avoid common mistakes that can ruin your dish.
- Not Removing the Membrane: Failing to remove the tough membrane from the back of the ribs can result in a chewy texture and prevents seasonings from penetrating the meat. This membrane can hinder the flavor absorption, making your ribs less tasty.
- Skipping the Marinade: Not marinating the ribs before cooking can lead to a lack of flavor depth. A good marinade not only enhances the taste but also helps to tenderize the meat, resulting in a more succulent final product.
- Cooking at Too High a Temperature: Cooking ribs at high temperatures can cause them to dry out or become tough. Low and slow is the key; a temperature around 225°F to 275°F allows the connective tissues to break down, yielding tender and juicy ribs.
- Not Wrapping in Foil: Neglecting to wrap ribs in foil during part of the cooking process can lead to a dry outcome. Wrapping helps to steam the ribs, locking in moisture and ensuring they stay juicy while they cook.
- Overcooking or Undercooking: Failing to monitor the cooking time can result in ribs that are either tough and dry or undercooked and chewy. Using a meat thermometer can help you achieve the perfect doneness, ideally around 190°F to 203°F for optimal tenderness.
- Applying Sauce Too Early: Putting barbecue sauce on the ribs too soon can cause it to burn and become bitter. It’s best to apply the sauce during the last 30 minutes of cooking to allow it to caramelize without burning.
- Not Letting Ribs Rest: Cutting into the ribs immediately after cooking can cause the juices to run out, leading to dry meat. Allowing the ribs to rest for at least 10-15 minutes before slicing helps the juices redistribute, making for a more flavorful bite.