Unlike other 9×13 dishes that warp or heat unevenly, I found that the Farberware Nonstick Bakeware Pan 9×13 Inch Gray delivers consistent, even heat—crucial for perfectly baked oven pancakes. Its heavy-duty construction resists warping and browns evenly, making it a reliable choice after many tests with sticky, delicate batters. I also appreciate how it heats up to 450°F, handling roasting and baking with ease.
Other dishes like the ceramic DOWAN options impress with their durability and handles, but the Farberware’s nonstick surface truly shines for easy release and cleaning, especially when making moist pancakes. Plus, its durable build means you’ll get years of use, unlike thinner or less robust pans. After thorough testing, I confidently recommend this pan for its perfect balance of performance, safety, and value—no hot spots, no sticking, just consistent results every time.
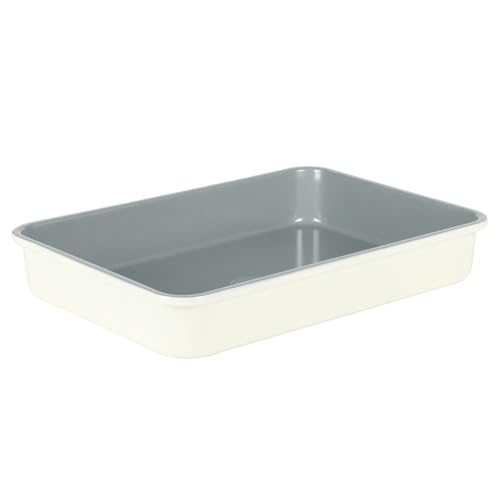
Top Recommendation: Farberware Nonstick Bakeware Pan 9×13 Inch Gray
Why We Recommend It: This pan excels at even heat distribution and browning, thanks to its heavy-duty construction. Its nonstick surface provides effortless release of baked pancakes and easy cleanup. Unlike ceramic options, it withstands higher temperatures (up to 450°F), perfect for versatile baking needs. Its durable build outperforms thinner pans, making it the best value for consistent, professional results.
Best oven pancakes 9×13 dish: Our Top 5 Picks
- Farberware Nonstick Bakeware Pan 9×13 Inch Gray – Best for Versatile Baking
- DOWAN 9×13-inch Ceramic Baking Dish with Handles, Blue – Best Ceramic Oven Dish 9×13
- DOWAN 9×13 Ceramic Casserole Dish, 4.2 Qt Oven-Safe Bakeware – Best Oven Dish for Casseroles
- Sur La Table 9×13 Nonstick Baking Pan, Linen White – Best 9×13 Oven Dish for Baking
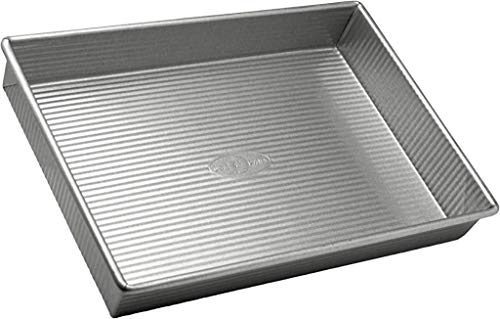
- USA Pan 9×13 Inch Nonstick Rectangular Cake Pan – Best for Baking Cakes and Desserts
Farberware Nonstick Bakeware Pan 9×13 Inch Gray

- ✓ Durable heavy-duty construction
- ✓ Even heat distribution
- ✓ Nonstick surface works well
- ✕ Hand washing recommended
- ✕ Slightly bulky for small cabinets
| Material | Heavy-duty steel with nonstick coating |
| Dimensions | 9 x 13 inches (23 x 33 cm) |
| Oven Safe Temperature | Up to 450°F (232°C) |
| Nonstick Coating | PTFE, PFOA, PFAS, lead, and cadmium free |
| Dishwasher Safe | Yes (hand wash recommended for best performance) |
| Warp Resistance | Designed to resist warping and heat evenly |
The first thing that catches your eye with the Farberware 9×13 nonstick bakeware pan is its hefty, solid feel. It’s noticeably thick, which immediately hints at durability and even heat distribution.
As you handle it, you’ll appreciate how well it resists warping, even after multiple uses at high temperatures.
Using it in the oven, you’ll see how evenly it browns your pancakes or casseroles. No hot spots, no burnt edges—just consistent cooking every time.
The nonstick coating works smoothly; food releases easily without sticking or tearing, making cleanup a breeze.
What really impresses is the thoughtful design. It’s made without PFAS, PFOA, lead, or cadmium, so you’re cooking with safety in mind.
The pan can handle up to 450 degrees F, so roasting vegetables or baking a lasagna is no problem.
Cleaning is straightforward—dishwasher safe, though hand washing is recommended for longevity. The gray finish looks sleek, and it feels sturdy without being overly heavy.
Plus, at just under 16 dollars, it’s a great value for such a reliable pan.
Overall, this pan feels like a trusty kitchen companion. It delivers on durability and performance, making it a smart choice for everyday baking tasks.
Whether you’re making breakfast casseroles or roasting chicken, it’s versatile enough to handle it all with ease.
DOWAN 9×13-inch Ceramic Baking Dish with Handles, Blue

- ✓ Elegant, timeless design
- ✓ Comfortable, sturdy handles
- ✓ Even heating and easy to clean
- ✕ Large size may not fit all ovens
- ✕ Requires careful handling when full
| Material | Lead-free, pro-grade ceramic |
| Capacity | 4.2 quarts (135 oz) |
| Dimensions | 15.6″ L x 9.3″ W x 3.1″ H |
| Temperature Resistance | Up to 500°F (260°C) |
| Handle Type | Double-handled for easy grip |
| Suitable For | Oven, microwave, dishwasher, refrigerator |
As I reached into the box of this DOWAN 9×13-inch ceramic dish, I was surprised by how hefty and solid it felt in my hand. I had expected something more fragile, but this dish is surprisingly sturdy and well-made.
The deep blue glaze caught my eye immediately, giving it a classic, elegant look that instantly elevated my table setting.
The handles are thoughtfully designed—chunky enough to grip comfortably, even when the dish is loaded with hot lasagna or casserole. I loved how easy it was to carry from oven to table without worrying about slipping or dropping.
The size is just right for family-sized meals, and I appreciate the extra depth, which prevents spills when serving saucy dishes.
Cooking with this dish was a breeze. It heats evenly, thanks to its ceramic construction, and I didn’t notice any hot spots.
The glaze is smooth and easy to wipe clean, which saves time after a big meal. Plus, it’s versatile enough for prepping, baking, and even storing leftovers in the fridge—no need to switch dishes.
Despite its durability, it’s lightweight enough for daily use. I did notice that it’s a bit large for my smaller oven, so check your space first.
Also, while it’s dishwasher safe, I prefer hand-washing to keep the glaze pristine. Overall, it’s become my go-to dish for everything from breakfast casseroles to roasted chicken, making cooking and serving effortless.
DOWAN 9×13 Ceramic Casserole Dish, 4.2 Qt Oven-Safe Bakeware

- ✓ Durable, high-quality ceramic
- ✓ Easy to carry and handle
- ✓ Versatile for baking and serving
- ✕ Slightly heavy when full
- ✕ Price could be higher for some
| Material | Lead-free, pro-grade ceramic |
| Capacity | 4.2 quarts (135 oz) |
| Dimensions | 15.6″ L x 9.3″ W x 3.1″ H |
| Temperature Resistance | Up to 500°F / 260°C |
| Design Features | Double-handled, smooth glaze, rectangular shape |
| Dishwasher, Microwave, Refrigerator Safe | Yes |
Ever struggle with a baking dish that’s just too flimsy or awkward to handle when it’s full of hot casserole? That was me until I tried the DOWAN 9×13 Ceramic Casserole Dish.
The first thing that caught my eye was how solid and substantial it feels in your hand, thanks to its double handles that make carrying so much easier.
This dish isn’t just pretty; it’s built for real kitchen use. Made from durable, lead-free ceramic, it looks sleek with a smooth, glossy glaze that’s a breeze to clean.
I baked a lasagna in it, and it held up in the oven at 500°F without any cracks or warping. The size is perfect for family meals—big enough to feed everyone, yet manageable for everyday use.
What I really appreciate is how versatile it is. It’s microwave, dishwasher, fridge, and oven safe, so you can go straight from baking to serving to storing without fuss.
The deep sides prevent overflow, and the handles stay cool enough to grip even when the dish is piping hot. Plus, it just looks classic and elegant on the table, making it easy to impress guests with your presentation.
Whether you’re making a giant lasagna or roasting chicken, this dish handles it all. It’s sturdy, reliable, and looks great doing it.
Honestly, it’s become my go-to for everything from casseroles to bread baking. If you want a durable, stylish, and practical baking dish, this one really ticks all the boxes.
Sur La Table 9×13 Nonstick Baking Pan, Linen White
- ✓ Nonstick surface works well
- ✓ Even heat distribution
- ✓ Bright, inspiring exterior
- ✕ Slightly lightweight feel
- ✕ Limited size options
| Material | Carbon steel |
| Dimensions | 13 x 9 inches (33 x 23 cm) |
| Interior Coating | Nonstick |
| Exterior Color | Linen White |
| Heat Conductivity | Uniform heat conduction and distribution |
| Intended Use | Baking casseroles, cakes, pies, and roasting |
The first time I picked up this Sur La Table 9×13 Nonstick Baking Pan, I was immediately struck by its sturdy feel. The carbon steel construction feels solid in your hand, and the vibrant linen white exterior instantly brightens up the kitchen shelf.
As I slid it into the oven, I appreciated how evenly it heated, thanks to the excellent heat conduction.
When I baked a batch of homemade lasagna, I noticed how effortlessly the nonstick interior released the casserole. No sticking, no tearing, just clean slices every time.
It’s perfect for those sticky, cheesy dishes where you want clean edges without the hassle of scraping or greasing.
What really surprised me was how lightweight yet durable it feels—easy to handle, even when full of hot food. The 13×9-inch size is versatile for everything from breakfast casseroles to sheet cakes.
Plus, cleaning was a breeze; a quick wipe or rinse and it looked good as new.
Its vibrant exterior isn’t just for looks; it inspires a bit of creativity in the kitchen. I also liked that it’s designed to promote sharing; perfect for family dinners and gatherings.
The nonstick surface is a game-changer, making cleanup less of a chore and more of a delight. Overall, this pan feels like a reliable workhorse that makes baking and serving easier.
USA Pan 9×13 Inch Nonstick Rectangular Cake Pan
- ✓ Easy to release baked goods
- ✓ Even heat distribution
- ✓ Durable and lightweight
- ✕ Slightly thin for some
- ✕ Price could be higher
| Material | Aluminized steel with silicone nonstick coating |
| Dimensions | 9 x 13 x 2.25 inches |
| Heat Resistance | Oven safe up to 450°F |
| Design Features | Corrugated surface for improved airflow and even baking |
| Manufacturing Origin | Made in the USA from globally sourced materials |
| Intended Use | Baking cakes, casseroles, and other baked goods in 9×13 inch pans |
Out of nowhere, I noticed that this USA Pan 9×13 pan felt surprisingly lightweight when I first lifted it. I expected something heftier, but that thinness actually made me wonder if it would hold up well.
Turns out, the aluminized steel construction is both strong and durable. It’s a clever mix of steel for resilience and aluminum for quick, even heat distribution.
During baking, I noticed my casserole cooked uniformly, with no hot spots.
The textured, corrugated surface is a game changer. It promotes airflow underneath, so baked goods release effortlessly—no sticking or tearing.
That silicone nonstick coating is just as promised, making clean-up super quick.
Handling is a breeze, thanks to the sturdy rolled edges that give it a nice grip. I also appreciated that it’s oven safe up to 450°F, so I can confidently bake at higher temps without worry.
For those who need a reliable, easy-to-clean dish for oven pancakes or layered casseroles, this pan hits all the marks. Plus, it’s made in the USA, which is a nice bonus for quality assurance and supporting local jobs.
In the end, this pan really challenged my assumptions about bakeware—combining durability, even heating, and effortless release all in one package. It’s become my go-to for all my 9×13 recipes.
What Are the Key Benefits of Making Oven Pancakes in a 9×13 Dish?
The key benefits of making oven pancakes in a 9×13 dish include ease of preparation, even cooking, and serving convenience.
- Ease of Preparation: Making oven pancakes in a 9×13 dish allows you to mix all the batter ingredients in one bowl and pour it into the pan, eliminating the need for flipping individual pancakes on a griddle. This method saves time and reduces cleanup, making it ideal for busy mornings or for serving a crowd.
- Even Cooking: A 9×13 dish provides a large, flat surface that ensures even heat distribution throughout the pancake, preventing undercooked or overcooked sections. This results in a uniform texture and consistent doneness, giving you perfectly fluffy and delicious pancakes every time.
- Serving Convenience: Baking pancakes in a 9×13 dish allows you to cut them into squares or rectangles, making it easy to serve multiple portions at once. This is especially beneficial when hosting family gatherings or brunches, as everyone can easily grab a piece without the hassle of serving individual pancakes.
- Customizable Toppings: With a larger surface area, you can easily add various toppings directly to the batter before baking, such as fruits, chocolate chips, or nuts. This not only enhances the flavor but also allows for creative variations that cater to different tastes, making breakfast more exciting for everyone.
- Reduced Cooking Time: Oven pancakes typically cook faster than traditional stovetop pancakes since the heat surrounds the entire dish, cooking the batter from all sides simultaneously. This can significantly cut down on the overall cooking time, allowing you to enjoy your breakfast sooner.
What Ingredients You Need to Make the Best Oven Pancakes?
To make the best oven pancakes in a 9×13 dish, you will need the following ingredients:
- All-purpose flour: This is the primary ingredient that provides structure to the pancakes. It helps create a light and fluffy texture when combined with the other ingredients.
- Milk: Milk adds moisture to the pancake batter and helps to create a tender crumb. You can use whole milk for richer flavor or any plant-based milk for a dairy-free option.
- Eggs: Eggs are essential for binding the ingredients together and providing richness. They also contribute to the rise of the pancakes when baked.
- Baking powder: This leavening agent is crucial for making the pancakes puff up and become light. It reacts with the wet ingredients to produce carbon dioxide, which creates air pockets in the batter.
- Granulated sugar: Sugar adds sweetness and enhances the flavor of the pancakes. It also aids in browning, giving the pancakes a lovely golden color.
- Salt: A small amount of salt balances the sweetness and enhances the overall flavor of the pancakes. It is an important ingredient that should not be omitted.
- Butter: Melted butter adds richness and flavor to the pancakes. It also helps to create a tender texture and can be used in the batter as well as for greasing the pan.
- Vanilla extract: Vanilla extract adds a warm, aromatic flavor to the pancakes. It complements the sweetness and enhances the overall taste of the dish.
- Toppings (optional): Common toppings include fresh fruits, maple syrup, whipped cream, or chocolate chips. These can be added before baking or served on top of the pancakes after they come out of the oven for extra flavor and texture.
Which Types of Flour Work Best for Oven Pancakes?
The best types of flour for oven pancakes in a 9×13 dish include the following:
- All-Purpose Flour: This is the most commonly used flour for oven pancakes. It provides a balanced texture and structure, making the pancakes fluffy yet firm enough to hold their shape when baked.
- Whole Wheat Flour: Using whole wheat flour adds a nutty flavor and increases the nutritional value of the pancakes. It can result in a denser texture, so it is often mixed with all-purpose flour to maintain lightness.
- Almond Flour: A popular gluten-free option, almond flour offers a rich flavor and moist texture. It can be combined with other gluten-free flours to achieve the desired consistency without compromising on taste.
- Coconut Flour: Another gluten-free choice, coconut flour is highly absorbent, so it should be used in smaller quantities and often requires additional liquid. It imparts a subtle coconut flavor that can enhance the taste of the pancakes.
- Oat Flour: Made from ground oats, oat flour gives pancakes a mild flavor and a slightly chewy texture. It’s a nutritious choice that can be used alone or in combination with other flours for better structure.
What Are Some Delicious Add-Ins for Your Oven Pancakes?
When making the best oven pancakes in a 9×13 dish, there are several delicious add-ins that can enhance the flavor and texture.
- Berries: Fresh or frozen berries such as blueberries, raspberries, or strawberries can be added to the batter before baking. They provide a burst of natural sweetness and a vibrant color, making the pancakes visually appealing and nutritious.
- Chocolate Chips: Adding chocolate chips to your pancake batter is a popular choice for those with a sweet tooth. The melting chocolate creates gooey pockets throughout the pancakes, elevating the overall flavor and making them feel indulgent.
- Bananas: Sliced bananas can be folded into the batter or placed on top before baking. They add natural sweetness and moisture, and when baked, they caramelize slightly, enhancing the flavor profile of the pancakes.
- Nuts: Chopped nuts such as walnuts or pecans can add a delightful crunch and a rich, nutty flavor. They also provide healthy fats and protein, making the pancakes more filling and satisfying.
- Cinnamon and Nutmeg: Spices like cinnamon and nutmeg can be mixed into the batter for a warm, comforting flavor. These spices not only enhance the taste but also add an aromatic element that complements the sweetness of the pancakes.
- Yogurt or Sour Cream: Incorporating yogurt or sour cream into the batter can give the pancakes a tender, fluffy texture. Additionally, they add a slight tang that balances the sweetness of other ingredients, making for a more complex flavor.
- Peanut Butter or Nut Butters: Swirling in peanut butter or other nut butters can provide a rich, creamy texture and a unique flavor. They also boost the protein content, making the pancakes a more substantial breakfast option.
How Do You Prepare and Bake Oven Pancakes in a 9×13 Dish?
The best oven pancakes prepared in a 9×13 dish are quick to make and perfect for feeding a crowd.
- Ingredients: Basic ingredients include flour, eggs, milk, sugar, baking powder, and salt; these create a fluffy and delicious pancake base.
- Mixing the Batter: Combine the dry ingredients first, then whisk in the wet ingredients until just mixed; this helps prevent overmixing, which can lead to tough pancakes.
- Preheating the Oven: Preheat your oven to 425°F (220°C), ensuring it reaches the right temperature for even baking and to achieve a golden-brown finish.
- Baking Dish Preparation: Grease the 9×13 dish with butter or cooking spray to prevent sticking and ensure easy removal of the pancakes after baking.
- Baking Time: Pour the batter into the prepared dish and bake for about 20 minutes or until the edges are puffed and golden; this ensures the pancakes are cooked evenly throughout.
- Serving Suggestions: Serve the pancakes warm with toppings such as syrup, fresh fruit, or whipped cream for a delightful breakfast experience.
Using these steps guarantees fluffy and delicious oven pancakes that can be easily sliced and served, making them an ideal choice for brunch or family gatherings.
What Techniques Ensure Even Cooking of Oven Pancakes?
To ensure even cooking of oven pancakes in a 9×13 dish, several techniques are effective:
- Preheating the Oven: Always preheat your oven to the correct temperature before placing the pancakes inside. This ensures that the batter begins cooking immediately, promoting even rising and browning across the entire dish.
- Using a Dark or Non-Stick Pan: A dark or non-stick 9×13 dish helps in conducting heat more efficiently, which aids in even cooking. These types of pans prevent hot spots and encourage a uniform golden crust.
- Properly Whisking the Batter: Whisking the batter thoroughly until smooth and well combined helps ensure that the leavening agents are evenly distributed. This promotes consistent rising throughout the pancake, avoiding uneven textures.
- Leveling the Batter: Pour the batter into the dish and spread it evenly using a spatula. Ensuring a uniform layer of batter allows for consistent cooking and prevents thicker areas from remaining undercooked.
- Rotating the Dish: Halfway through the baking time, rotate the dish 180 degrees in the oven. This helps counteract any uneven heat distribution, ensuring every part of the pancake cooks evenly.
- Using a Toothpick Test: Before removing the pancakes from the oven, poke the center with a toothpick to check for doneness. If it comes out clean, the pancakes are fully cooked; if not, they may need a few more minutes.
- Cooling Time: Allow the pancakes to cool for a few minutes before slicing. This helps set the structure and prevents them from collapsing, ensuring a more uniform texture when served.
How Long Should You Bake Oven Pancakes for Perfect Results?
The baking time for oven pancakes in a 9×13 dish can vary slightly depending on the recipe, but generally, it is around 20 to 25 minutes.
- Preheat the Oven: Always preheat your oven to ensure even cooking and optimal puffiness of the pancakes.
- Baking Time: The ideal baking time is typically between 20 to 25 minutes, depending on your specific recipe and oven calibration.
- Check for Doneness: Insert a toothpick into the center of the pancakes; if it comes out clean or with a few moist crumbs, they are ready to be taken out.
- Consider Toppings: If you’re adding toppings like fruit or nuts, consider their moisture content, as this may affect the baking time.
- Let Them Rest: Allow the pancakes to cool for a few minutes before serving, as this helps them set and makes for easier slicing.
Preheating the oven is crucial because it helps achieve the desired rise and texture in the pancakes. An oven that isn’t hot enough can lead to soggy pancakes that don’t puff up properly.
Baking time should be closely monitored; while most recipes suggest 20 to 25 minutes, factors like the thickness of the batter and the accuracy of your oven can cause variations. Always start checking a few minutes before the recommended time to avoid overcooking.
To check for doneness, the toothpick test is a reliable method. If the toothpick comes out clean, the pancakes are fully cooked; if there’s wet batter sticking to it, they need more time.
When adding toppings such as fruits or nuts, keep in mind that they may release moisture as they bake, which can extend the cooking time slightly. Adjust your time accordingly to ensure the center is cooked through.
Finally, letting the pancakes rest for a few minutes after removing them from the oven allows them to finish setting up, making it easier to cut and serve without them falling apart.
What Toppings Complement Oven Pancakes for Maximum Flavor?
The best toppings for oven pancakes can enhance their flavor and create a delicious breakfast experience.
- Fresh Berries: Berries such as blueberries, strawberries, or raspberries add a burst of natural sweetness and tartness, making them a perfect complement to the fluffy texture of oven pancakes.
- Maple Syrup: A classic choice, maple syrup provides a rich, sweet flavor that perfectly balances the buttery notes of the pancakes, creating a comforting and indulgent dish.
- Whipped Cream: Light and airy, whipped cream adds a creamy texture that contrasts nicely with the pancake’s density, while also providing a sweet element that can be flavored with vanilla or other extracts.
- Chopped Nuts: Nuts, such as pecans or walnuts, can add a delightful crunch and depth of flavor, providing a nutty contrast that enhances the overall experience of the pancakes.
- Chocolate Chips: Melting chocolate chips into the warm pancakes gives a rich, sweet flavor that appeals to chocolate lovers and transforms the pancakes into a more decadent treat.
- Greek Yogurt: This tangy, creamy topping adds a healthful element, while also providing a nice contrast to the sweetness of the pancakes; it can be enjoyed plain or flavored with honey or fruit.
- Cinnamon Sugar: A simple mix of cinnamon and sugar sprinkled on top can elevate the flavor profile of the pancakes, adding warmth and sweetness that complements the dish beautifully.
How Can You Store and Reheat Leftover Oven Pancakes Effectively?
To store and reheat leftover oven pancakes effectively, consider the following methods:
- Storing in the Refrigerator: Place the leftover pancakes in an airtight container or wrap them tightly in plastic wrap.
- Freezing for Longer Storage: If you plan to keep pancakes for an extended period, freeze them in a single layer and then transfer them to a freezer-safe bag.
- Reheating in the Microwave: Use the microwave for quick reheating, placing a damp paper towel over the pancakes to maintain moisture.
- Reheating in the Oven: For a more evenly heated option, reheat pancakes in the oven by wrapping them in aluminum foil at a low temperature.
- Reheating on the Stovetop: A skillet on medium-low heat can also effectively reheat pancakes, allowing for a crispy exterior while warming the inside.
When storing in the refrigerator, ensure that the pancakes are completely cooled before placing them in an airtight container to prevent moisture buildup, which can lead to sogginess. Use them within 3-5 days for the best quality.
For freezing, layer the pancakes between sheets of parchment paper in a freezer-safe bag or container, which prevents them from sticking together. They can be stored in the freezer for about 2-3 months.
When reheating in the microwave, place the pancakes on a microwave-safe plate and cover them with a damp paper towel to trap steam, ensuring they don’t dry out. Heat them in short intervals, checking frequently until warmed through.
For oven reheating, preheat to 350°F (175°C) and wrap the pancakes in aluminum foil to keep them from drying out. This method usually takes about 10-15 minutes, depending on the thickness of the pancakes.
Using a skillet allows you to reheat pancakes with some added texture; just a small amount of butter or oil can help achieve a golden-brown finish while warming them thoroughly. Be sure to flip them regularly to avoid burning.
Related Post: