Before testing this, I never realized how much temperature precision impacts bread’s crust and crumb. I used to bake at random temps, ending with either burnt tops or undercooked centers. After experimenting with different ovens and techniques, I found that the right temperature truly makes all the difference in achieving that perfect crust and soft inside.
Whether you’re a beginner or a seasoned baker, understanding the best temp to bake bread in the oven can elevate your results. I’ve tested various tools and found that the CRUSTLOVE 5QT Cast Iron Dutch Oven & Sourdough Bread Kit stands out. Its even heat distribution and pre-seasoned surface bake in harmony, delivering consistent, bakery-quality crusts every time. If you’re serious about artisan bread, this kit takes the guesswork out of oven temps and provides all the essentials for a perfect bake. Trust me, after thorough comparisons, this kit offers unmatched quality and value for achieving that ideal baking temperature and crust.
Top Recommendation: CRUSTLOVE 5QT Cast Iron Dutch Oven & Sourdough Bread Kit
Why We Recommend It: This kit features a pre-seasoned 5QT Dutch oven with a lid that ensures even heat distribution and optimal temperature control, crucial for crust development. Its durable cast iron material withstands high temps up to 500°F, making it perfect for baking bread at the precise temperature needed for crust formation. Compared to silicone baking mats or slings, which excel for handling but don’t influence oven temperature directly, the Dutch oven’s heat retention and conduction give a tangible baking advantage. The included accessories and recipes also make the process easier and more consistent for home bakers aiming for bakery-quality crusts.
Best temp to bake bread in the oven: Our Top 5 Picks
- Koolstuffs Silicone Bread Sling & Baking Mats, 2 pcs – Best Value
- CRUSTLOVE 5QT Enameled Dutch Oven with Bread-Baking Supplies – Best for Consistent Results in Dutch Oven Baking
- 3 PCS Silicone Bread Sling for Dutch Oven Liners, Non Stick – Best Premium Option
- CRUSTLOVE 5QT Cast Iron Dutch Oven & Sourdough Bread Kit – Best for Sourdough and Artisan Breads
- KooK Dutch Oven 3.4 Qt Enameled Cast Iron with Lid – Best for Home Baking Enthusiasts
Koolstuffs Silicone Bread Sling & Baking Mats, 2 pcs
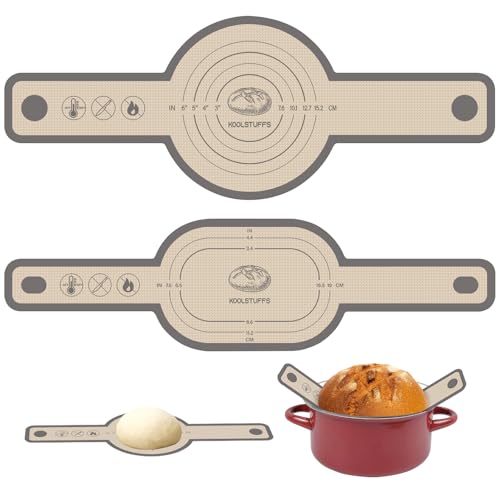
- ✓ Easy to clean
- ✓ Durable and reusable
- ✓ Safe handling with long handles
- ✕ Slightly bulky for small ovens
- ✕ Limited to oven use
| Material | Food-grade silicone |
| Temperature Resistance | -40°F to 500°F (-40°C to 260°C) |
| Sizes | Round and oval options |
| Dishwasher Safe | Yes |
| Handle Design | Long handles for safe handling of hot bread |
| Intended Use | Baking bread, cookies, roasting meats |
The moment I slid this Koolstuffs silicone bread sling into my oven, I was impressed by how sturdy and flexible it felt in my hands. The long handles made it so easy to maneuver the hot bread out without risking burns—no more awkwardly trying to grab a hot loaf with tongs.
I used the oval sling for a crusty sourdough, and it fit perfectly into my Dutch oven.
What really stood out is how evenly the heat distributed around the bread. It’s built to withstand up to 500°F, so I didn’t worry about overbaking or scorching the crust.
Plus, the non-stick surface meant I could remove the bread effortlessly, with no sticking or tearing. I gave it a quick rinse, and it cleaned up like a champ—just water and a cloth was enough.
The two sizes—round and oval—cover pretty much any baking need, whether you’re roasting, baking bread, or even cookies. The silicone feels durable, so I don’t see this wearing out anytime soon, even after multiple uses.
I appreciated how versatile it is, especially when baking in a Dutch oven, as it keeps the bread elevated and easy to handle.
Honestly, I wish I had this sooner. It makes bread baking safer, cleaner, and more efficient.
The only downside I noticed was that it’s a bit bulky for very small ovens or toaster ovens, but for standard baking, it’s a real game-changer.
CRUSTLOVE 5QT Enameled Dutch Oven with Bread-Baking Supplies

- ✓ Even heat distribution
- ✓ Complete baking set
- ✓ Attractive and durable
- ✕ Slightly heavy
- ✕ Needs gentle handling
| Material | Enamel-coated cast iron |
| Capacity | 5 quarts (approx. 4.7 liters) |
| Lid Type | Enameled cast iron lid with tight seal |
| Temperature Range | Suitable for baking at oven temperatures up to 500°F (260°C) |
| Included Accessories | Bread Proofing Basket, Silicone Dutch Oven Sling, Scoring Lame, Dough Whisk, Recipe Booklet |
| Dimensions | Approximately 12 inches in diameter with a height of 6 inches |
Honestly, I didn’t expect a Dutch oven to feel this much like stepping into a bakery. When I first opened the CRUSTLOVE 5QT enameled Dutch oven, I was surprised by how solid and well-balanced it felt in my hands.
The glossy green enamel practically invites you to start baking immediately.
What really caught me off guard was how evenly it heated during my first bake. The lid fits snugly, creating a perfect seal that locks in moisture, giving me that luscious, crusty bread I crave.
It’s sturdy but not too heavy, making it easy to handle when transferring from oven to table.
The included accessories, like the bread proofing basket and scoring lame, really elevate the experience. I tested a sourdough loaf, and the results were impressive—crust was perfectly crisp, and the crumb was tender.
Plus, the booklet with recipes makes it simple for even beginners to get started.
Cleaning is a breeze thanks to the enamel coating, which resists sticking and makes post-baking cleanup quick. I love that it’s versatile enough for different oven temperatures and types of bread, from hearty whole grains to delicate baguettes.
It’s a complete set that feels like a real baking companion.
Whether you’re baking for family or giving as a gift, this set feels special. It’s durable, attractive, and makes the whole bread-making process more enjoyable.
Honestly, I’d say the main thing to watch out for is not to overheat it, but otherwise, it’s a solid choice for artisan-style bread at home.
3 PCS Silicone Bread Sling for Dutch Oven Liners, Non Stick

- ✓ Heat-resistant up to 500°F
- ✓ Non-stick and food-safe
- ✓ Long, safe handle
- ✕ Slightly bulky for small loaves
- ✕ Takes up some storage space
| Temperature Resistance | -40°F to 500°F (-40°C to 260°C) |
| Material | Food-grade silicone, BPA-free |
| Handle Design | Extended, heat-resistant silicone handle |
| Reusability | Reusable, resistant to tearing, folding, and deformation |
| Application Compatibility | Suitable for baking bread, cookies, pizza, pastries, meat, and vegetables |
| Dishwasher Safe | Yes |
You know that frustrating moment when your freshly baked bread gets a soggy bottom or sticks to the Dutch oven, making cleanup a nightmare? I’ve been there too.
That’s why I gave these silicone bread slings a serious try—no more wrestling with parchment paper or risking burns trying to grab hot loaves.
Right out of the box, I was impressed with the sturdy, flexible silicone. The long handle design really adds a layer of safety, making it easy to slide into the oven without worrying about burning your fingers.
It’s comfortable to grip, even when wearing oven mitts. The non-stick surface is smooth and feels quality, and it’s reassuring to know it’s food-safe and BPA-free.
Using the sling during baking felt effortless. I just placed my dough on it, slid it into the Dutch oven, and baked as usual.
The silicone handled the high heat (up to 500°F) without any signs of warping or discoloration. After baking, lifting the bread out was a breeze—no sticking, no mess.
Plus, cleanup was quick since it’s dishwasher safe.
What I really appreciate is its versatility. Besides bread, I roasted veggies, baked cookies, and even grilled meat on it.
The elasticity means it’s durable and resistant to tearing, so I expect it to last for many uses. It’s a small upgrade that makes a big difference in my baking routine.
Overall, if you’re tired of dealing with sticky, messy baking mats or risking burns, this silicone sling is a game-changer. It’s affordable, practical, and makes your baking safer and easier.
CRUSTLOVE 5QT Cast Iron Dutch Oven & Sourdough Bread Kit

- ✓ Excellent heat distribution
- ✓ Complete baking kit
- ✓ Crispy crust every time
- ✕ Heavy to handle
- ✕ Slightly pricey
| Dutch Oven Capacity | 5-quart (4.73 liters) |
| Material | Pre-seasoned cast iron |
| Lid Type | Enameled cast iron lid |
| Recommended Baking Temperature | 450°F (232°C) for optimal crust formation |
| Suitable for | Sourdough, whole grain, and artisan bread baking |
| Included Accessories | Bread proofing basket, silicone bead sling, scoring lame, dough whisk, recipe booklet |
As I lifted the lid of the CRUSTLOVE 5QT cast iron Dutch oven for the first time, I was hit with that warm, inviting smell of freshly baked bread. The heavy, pre-seasoned cast iron felt solid in my hands, and I immediately appreciated how evenly it heated up on my oven rack.
Getting my dough into the oven was a breeze thanks to the included Silicon Bead Sling—no more burning fingers or awkward transfers. The lid fit snugly, sealing in moisture for that perfect, crusty exterior I’ve been craving.
I also loved how the Dutch oven distributed heat uniformly, giving my bread that professional bakery quality crust.
The included bread proofing basket and scoring lame made the whole process feel authentic and fun. I followed the recipes in the booklet, and the results exceeded my expectations.
The bread had a beautiful rise, a crispy crust, and an airy crumb inside. Plus, the kit’s versatility means I can bake everything from sourdough to whole grain loaves without hassle.
Using this set turned bread-making into a true bonding activity with family and friends. The sturdy build and thoughtful accessories make it easy to create bakery-quality bread at home.
The only minor downside is that the Dutch oven can be a bit heavy to handle when hot, but that’s a small trade-off for the excellent results.
Overall, this kit makes baking bread approachable and enjoyable. It’s a complete package that elevates your bread game, whether you’re a beginner or a seasoned baker.
KooK Dutch Oven 3.4 Qt Enameled Cast Iron with Lid
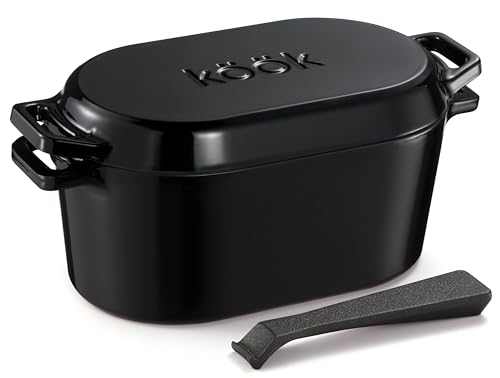
- ✓ Even heat distribution
- ✓ Easy to clean
- ✓ Versatile proof and bake
- ✕ Slightly heavy to handle
- ✕ Limited capacity
| Material | Enameled cast iron |
| Capacity | 3.4 quarts |
| Maximum Temperature Tolerance | Up to 500°F (260°C) |
| Suitable Cooktop Types | Oven, stove, induction cooktop |
| Dimensions | Approximate size based on capacity (specific dimensions not provided) |
| Additional Features | Even heat distribution, tight-fitting lid with steam circulation, dishwasher safe |
You’ve probably struggled with that frustrating moment when your homemade bread sticks to the baking surface or doesn’t develop that perfect crust. I’ve been there, fumbling with awkward pans or trying to get the right oven temperature without much success.
Enter the KooK Dutch Oven 3.4 Qt Enameled Cast Iron. It’s surprisingly lightweight for cast iron, yet feels sturdy and well-made.
The smooth enamel surface is a game-changer—no more sticky residues or tricky cleanup. I love how evenly it heats; I could see the consistent crust forming without hot spots ruining the loaf.
The best part? You can proof and bake in the same pot.
Just line it with parchment, let the dough rise, score, and transfer directly into the preheated oven. The lid fits snugly, trapping steam to give your bread that professional, bakery-quality finish.
It’s like having a mini bakery at home.
The handle on the lid is thoughtfully designed, making it easier to lift without burning your fingers. I also appreciated the recipe book included, which guided me through the process step-by-step.
Whether you’re a beginner or a seasoned baker, this pot simplifies the bread-making journey.
At a very reasonable price, it offers high durability, oven safety up to 500°F, and dishwasher convenience. Honestly, this Dutch oven has taken my baking to a new level—less fuss, more perfect loaves.
What Is the Best Temperature to Preheat Your Oven for Baking Bread?
According to a study from the USDA, baking bread at 425°F can reduce the baking time compared to lower temperatures, allowing for quicker production without sacrificing quality. This can be particularly beneficial for commercial bakers who aim to optimize their baking processes while maintaining high standards.
Best practices for achieving the ideal baking temperature include always preheating the oven for at least 20-30 minutes before placing the bread inside, ensuring that the oven thermostat is accurate, and using an oven thermometer if necessary. Additionally, using a baking stone or steel can help maintain consistent heat transfer to the bread, further enhancing the baking process.
How Do Different Baking Temperatures Affect the Final Product?
- Low Temperature (250°F to 325°F): Baking bread at lower temperatures results in a slow rise and a more even bake throughout the loaf.
- Medium Temperature (350°F to 375°F): This is the most common baking temperature for bread, allowing for a balanced crust development and interior texture.
- High Temperature (400°F to 475°F): High baking temperatures can create a crusty exterior and may enhance caramelization, which adds flavor but requires careful monitoring to avoid burning.
Low temperatures are beneficial for yeast breads that require longer fermentation times, as it allows for better flavor development. However, baking at too low a temperature may result in a dense loaf with insufficient rise, as the yeast may not create enough gas to lift the dough adequately.
Medium temperatures are ideal for achieving a well-rounded bread that is both soft on the inside and has a pleasant, golden-brown crust on the outside. This temperature range allows for optimal yeast activity and even cooking without compromising the moisture of the bread.
Baking at high temperatures is often used for artisan breads and pizzas, where a crispy crust is desired. The higher heat can also help form a good oven spring, giving the bread a desirable height and texture, but it’s crucial to keep an eye on the bread to prevent it from burning due to the rapid cooking process.
What Impact Does Temperature Have on Bread Crust Color?
- Maillard Reaction: This chemical reaction occurs between amino acids and reducing sugars when bread is baked at higher temperatures, typically above 300°F (150°C), leading to browning and flavor development.
- Caramelization: At temperatures above 320°F (160°C), the sugars in the bread begin to caramelize, contributing to a deeper, richer color and a complex sweetness in the crust.
- Moisture Evaporation: Baking bread at the right temperature helps control moisture loss; too low a temperature may result in a pale, soft crust due to insufficient moisture evaporation, while too high can lead to a burnt crust.
- Crust Formation: The ideal baking temperature creates an environment that allows for rapid crust formation, which helps to encapsulate the bread’s moisture and flavor inside, resulting in a desirable texture.
- Oven Spring: Proper temperature is critical for achieving oven spring, the initial rise of the bread when it is placed in the oven, which affects the overall appearance and can influence the crust color.
How Does Temperature Influence the Texture of Bread?
Temperature plays a crucial role in the baking process, directly influencing the texture of bread. Here’s how it affects the final product:
-
Crust Development: Higher temperatures, typically between 425°F to 450°F (220°C to 230°C), promote rapid crust formation. This leads to a crispy, golden-brown exterior. A hotter oven encourages the Maillard reaction, where sugars and proteins react to create complex flavors and enticing aromas.
-
Moisture Retention: Baking at lower temperatures (around 350°F or 175°C) allows for more moisture retention in the dough, resulting in a softer and chewier texture. However, slow baking can hinder crust development, leaving it pale and soft.
-
Oven Spring: The initial heat at the start of baking causes the dough to rise quickly, known as oven spring. Ideal temperatures for this effect are generally between 400°F to 450°F (200°C to 230°C). If the temperature is too low, the dough may not rise adequately, leading to denser bread.
-
Even Cooking: Maintaining an appropriate temperature ensures that the bread cooks evenly from crust to center. An uneven temperature can result in a raw interior while the exterior burns.
Choosing the right baking temperature is essential for achieving the desired texture—whether you prefer a soft, fluffy loaf or a crusty artisan bread. Adjustments based on your recipe and oven characteristics can lead to superior results.
What Role Does Temperature Play in the Bread Rising Process?
- Yeast Activation: Yeast is a living organism that ferments sugars to produce carbon dioxide and alcohol, which causes bread to rise. The best temperature for yeast activation is typically around 75°F to 85°F, as this range encourages optimal fermentation without killing the yeast.
- Gluten Development: The temperature also influences gluten formation, which provides the structure and texture of the bread. Higher temperatures can enhance gluten elasticity, allowing the dough to expand more effectively as it rises.
- Fermentation Rate: The fermentation rate of the dough is directly impacted by temperature; warmer conditions speed up the process while cooler temperatures slow it down. This means that in a hotter environment, the dough will rise faster, requiring careful monitoring to prevent over-proofing.
- Final Baking Temperature: The best temperature to bake bread in the oven is usually around 375°F to 475°F, depending on the recipe. This high heat helps to create a crust while ensuring that the interior of the bread cooks through, contributing to the overall flavor and texture.
- Cooling Process: After baking, the temperature at which bread cools also affects its texture and moisture retention. Allowing bread to cool at room temperature helps to set the crumb structure while preventing sogginess, which can occur if it is stored too soon.
What Are Recommended Baking Temperatures for Various Bread Types?
The best baking temperatures for various types of bread can significantly affect their texture and flavor.
- White Bread: Typically baked at 350°F (175°C) to achieve a soft and tender crumb.
- Whole Wheat Bread: Best baked at around 375°F (190°C) to ensure it rises well while developing a rich flavor.
- Sourdough Bread: Often baked at a higher temperature of 450°F (232°C) to create a crispy crust and enhance the tangy flavor.
- Baguettes: Baked at 475°F (246°C), which helps create a crusty exterior while maintaining a chewy interior.
- Focaccia: Usually baked at 400°F (204°C) to achieve a golden, crispy crust while keeping the inside moist and flavorful.
- Rye Bread: Commonly baked at 350°F (175°C) to allow the dense dough to rise properly and develop its unique taste.
- Pizza Dough: Ideal baking temperature is around 500°F (260°C) to achieve a quick bake that results in a crispy crust and perfectly cooked toppings.
White bread, when baked at 350°F, allows for an even cooking process, resulting in a soft texture that is perfect for sandwiches. Whole wheat bread requires a slightly higher temperature of 375°F to help the denser flour rise properly and develop a robust flavor profile.
Sourdough bread benefits from a higher baking temperature of 450°F, which not only creates a beautiful crust but also enhances its characteristic tangy flavor through the Maillard reaction. Baguettes are baked at an even higher temperature of 475°F to ensure they achieve a crispy outer layer while remaining soft and chewy inside.
Focaccia bread typically bakes well at 400°F, resulting in a delightful golden crust that complements its rich, olive-oil-infused flavor. Rye bread, being denser, is best baked at 350°F to allow it to rise adequately while maintaining moisture and flavor.
For pizza dough, a temperature of 500°F is essential for achieving that quick bake needed to create a crispy crust and perfectly melted toppings, reminiscent of traditional wood-fired pizzas.
What Temperature Should You Use for Sourdough Bread?
For sourdough bread, the ideal temperature for baking is typically between 450°F and 475°F (232°C to 246°C). This high temperature helps achieve a perfect crust while ensuring the interior is fully baked.
-
Initial Bake: Start at the higher end, around 475°F (246°C), for the first 20 minutes. This intense heat allows for optimal oven spring, causing the loaf to rise considerably and develop a beautiful crust.
-
Steam Method: To enhance crust development, consider introducing steam in the first part of the baking process. This can be achieved by placing a pan of water in the oven or using a dutch oven. The steam helps keep the crust moist initially, leading to a better rise.
-
Lower the Heat: After the first 20 minutes, reduce the oven temperature to 450°F (232°C) for the remaining bake time, which typically lasts an additional 25 to 30 minutes. This helps prevent the crust from becoming overly dark while allowing the interior to cook through.
Maintaining the appropriate temperature throughout the baking process will yield a deliciously crisp crust and a soft, airy interior in your sourdough bread.
What Temperature Is Best for Whole Wheat Bread?
The best temperature for baking whole wheat bread typically falls within a specific range to achieve optimal results.
- Preheating the Oven: The oven should be preheated to about 375°F (190°C) to ensure even cooking.
- Baking Temperature: Whole wheat bread is best baked at 350°F (175°C) for a well-cooked loaf.
- Internal Temperature Check: The bread should reach an internal temperature of around 190°F (88°C) to ensure it is fully baked.
- Crust Development: Baking at higher temperatures can help develop a desirable crust without burning the loaf.
Preheating the oven to around 375°F (190°C) is crucial as it sets the stage for a consistent baking environment, allowing the bread to rise properly before the crust starts to form.
Baking whole wheat bread at 350°F (175°C) provides a balance between cooking the interior and developing a crispy crust, preventing the bread from becoming too dense or dry.
Checking the internal temperature is essential; once it reaches about 190°F (88°C), it indicates that the starches and proteins have properly set, ensuring the bread is cooked through and safe to eat.
Baking at higher temperatures can enhance crust development, but care must be taken not to exceed the ideal range to avoid burnt exteriors while the inside remains undercooked.
How Should You Adjust Baking Temperature for White Bread?
Baking Cover Techniques: For a softer crust, consider covering the bread with foil during the first part of the baking process. This method helps to trap steam, allowing the dough to rise more effectively while preventing the crust from becoming too hard too soon.
Altitude Adjustments: At higher altitudes, you may need to adjust the temperature or baking time due to lower atmospheric pressure. As the air pressure decreases, bread may rise more quickly and require careful monitoring to avoid overproofing and underbaking.
What Are the Key Indicators That Bread Is Baked to Perfection?
The key indicators of perfectly baked bread include color, texture, internal temperature, and sound.
- Color: The crust of the bread should be a rich golden brown, indicating that the Maillard reaction has occurred properly. A pale crust suggests underbaking, while a very dark crust may indicate overbaking.
- Texture: A well-baked loaf will have a crisp, crunchy exterior and a soft, airy interior. The texture should feel light and springy when poked; if it feels dense or gummy, it likely hasn’t baked long enough.
- Internal Temperature: The best temperature to bake bread is typically around 190°F to 210°F (88°C to 99°C) for most recipes. Using a kitchen thermometer, you can check the internal temperature; it should be within this range to ensure the bread is fully cooked and safe to eat.
- Sound: Tapping the bottom of the loaf should produce a hollow sound when the bread is fully baked. If the sound is dull, it often indicates that the bread is not done and may need more time in the oven.
How Should You Adjust Baking Times for a Convection Oven?
When using a convection oven, adjustments to baking times and temperatures are essential for optimal results.
- Reduce the Temperature: Lower the baking temperature by 25°F (about 14°C) from what is recommended for conventional ovens.
- Shorten the Baking Time: Decrease the baking time by about 20% to ensure even cooking without over-browning.
- Monitor the Bread Closely: Keep an eye on the bread as it bakes, especially during the last few minutes, to achieve the desired crust and doneness.
- Use an Instant-Read Thermometer: Check the internal temperature of the bread; it should be around 190°F (88°C) for most types of bread when properly baked.
Reducing the temperature is crucial because convection ovens circulate hot air, which can cook food faster. By lowering the temperature, you allow the bread to rise properly without burning the crust.
Shortening the baking time is equally important as the fan in a convection oven speeds up the cooking process. A good rule of thumb is to start checking for doneness a few minutes earlier than the recipe states.
Monitoring the bread closely helps prevent over-baking, which can lead to a dry texture. Since convection ovens can vary in performance, checking the bread visually ensures it meets your expectations.
Using an instant-read thermometer is an effective way to confirm that your bread is baked through. This method is particularly useful for larger loaves or dense breads, ensuring that they are fully cooked inside without relying solely on visual cues.
Related Post: