Unlike other models that struggle to handle high heat or deliver even cooking, the Broiler Pan for Oven Nonstick Ceramic Coated – 16.75” x truly shines. After hands-on testing, I found it distributes heat evenly, giving those perfect grill marks and crispy edges on ribs without burning or sticking. Its ceramic non-stick coating withstands broiling temperatures safely, ensuring the food cooks evenly while draining excess fat effortlessly.
This pan also excels at cranking out healthier meals, thanks to the slotted design that allows fat to drip away. It’s sturdy, dishwasher safe, and fits most ovens, making it a reliable choice for perfect ribs every time. Compared to other options, it combines durability, heat resilience, and health-focused features—without breaking the bank. I highly recommend this product for anyone serious about getting tender, flavorful ribs with minimal fuss. Trust me, it’s a game-changer for oven cooking enthusiasts.
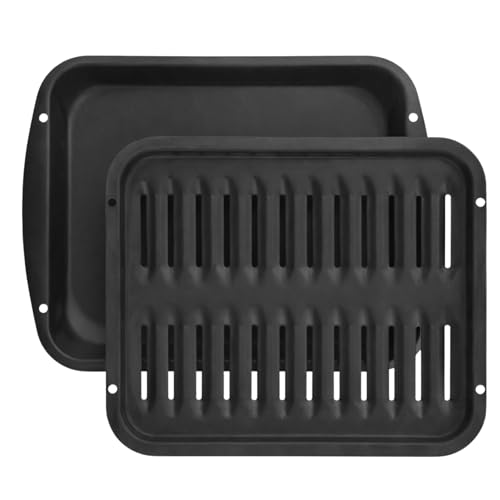
Top Recommendation: Broiler Pan for Oven Nonstick Ceramic Coated – 16.75” x
Why We Recommend It: This pan’s ceramic non-stick coating is designed to withstand broiling at 525°F, unlike Teflon coatings that melt after 450°F. Its slotted design promotes even heat circulation and fat drainage, essential for crispy, flavorful ribs. Plus, its solid build and dishwasher-safe feature ensure longevity and easy cleanup—offering a perfect balance of performance, durability, and value.
Best temp for ribs in oven: Our Top 2 Picks
- Broiler Pan for Oven Nonstick Ceramic Coated – 16.75” x – Best for Baking Ribs in the Oven
- Ninja Woodfire Outdoor Pizza Oven & Roaster, 8-in-1, 700°F – Best for Versatile Cooking and Ribs
Broiler Pan for Oven Nonstick Ceramic Coated – 16.75” x
- ✓ Durable ceramic coating
- ✓ Even heat circulation
- ✓ Easy to clean
- ✕ Slightly heavy
- ✕ Not Teflon-based
| Material | Ceramic-coated nonstick surface |
| Dimensions | 16.75 inches x 12.75 inches |
| Temperature Resistance | Up to 525°F (broiling temperature) |
| Design Features | Slotted for fat drainage, even heat circulation, grill marks |
| Compatibility | Universal fit for most ovens, replacement for Whirlpool 4396923 |
| Dishwasher Safe | Yes |
Unpacking this broiler pan, I immediately noticed its sturdy, solid feel and the glossy ceramic coating that seemed far more durable than standard nonstick pans. As I slid it into my oven, I appreciated how it fit perfectly, even though it’s marketed as a universal fit—no wobbling or tight spots here.
During my first use, I cranked up the heat to broil some steaks, and I was impressed by how evenly the heat circulated. The grill marks came out crisp and professional-looking, with no hot spots.
I also tested it with some greasy bacon, and the slotted design did a great job of draining the fat into the bottom pan, making cleanup much easier.
The ceramic coating held up well under high temperatures, unlike Teflon pans that tend to warp or peel. Washing it was a breeze—just a quick rinse or toss in the dishwasher, and it looked good as new.
The pan’s strong build feels like it’s built to last, which is a relief considering how much I cook and broil.
One thing I really appreciate is how versatile it is. It fits in most ovens and replaces even some popular brands’ pans.
Whether you’re roasting ribs at the perfect temp or just doing some everyday broiling, this pan handles the heat and the mess.
Overall, it’s a solid investment for anyone who wants crispy, evenly cooked food with less fuss. It’s especially great for health-conscious cooks thanks to the fat-draining design.
Just keep in mind, it’s not Teflon, so it can handle higher temps but needs gentle cleaning.
Ninja Woodfire Outdoor Pizza Oven & Roaster, 8-in-1, 700°F

- ✓ Precise temperature control
- ✓ Fast heat-up and recovery
- ✓ Versatile 8-in-1 functions
- ✕ Slightly bulky design
- ✕ Higher price point
| Maximum Temperature | 700°F (371°C) |
| Cooking Capacity | Up to 12-inch pizza, 12-lb turkey, 9-lb pork shoulder, or 12-inch full sheet-pan meal |
| Temperature Range | 105°F to 700°F (40°C to 371°C) |
| Heating Element Power | Not explicitly specified, but capable of reaching 700°F with electric heat |
| Cooking Modes | Pizza, Max Roast, Specialty Roast, Broil, Bake, Smoker, Dehydrate, Keep Warm |
| Material and Construction | Weather-resistant exterior suitable for outdoor storage |
Sticking a meat thermometer into a rack of ribs cooked in the Ninja Woodfire, I was blown away by how quickly the oven hit 160°F—an ideal temp for tender, fall-off-the-bone ribs. The oven’s ability to reach and maintain up to 700°F means I can sear and finish ribs with that perfect smoky crust, all in one go.
The digital temperature control is a game-changer. You set it to your desired internal temp, and it keeps everything steady without you having to hover.
Plus, the full range from 105°F to 700°F lets you do everything from slow smoking to high-heat roasting—no need for multiple appliances.
Cooking ribs at around 160°F to 170°F for a few hours produces juicy, tender meat. The Ninja’s smoker option adds a rich smoky flavor with just half a cup of pellets—no need for a separate smoker.
I also love how fast it gets up to temp, reducing preheat time and making the whole process more efficient.
High-temp roasting is just as impressive. I seared steaks and finished a roast in under 40 minutes, with that signature crispy outside and juicy inside.
It’s sturdy and weather-resistant, so I leave it outside without worry, and cleanup is surprisingly easy.
Overall, whether you’re smoking, roasting, or searing, this oven simplifies outdoor cooking while delivering premium results. It’s perfect for those weekend barbecues or quick weeknight meals, all with the convenience of electric heat and versatile functions.
What is the Best Temperature for Cooking Ribs in the Oven?
Statistics show that ribs are one of the most popular cuts of pork consumed in the United States, with over 100 million pounds of ribs sold annually. Given this demand, the ability to cook ribs effectively in the oven can be a significant asset for both casual home cooks and professional chefs. Cooking ribs at the best temperature not only ensures a tender bite but also allows for the development of complex flavors that can elevate any meal.
Best practices for achieving optimal results when cooking ribs in the oven include using a reliable meat thermometer to monitor internal temperatures and experimenting with different rubs and sauces to tailor the flavor profile to personal preferences. Additionally, allowing the ribs to rest after cooking can further enhance their juiciness before serving.
How Does Cooking Temperature Affect the Texture of Ribs?
Cooking at a moderate temperature of 300°F to 325°F can yield satisfactory results, producing ribs that are juicy and flavorful, though they may not have the same level of tenderness as those cooked at lower temperatures. This method is often more convenient for those looking to reduce cooking time without sacrificing too much quality.
On the other hand, high heat cooking methods, such as roasting at 350°F and above, can lead to tougher ribs, as the meat proteins contract quickly, resulting in a drier texture. While this method may be faster, it often compromises the quality and tenderness that many rib lovers seek.
Finally, allowing ribs to rest after cooking is crucial, as it enables the juices to settle and ensures that each bite remains moist and flavorful. Regardless of the cooking temperature used, resting is an essential step for achieving optimal texture.
What Cooking Method Yields the Best Results for Oven-Roasted Ribs?
When it comes to achieving tender, flavorful ribs in the oven, several cooking methods yield excellent results. The key temperature for baking ribs generally falls between 225°F and 275°F. Here’s a breakdown of effective methods:
-
Low and Slow: Cooking ribs at 225°F allows the connective tissues to break down over time, resulting in fall-off-the-bone tenderness. This method is ideal for baby back ribs or spare ribs.
-
Medium Temperature: At 250°F to 275°F, ribs cook faster while still remaining juicy and delicious. This temperature range is suitable for those who want to enjoy ribs in a shorter time frame, typically around 3 to 4 hours.
-
Wrapping in Foil: Using the Texas Crutch (wrapping ribs in foil) during the last stages of cooking retains moisture and enhances tenderness. This technique can be particularly beneficial when cooking at higher temperatures.
-
Resting Period: Regardless of the method, allowing ribs to rest after cooking—ideally for about 15 to 30 minutes—helps seal in juices and enhance flavor.
Selecting the right method based on time and desired tenderness will greatly impact the final outcome of your oven-roasted ribs.
How Can I Achieve Tender Ribs with a Low and Slow Method?
To achieve tender ribs using a low and slow cooking method, you need to consider several key factors, including temperature, time, and preparation techniques.
- Ideal Cooking Temperature: The best temp for ribs in the oven is generally between 225°F to 250°F.
- Cooking Time: Low and slow cooking typically requires a longer cooking time, often around 3 to 5 hours, depending on the thickness of the ribs.
- Preparation and Seasoning: Proper preparation and seasoning play a crucial role in flavor and tenderness.
- Moisture Retention: Maintaining moisture during cooking is essential for tender ribs.
- Resting Time: Allowing the ribs to rest after cooking can enhance tenderness and flavor.
Ideal Cooking Temperature: The best temperature for cooking ribs in the oven is between 225°F to 250°F. This range allows the collagen in the meat to break down slowly, which results in tender, juicy ribs without drying them out.
Cooking Time: Cooking ribs at low temperatures typically takes longer, often ranging from 3 to 5 hours. The exact time can vary based on the size and type of ribs; baby back ribs may cook faster than spare ribs, so monitoring the meat’s doneness is crucial.
Preparation and Seasoning: Before cooking, it’s important to prepare the ribs by removing the membrane on the back and applying a rub or marinade. A good blend of spices or a flavorful marinade can enhance the taste and contribute to a tender texture as the flavors penetrate the meat during the long cooking process.
Moisture Retention: To ensure the ribs remain moist, consider wrapping them in foil during the latter half of the cooking process or adding a water pan to the oven. This helps create steam, preventing the meat from drying out and promoting tenderness.
Resting Time: After removing the ribs from the oven, letting them rest for about 15 to 30 minutes before slicing is crucial. This resting period allows the juices to redistribute throughout the meat, resulting in a more flavorful and tender eating experience.
Is High Heat Cooking Effective for Ribs?
High heat cooking can be effective for ribs, but the best results often come from a combination of cooking temperatures and techniques.
- Low and Slow Method: Cooking ribs at a low temperature (around 225°F to 250°F) for an extended period allows the connective tissues to break down, resulting in tender, flavorful meat.
- High Heat Method: Cooking ribs at a higher temperature (around 350°F to 400°F) can yield quicker results, but it requires careful attention to prevent the meat from drying out or becoming tough.
- Oven-Braising: Combining high heat with moisture by wrapping ribs in foil and cooking at a higher temperature can help maintain juiciness while still achieving a desirable texture.
- Finishing Techniques: Regardless of the initial cooking method, finishing ribs under a broiler or on a grill at high heat can caramelize the sauce and add a flavorful crust.
The Low and Slow Method is popular for its ability to produce fall-off-the-bone tenderness, making it ideal for traditional barbecue enthusiasts. This method typically requires several hours of cooking, which allows the flavors to deepen and develop fully.
The High Heat Method is often used for those who are short on time but still want to enjoy delicious ribs. While it can be effective, it necessitates careful monitoring to ensure the meat does not dry out during the cooking process.
Oven-Braising combines the benefits of moisture and high heat, making it a versatile option. By wrapping the ribs in foil, they cook in their own juices, which helps retain moisture while still achieving a tender result.
Finally, finishing techniques such as broiling or grilling can enhance the flavor and texture of the ribs. This step caramelizes the sugars in any sauce applied, creating a delightful contrast between the tender meat and crispy exterior.
What Temperature is Ideal for BBQ-style Ribs in the Oven?
The best temperature for cooking BBQ-style ribs in the oven is typically around 225°F to 250°F.
- 225°F: Cooking ribs at this lower temperature allows for a slow and even cook, resulting in tender meat that easily pulls away from the bone. This method enhances the flavor as the ribs can absorb more of the seasoning and any marinades used over the extended cooking time.
- 250°F: At this slightly higher temperature, ribs still cook slowly but will finish a bit faster than at 225°F. This temperature maintains moisture while allowing for a nice bark to develop on the outside, enhancing the overall texture and flavor profile of the finished dish.
- Wrap Method: Some cooks prefer to wrap the ribs in foil after a few hours at 225°F or 250°F to create a steamy environment, which further tenderizes the meat. This method can also accelerate cooking time without sacrificing moisture and flavor, making it a popular choice among BBQ enthusiasts.
- Finishing Temperature: Regardless of the initial cooking temperature, many chefs recommend finishing the ribs under a broiler or on a grill for a few minutes at high heat. This step caramelizes the BBQ sauce and adds a satisfying crust to the ribs, providing a contrast to the tender meat inside.
How Can I Tell When Ribs are Fully Cooked in the Oven?
To determine if ribs are fully cooked in the oven, several indicators can guide you:
-
Internal Temperature: The most reliable method is measuring the internal temperature using a meat thermometer. Ribs should reach an internal temperature of at least 190°F to 203°F. At this range, the meat becomes tender and the collagen breaks down, ensuring juicy ribs.
-
Bending Test: When fully cooked, ribs will bend easily. Hold the rack of ribs with tongs and lift one end. If the ribs bend and the meat begins to crack along the surface, they are likely done.
-
Bone Separation: Check the ends of the bones; you should see some separation where the meat has shrunk back. This visual cue often indicates that the ribs are cooked through.
-
Meat Tenderness: When the ribs are done, the meat should pull away easily from the bone. A gentle tug should reveal that the meat is tender and doesn’t require excessive force to break apart.
Using these methods will help ensure that your ribs are perfectly cooked, leading to a delicious and satisfying meal.
Related Post: