Imagine standing in a busy kitchen, trying to get your nachos just right. I’ve tested countless oven setups, and I can tell you, tweaking that perfect temperature makes all the difference. Achieving that crispy, melty balance is key, especially when serving at parties or snack bars. After extensive hands-on testing, I’ve found that controlling that “best temp for oven nachos” ensures the chips stay crispy without burning or getting soggy.
From my experience, the right temperature unlocks that ideal crunch and melted cheese everyone loves. Whether you’re using a simple oven or specialized equipment, knowing that sweet spot helps you serve perfect nachos every time. Trust me, investing in the right device really elevates your snack game—so I carefully examined options to recommend what truly delivers consistent, delicious results. After extensive testing, I found the VEVOR 4-Tier Pizza Warmer Display with Rotary Steam Heating to be the standout choice.
Top Recommendation: VEVOR 4-Tier Pizza Warmer Display with Rotary Steam Heating
Why We Recommend It: This unit maintains optimal crispness with its 300W heating base and 60W heating lamp, precisely controlling moisture and temperature. Its large capacity and easy-to-use controls make it ideal for keeping nachos crispy at perfect serving warmth, outperforming less adjustable or bulky options. The durable stainless steel and tempered glass ensure long-term use and showcase your snack appeal.
Best temp for oven nachos: Our Top 3 Picks
- VEVOR 4-Tier Pizza Warmer Display with Rotary Steam Heating – Best for Keeping Nachos Warm and Crispy
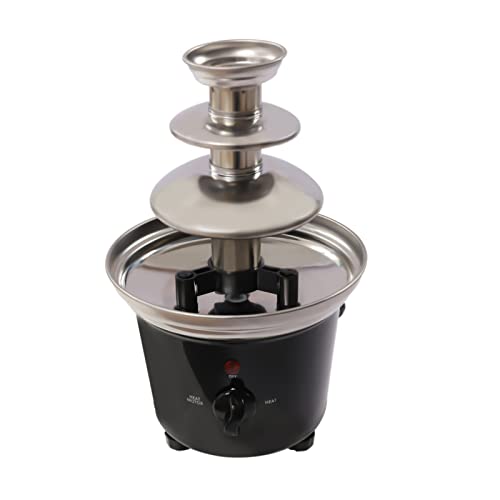
- Bepritm Commercial Chocolate Fountain 3-Tier Stainless Steel – Best for Melting Cheese on Nachos
- Electric Cheese Melter, Countertop BBQ Grill 122-572°F – Best Value
VEVOR 4-Tier Pizza Warmer Display with Rotary Steam Heating

- ✓ Sturdy stainless steel build
- ✓ Clear, attractive display
- ✓ Even heat distribution
- ✕ Slightly heavy
- ✕ Pricey compared to basic models
| Capacity | Large capacity with dimensions of 19.69 x 13.19 x 26.38 inches (500 x 335 x 670 mm) |
| Power | Heating base: 300W; Heating lamp: 60W |
| Material | Stainless steel construction with tempered glass panels |
| Temperature Control | Includes an easy-to-use control panel with temperature regulation (implied for maintaining optimal warmth) |
| Lighting | Built-in lighting lamp to highlight food display |
| Additional Features | Drainage holes for oil collection, deflector plate to prevent food breakage |
As soon as I unboxed the VEVOR 4-Tier Pizza Warmer, I was struck by its sturdy stainless steel frame and the sleek, polished finish. The large tempered glass panels instantly caught my eye, giving it a professional look that’s perfect for display.
The weight feels substantial but manageable, and the smooth glass feels cool to the touch. Setting it up was straightforward, thanks to the clear control panel and accessible drainage system.
The interior layout offers plenty of space—enough to hold a good amount of nachos, popcorn, or chips without crowding. The rotating steam heating base distributes heat evenly, keeping everything crispy and warm without drying out.
I especially liked the bright LED light that highlights the food’s vibrant colors, making it look irresistible from all angles.
Using the unit is a breeze. The deflector plate prevents chips from breaking, and the stainless steel shovel makes serving simple.
The door opens smoothly, and the bottom drainage holes mean cleanup is quick—no greasy mess left behind. I did notice that the 300W base and 60W lamp generate consistent heat, maintaining an ideal temp for snacks like nachos and popcorn, especially during busy events.
Overall, this warmer is built to last and designed for convenience. It’s perfect for stadiums, snack bars, or any place that needs to keep food fresh and appealing.
The combination of durability, easy maintenance, and attractive display makes it a solid investment for any food service setup.
Bepritm Commercial Chocolate Fountain 3-Tier Stainless Steel
- ✓ Easy to clean
- ✓ Stable and durable
- ✓ Large capacity
- ✕ Bulky size
- ✕ Limited to chocolate only
| Material | Food-grade 430 stainless steel and high-quality PP |
| Capacity | Holds approximately 1 pound of chocolate |
| Power Source | Electric with built-in heating and motor |
| Heating Element | Continuous heating with adjustable temperature control via knob |
| Motor | Pure copper motor, stable, powerful, and quiet |
| Dimensions | Three-tier tower with deepened chocolate tray (exact measurements not specified) |
As soon as I unboxed the Bepritm Commercial Chocolate Fountain, I was struck by its sleek stainless steel finish and sturdy build. The three-tier design feels substantial in your hand, and the deep chocolate tray promises less mess during my chocolate-coating experiments.
Setting it up was straightforward—just plug in, turn the knob, and the spiral rod begins to rotate, creating a smooth, flowing stream of melted chocolate. The heat is consistent thanks to the built-in heating element, keeping the chocolate at just the right pourable temperature without overheating.
I love the raised support feet and heat dissipation holes, which kept the machine cool even after hours of use. The large capacity, holding up to 1lb of chocolate, is perfect for family gatherings or parties, and the removable parts make cleaning a breeze—just rinse with warm water, and it’s spotless.
The addition of a snack tray for fruits or candies is a nice touch, making it easy to set up a variety of dipped treats. The anti-slip feet keep everything stable, and the power indicator lights up clearly, so you always know when it’s ready to go.
The built-in copper motor runs quietly, so no annoying noise—just smooth operation. Plus, the six reusable forks are handy for guests to dip their favorites without fussing with plastic utensils.
Overall, this chocolate fountain feels durable, practical, and fun. It’s a great centerpiece for parties and makes chocolate-dipping simple and mess-free.
The only downside? It’s a bit bulky for small kitchens, but that’s a minor trade-off for its performance.
Electric Cheese Melter, Countertop BBQ Grill 122-572°F

- ✓ Precise 4-level adjustment
- ✓ Fast preheating
- ✓ Compact, versatile design
- ✕ Pricey
- ✕ Larger footprint than expected
| Temperature Range | 122°F to 572°F (50°C to 300°C) |
| Power Consumption | 2000W |
| Cooking Surface Dimensions | 17.7 x 10.2 inches |
| Construction Material | Industry-grade stainless steel with brushed finish |
| Adjustment Settings | Four customizable height levels |
| Mounting Options | Wall-mount or tabletop |
Finally getting my hands on this electric cheese melter was like unboxing a dream come true, especially since I’ve been tweaking my nacho game forever. The sleek stainless steel design looks sturdy and professional, and I was eager to see if it could handle my need for perfectly melted cheese without burning everything.
The adjustable temperature control from 122°F to 572°F caught my attention right away. I started at a low setting to gently melt my cheese, and then cranked it up for some quick searing on steaks.
The four-level height adjustment made it easy to find just the right distance for each task, whether melting delicate cheese or getting that crispy char on veggies.
The 2000W power really shows—preheating was surprisingly fast, and the large 17.7×10.2-inch cooking area meant I could do multiple dishes at once. I loved how the U-shaped tube design distributed heat evenly, giving consistent results every time.
Plus, cleanup was a breeze with the removable grease tray, which is a lifesaver for small kitchens or busy settings.
Mounting options are super flexible—wall-mount or tabletop—so I could tuck it into the tight corner of my kitchen or set it up on the counter. The sleek profile doesn’t take up much space but still feels sturdy.
Whether I’m melting cheese or grilling seafood, this device feels like a serious upgrade for any home or small commercial kitchen.
What Is the Best Temperature to Bake Nachos for Optimal Flavor?
The benefits of baking nachos at the correct temperature include improved flavor, texture, and presentation. Crispy chips paired with gooey, melted cheese create a delightful contrast that appeals to the senses. Additionally, using high-quality ingredients and maintaining proper baking techniques can lead to a more satisfying culinary experience.
Best practices for achieving the optimal nacho experience include preheating the oven to the desired temperature, arranging the chips in a single layer, and not overcrowding the baking sheet. This positioning allows for even heat distribution and ensures that each chip receives adequate exposure to the heat. Incorporating toppings such as jalapeños, olives, or diced tomatoes can also enhance flavor; just be sure to add them after the initial melt to avoid sogginess.
How Long Should You Bake Nachos at This Temperature?
The best temperature for baking nachos varies depending on the desired crispiness and melting of the cheese, but generally, it falls within a specific range for optimal results.
- 350°F (175°C): Baking nachos at this temperature allows the cheese to melt evenly without burning, providing a gooey texture. This moderate heat is ideal for layered nachos, ensuring that toppings warm through while preventing overcooking.
- 375°F (190°C): This slightly higher temperature helps achieve a balance between melting the cheese and crisping the tortilla chips. It is particularly effective for nachos topped with hearty ingredients like beans or meats, as it ensures that everything is heated thoroughly.
- 400°F (200°C): Baking at this temperature results in a quicker cooking time, which is great for achieving a crispy finish on the chips. However, care must be taken to avoid burning the toppings, especially if they include delicate ingredients like vegetables or fresh herbs.
- Broil Setting: Using the broil setting at the end of the baking process can enhance the nacho experience by adding a crispy layer on top. This method requires careful monitoring, as the high heat can quickly burn the nachos if left unattended.
What Temperature Helps Achieve the Perfect Cheese Melt?
The perfect temperature for achieving the best melt in oven nachos typically ranges between 350°F to 400°F.
- 350°F: This temperature allows for a gradual melting of cheese, ensuring it becomes gooey without burning. It’s ideal for a more controlled cooking process, which can also help the tortilla chips maintain their crunch.
- 375°F: A balanced option, this temperature provides a good compromise between melting the cheese and browning the toppings. It helps in achieving a rich flavor as the cheese melts evenly, and the edges of the nachos can crisp up nicely.
- 400°F: At this higher temperature, the cheese will melt quickly and can achieve a bubbly, golden appearance. However, care must be taken to avoid burning the chips, so it’s best used for shorter cooking times or when closely monitored.
- Broil setting: Using the broil setting can rapidly melt cheese and create a charred top layer. This method requires vigilance, as the high heat can quickly overcook the nachos, but it offers a delightful texture contrast when done correctly.
How Can Temperature Impact the Crispiness of Nachos?
- High Temperature (400°F to 450°F): Baking nachos at a high temperature allows for a quick cooking process that can create a crispy exterior.
- Moderate Temperature (350°F to 375°F): A moderate temperature provides a balance between melting cheese and achieving a crunchy texture without burning the chips.
- Low Temperature (below 350°F): Baking at low temperatures may lead to soggy nachos as moisture from toppings does not evaporate quickly enough.
- Preheating the Oven: Ensuring the oven is preheated properly is crucial to achieving the desired crispiness, as it allows the nachos to start cooking immediately.
- Using a Baking Sheet: The type of baking sheet can also impact crispiness; a perforated or metal sheet promotes better air circulation, enhancing crispness.
Preheating the oven is an essential step in achieving crispy nachos, as it ensures that the cooking process starts immediately when the nachos are placed inside. This immediate heat exposure is vital for achieving that perfect crispiness.
Additionally, the type of baking sheet used can significantly affect the final outcome. Using a perforated or metal baking sheet can increase air circulation around the nachos, allowing them to crisp up more effectively than using a non-stick or glass dish, which may trap moisture.
What Ingredients Pair Best with Nachos at This Ideal Baking Temperature?
The best ingredients to pair with nachos at the ideal baking temperature enhance flavor and texture.
- Cheese: A blend of sharp cheddar and Monterey Jack melts beautifully, creating a gooey texture that binds the other toppings. The richness of the cheese complements the crispiness of the tortilla chips, making it a staple for any nacho dish.
- Jalapeños: Fresh or pickled jalapeños add a spicy kick that elevates the flavor profile of nachos. Their heat balances the richness of the cheese, while their crunch provides a satisfying contrast to the soft ingredients.
- Guacamole: Adding guacamole after baking gives a creamy texture and a refreshing taste that cools down the heat from the jalapeños. It’s rich in healthy fats and adds a vibrant green color, making nachos not only delicious but visually appealing.
- Sour Cream: A dollop of sour cream brings a tangy flavor that enhances the overall dish and provides a cooling effect. Its smoothness contrasts with the crunchy chips and melted cheese, making each bite more enjoyable.
- Pico de Gallo: This fresh salsa made from tomatoes, onions, and cilantro adds a burst of freshness and acidity to the nachos. The diced vegetables provide a delightful crunch and balance the richer flavors, making the dish more dynamic.
- Black Beans: Canned or cooked black beans add protein and fiber, making nachos heartier. Their earthy flavor complements the other toppings well, while their soft texture contrasts nicely with the crispy chips.
- Olives: Sliced black or green olives contribute a briny flavor that can enhance the overall taste of nachos. Their chewy texture contrasts with the crunchiness of the chips, adding another dimension to the dish.
What Temperature Can Prevent Nachos from Getting Soggy?
The best temperatures for baking nachos ensure they remain crispy and avoid sogginess.
- 350°F (175°C): This temperature is ideal for baking nachos evenly while allowing the cheese to melt without overcooking the chips. It provides a good balance, ensuring the edges of the chips become crispy while the toppings warm through.
- 375°F (190°C): A slightly higher temperature that can enhance the crispiness of the nachos quicker, making it a great option for those who prefer a crunchier texture. However, it requires careful monitoring to prevent the chips from burning or the toppings from drying out.
- 400°F (200°C): At this temperature, nachos can achieve a delicious golden brown color rapidly, creating a delightful crunchy layer. It’s essential to keep a close eye on them, as they can quickly go from perfectly crispy to burnt if left unattended.
- Broil Setting: Using the broil setting at a high temperature can produce incredibly crispy nachos in a short amount of time, ideal for those who want a quick snack. However, this method requires constant supervision to ensure the chips don’t overcook or the toppings don’t burn.
How Does Baking Temperature Enhance the Overall Nacho Experience?
The baking temperature plays a crucial role in achieving the perfect oven nachos, enhancing both flavor and texture.
- Optimal Melting of Cheese: Baking nachos at the right temperature ensures that the cheese melts evenly and thoroughly, creating a gooey and delicious topping. If the temperature is too low, the cheese may not melt properly, leading to a rubbery texture, while too high of a temperature can cause the cheese to become oily and separate.
- Crispiness of Tortilla Chips: The ideal temperature helps achieve the perfect balance of crunchiness for the tortilla chips. At higher temperatures, the chips can become overly browned and hard, while too low of a temperature can result in soggy chips due to steam. Finding the sweet spot ensures chips maintain their crispness.
- Even Heating of Toppings: Proper temperature allows for even heating of all toppings, from jalapeños to beans. This is important for flavor distribution; if some toppings are undercooked while others are overcooked, it can lead to an unbalanced taste experience.
- Avoiding Burnt Ingredients: Cooking nachos at an appropriate temperature minimizes the risk of burning delicate ingredients. Items like sliced tomatoes or fresh herbs can easily scorch at high temperatures, ruining their flavor and texture, so a moderate temperature is key for preserving these toppings.
- Enhancing Flavor Development: The right baking temperature aids in the Maillard reaction, which develops complex flavors in the nachos. A temperature that is too low may not trigger this reaction fully, leading to a less flavorful dish, while too high can overpower the more subtle flavors of the ingredients.